Going through with your Google Ads account might be time-consuming, but these Google Ads management tips will definitely save you time and you’ll easily navigate your account with just a few clicks. In this article, we will list down several Google Ads features that you probably did not know existed and it will definitely make running your ad campaign easier.
Don’t have the time to manage your Google Ads account?
Google suggests managing your Google Ads account no less than 30 minutes per week, but if you want to maximize the potential of your ad campaign, you can allot more time managing your ads. Here are some Google Ads management tips we recommend to add to your strategy:
Table of Contents
ToggleFilter And Organize Your Campaigns
If you have lots of campaigns in your account, you might want to reorganize and filter it so you could easily see it better. Notice the three dots in the further left menu, click it and you have now all the options to filter out campaigns for easier sorting.
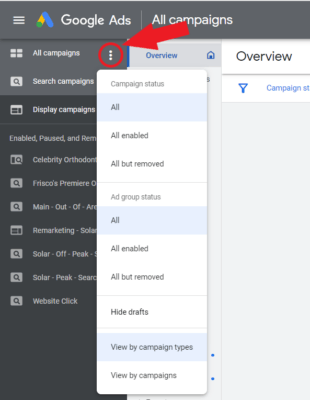
You could filter out your campaigns and ad groups by status. You could also sort it based on campaign types, and to make active campaigns easier, you could hide your campaign drafts as well.
Modify Your Columns
Columns are where you look at the data and compare metrics to each other. You can actually reorganize your columns and add include other hidden metrics that can be helpful when analyzing data. This is one of the Google Ads management tips that will make your campaign handling easier and it will also give you a better view of the entire campaign data. While we are here, check out this article on how to get more data out of your ad campaign.
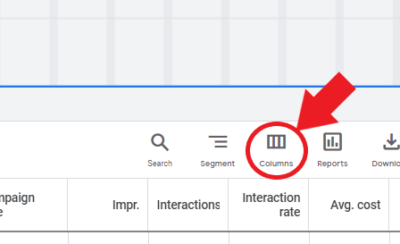
To modify your columns, click on the columns icon which can be seen above the columns table.
On the left side, you can see here all metrics categories, while all the metrics that are already included in your columns are on the right side. You can rearrange it by holding and dragging the three lines beside the metric, and you can also remove it by clicking the x button.
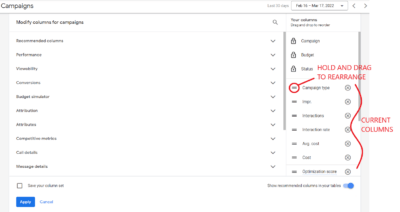
You can choose here what else you want to add and uncheck or remove in your columns, and then you can save it as your own customed column. You can also create multiple column sets depending on your goal or needs.
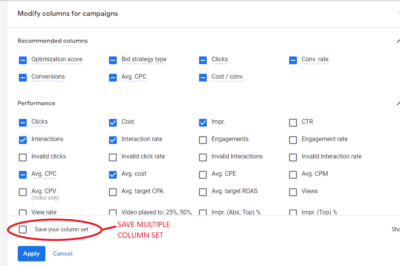
Recommended metrics by Google are automatically included in the columns, but if you want more in-depth and more complete data, you can also check and add some of these hidden metrics.
- Performance
- These include some of the most important metrics that you have to look at when you are analyzing data. These metrics are clicks, impressions, CTR, avg. CPC, and avg. CPM.
- Viewability
- These will let you know the percentage of whether or not your ad was shown to your target users or locations.
- Conversions
- These will let you add metrics that will give you more information about your conversions.
- Budget simulator
- This will give you an insight into how much your budget should be and how this will affect your ads and spending.
- Attribution
- These columns will give you insight into how all attributes of your ad work together when you receive conversions
- Attributes
- Attributes are the settings and strategies you have chosen for your campaign. You can add these to your column so that you wouldn’t forget what attributes you are using for the campaign.
- Competitive metrics
- These will show you how many impressions are you getting compared to the available traffic in the market, this will also give you insights on the position and rankings of your ad
- Call details
- Adding these in your columns will give you how many people clicked on your phone number, and how many had seen it.
- Change history
- Metrics that will show you all the changes you have made to your campaign
- Reach metrics
- This will give you insights into how many new users have seen your ad.
- Gmail Metric
- Shows metrics about the number of times your ad was forwarded as a message
- Custom columns
- If you have custom columns, you would see them here. But if you don’t have one, you can also create it here.
If you want an in-depth definition and explanation of columns and metrics, you can read more here.
Utilizing Google Ads Notes
Taking notes is necessary whenever you manage or handle your Google Ads campaign, especially when you are planning to optimize your overall ads. You probably have a separate notepad that contains all your notes, but sometimes it is still not enough.
Note-taking is much better when you have your data and figures written down also, but that is just too time-consuming. But did you know that you can directly create a note in your Google Ads account?
Using Google Ads notes is the best option to create better documentation of the campaign. You can add notes from the campaign level to the ad group level.
To add notes, click on any part of the graph that you want to put a note on. Then click ‘Add note’.
 Write your notes or observation here then click ‘Save.’ You can add as many notes as you want, just repeat these steps.

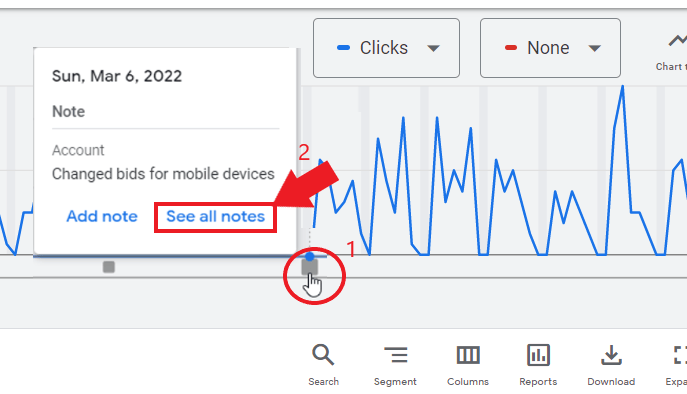
Once you put notes on your graphs, you can see a gray square below the dates with notes, click on that and select ‘See all notes’.

This will show you all the notes you have added to the graph. You can also filter notes by account level, campaign level, and ad group level. You also have the option to minimize this notes tab and just click on it when you need it for easier access.
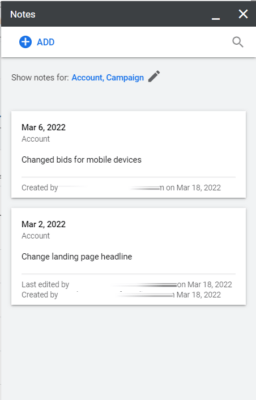
Utilizing your notes is one of the Google Ads management tips that will definitely step up your Google Ads navigation.
Don’t know what to put on your notes?
Recommendations and Optimization Score
Google has recommendations and insights to better optimize your campaigns and following these will increase your optimization score. The optimization score of your campaign will estimate how well your Google Ads account is set to perform. You can see this by clicking the ‘Recommendations’ tab on the left side menu.
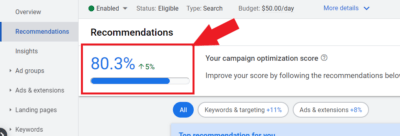
This account has an 80.3% optimization score, and that is a good overall score already. But we can still push it up to 100% by following these recommendations or by dismissing it all:
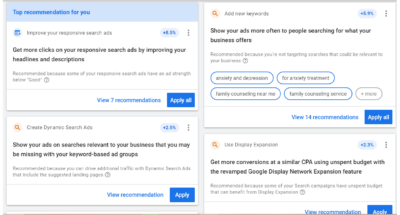
Just click on the three dots on the corner of the recommendation box, then click ‘Dismiss all’. The +2.3% is the amount of score that will be added to your optimization score.

Then Google will ask you for a reason for dismissing these recommendations, it is optional but you still give out a reason if you want to.
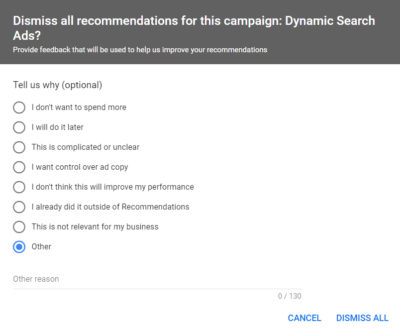
See how this optimization score increased from 80.3% to 82.6%? This is because we dismissed that recommendation and it is possible to increase it up to 100% if you want to.

The reason why we don’t recommend following all these recommendations is that Google is still a robot and it does not know you and your business entirely. And as much as possible, you should always have full control over the account and optimize it based on informed decisions (from your existing data).
Although some of the recommendations might be good, you can always test them and observe if they would improve the performance of your ad campaign.
Read this article about ‘Do you really want a 100% Google Ads optimization score?’.
Added/Excluded Option for Search Terms
It is always recommended to look at your search term data whenever you optimize your ad campaigns. There might be lots of irrelevant keywords or keywords with no intent that you can block, but there are also good search queries that you can add to your keywords list.
To make it easier, you have an option to just quickly add or remove/block a keyword from the search term list. Just go to the ‘Search terms’ tab which can be found under ‘Keywords’. After you check your search term and you have decided to add or remove a keyword, just click on the check box of that keyword. You can select multiple keywords at the same time.
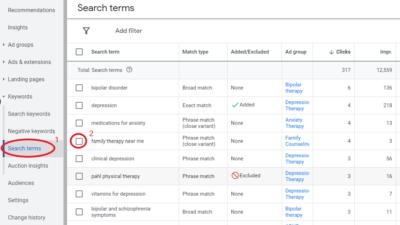
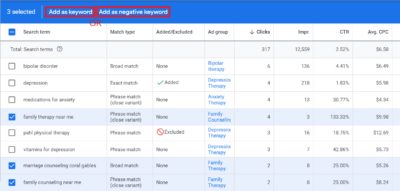
Then, once you have selected the keywords, click ‘Add as keyword’ if you want to add it to your list, or click ‘Add as negative keyword’ if you want to prevent it from triggering your ad.
After that, you can see in the column if it’s added or excluded.
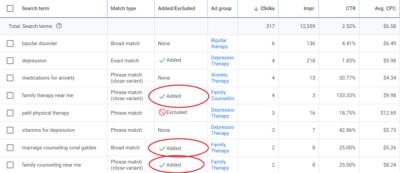
You can also use a filter to just see things that are not yet added or excluded or the new search terms on your campaign. If you want to learn more about blocking keywords, read these tips on how to increase conversions using negative keywords.
Filter Search Terms
You’ll usually get hundreds or thousands of search terms every day. But to make your search term management easier, we recommend using the filter option to easily check on specific keywords, match types, and so on.
For example, you have added and excluded multiple search term keywords and you want to see only the new ones, you can use a filter to sort these search terms.
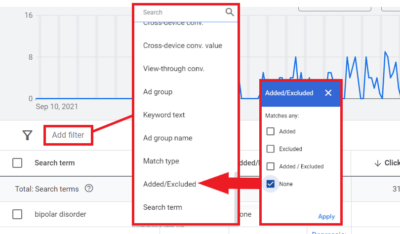
Just click ‘Add filter’, select ‘Added/Excluded’ then choose however you want your search term to be filtered. We chose none here so that it will only show search terms that are not yet added or excluded.
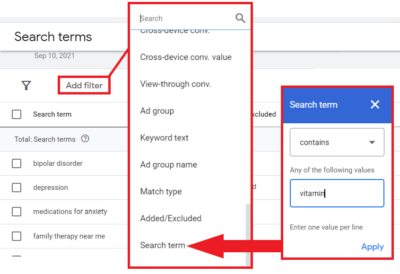
Another example is when you want to see search terms that contain or does not contain a specific keyword. Here, we do not offer vitamins in our products and services, so we want to block them or exclude them in the search term. We want to see all the search terms that contain the keyword ‘vitamin’, so we could exclude it all at once.

To do this, click on ‘Add filter’, then select ‘Search term’. Then make sure that ‘contains’ is selected, then type the keyword that you want to sort in search terms. In this example, we use ‘vitamin’.
Once you click ‘Apply’, you should see all the search terms with ‘vitamins’. Then we could exclude it from the list to prevent your ads from showing up on these search queries. There are still lots of ways you could filter your search terms, it could be by metrics, match type, ad group, and so on.
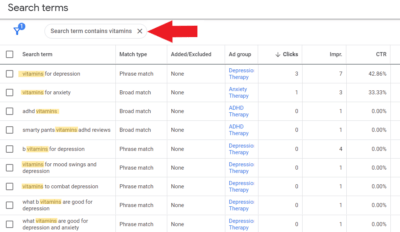
These examples are from an ads campaign for psychiatrists, if you need a refresher guide, read this article about Google Ads for psychiatrists.
Easily Make Changes On Ad Campaigns
You could easily do a general edit for all campaigns by going to the ‘Campaigns’ tab and selecting the campaign you want to quickly change. Then click the ‘Edit’ dropdown button, then choose however you want to change your selected campaign.
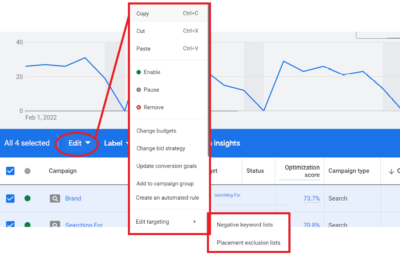
You could copy, cut, and paste your campaign if you want to duplicate it. Or you could also enable, pause, or remove campaigns. You also have the option here to create quick bulk changes on bids, bid strategy, conversion gals, automated rules, and so on.
If you want to make in-depth optimization for your ad campaign, read this article about advanced Google Ads optimization strategies that’ll outrank your competitors.
Don’t know how to make the right changes to your Google Ads?
Conclusion: These Google Ads Management Tips Will Boost Your Productivity
Following these Google Ads management tips is a great practice to make yourself more productive and that you could easily optimize your ad campaigns. You won’t need to spend hours and hours because you are having a hard time navigating through your Google Ads account.
If you want more Google Ads shortcuts and tricks, or if managing Google Ads is a struggle for you, schedule a free consultation with our Google Ads expert today!

