If you are looking for a way to take your marketing efforts to the next level, this article is for you! In this blog, we’ll walk you through the steps on how to set up Google Ads for driving schools along with some tips that will help you get more students!
Table of Contents
ToggleWhat is Google Ads?
You’ve probably encountered one of these before while you’re looking for the nearest business establishment to visit. Google Ads is an advertising platform where you can promote your driving school to individuals who wanted to learn to drive. Not only does it help improve the volume of traffic you get and give you measurable results, but it also helps you get more new customers!
Most likely you’ve already seen tons of your competitors use Google Ads to increase their business revenue. With billions of people using Google to search for the nearest local business in their area, promoting your driving school on this platform will improve your visibility and increase your chances of being noticed by your target audience. The more people see your ad, the higher chances you’ll reach your potential customers!
Aside from that, Google Ads has a built-in analytics feature that helps you keep track of your ads’ performance. Here, you can immediately see the number of clicks, impressions, and conversions that your driving school ad got in the past week, month, or in a specific time range which makes it easy for you to make decisions about your ad campaigns.
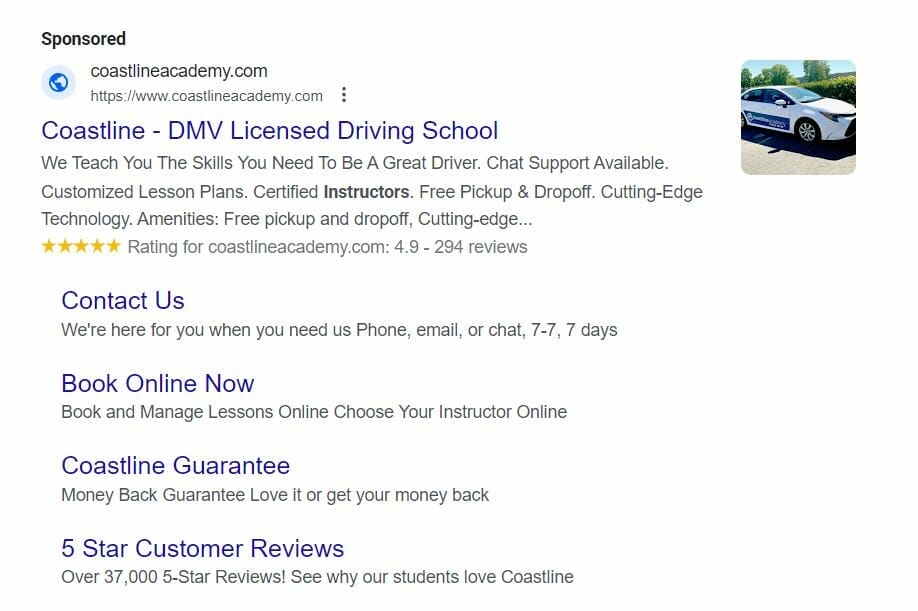
This is what an ad looks like on search results:
Does Google Ads sound like a great idea for you?
Schedule A Free Strategy Session!
How to set up Google Ads for Driving Schools
The first step in creating your driving school’s ad campaign is by signing in to your Google Account. Once you’re logged in, go to https://ads.google.com/home/ and click “Get started.”
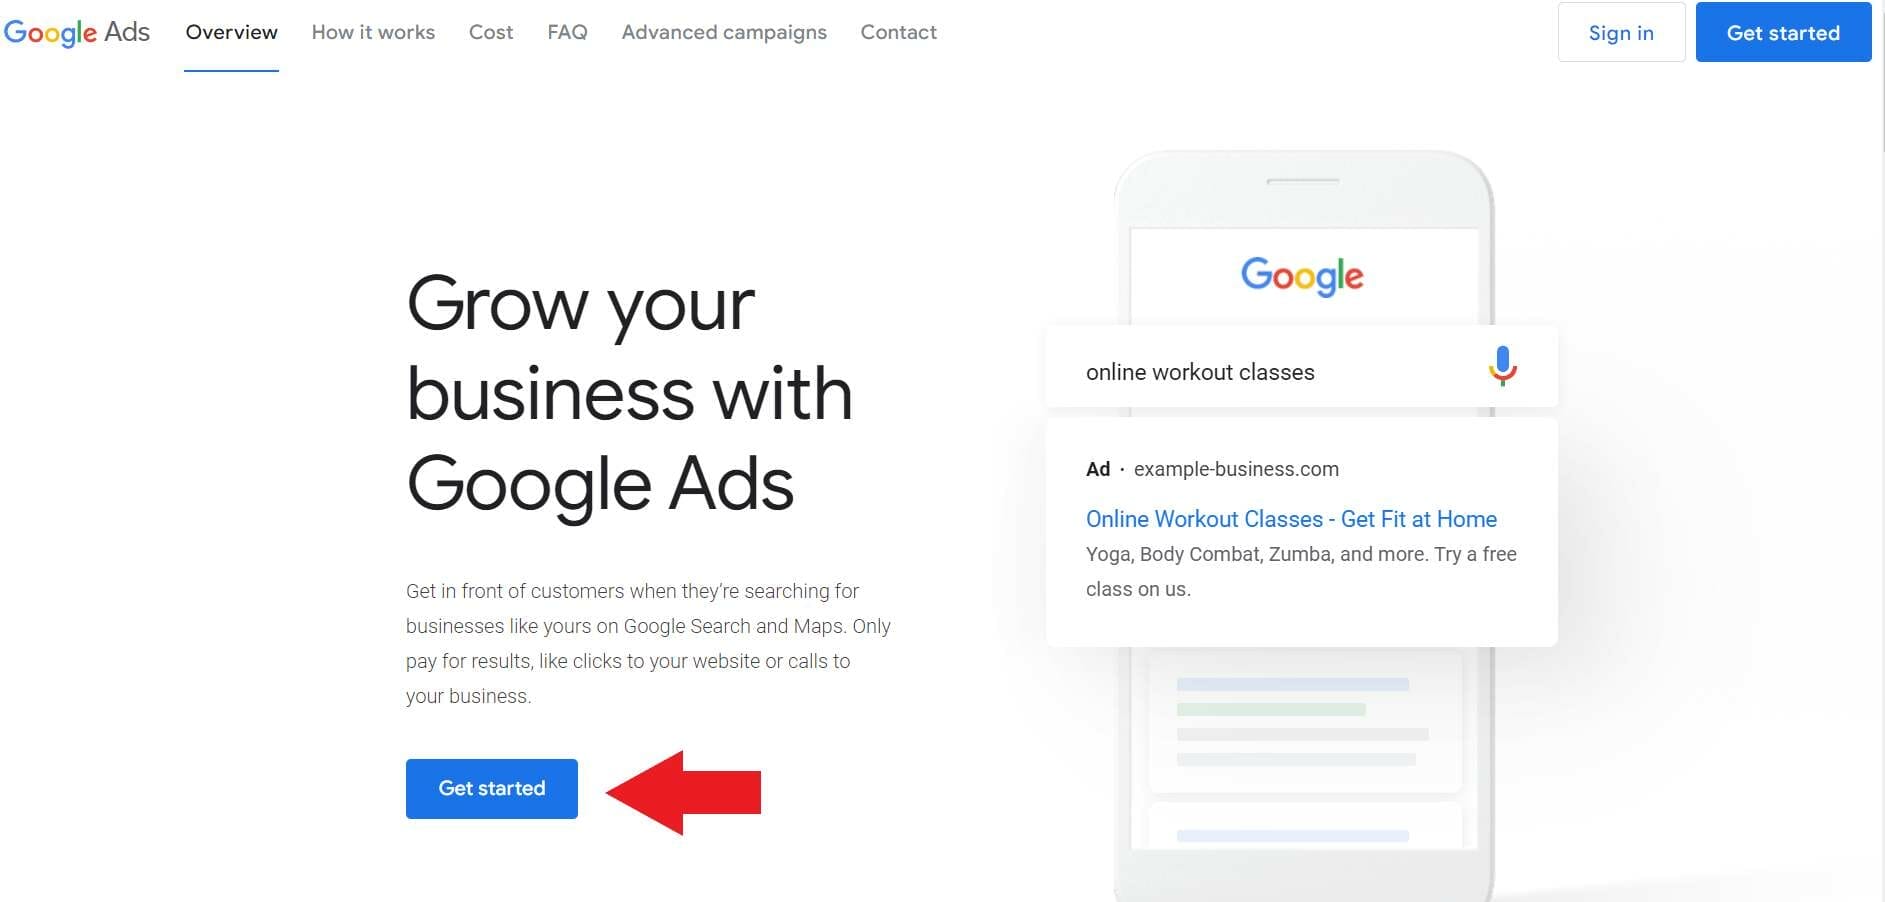
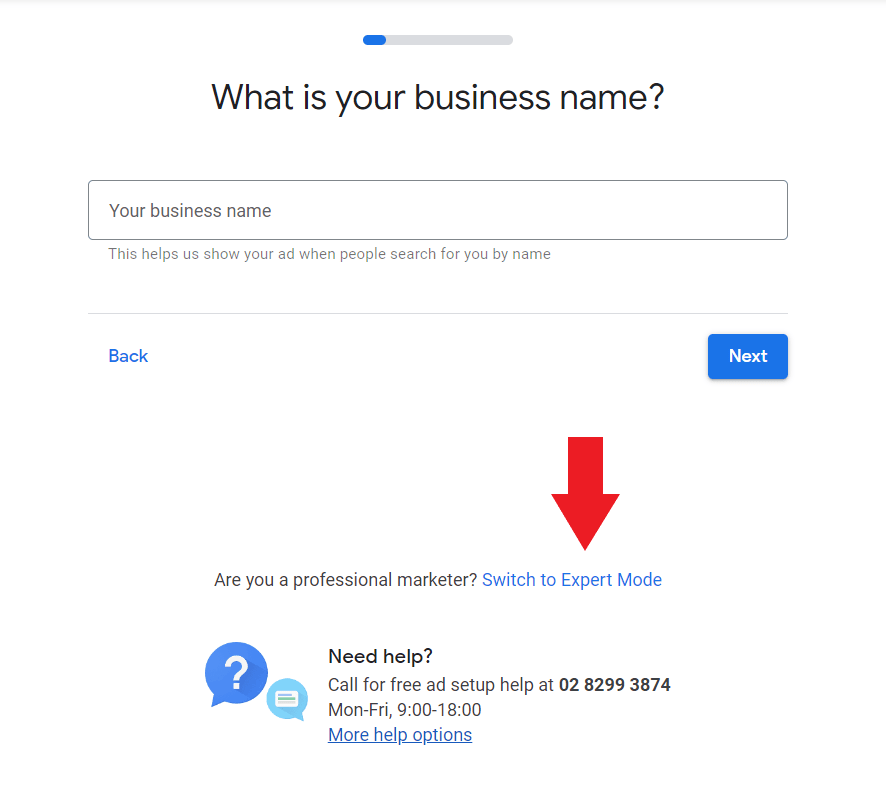
Then, switch to “expert mode.” This allows you to have access to all of the advanced features that Google Ads has like creating customized campaigns.
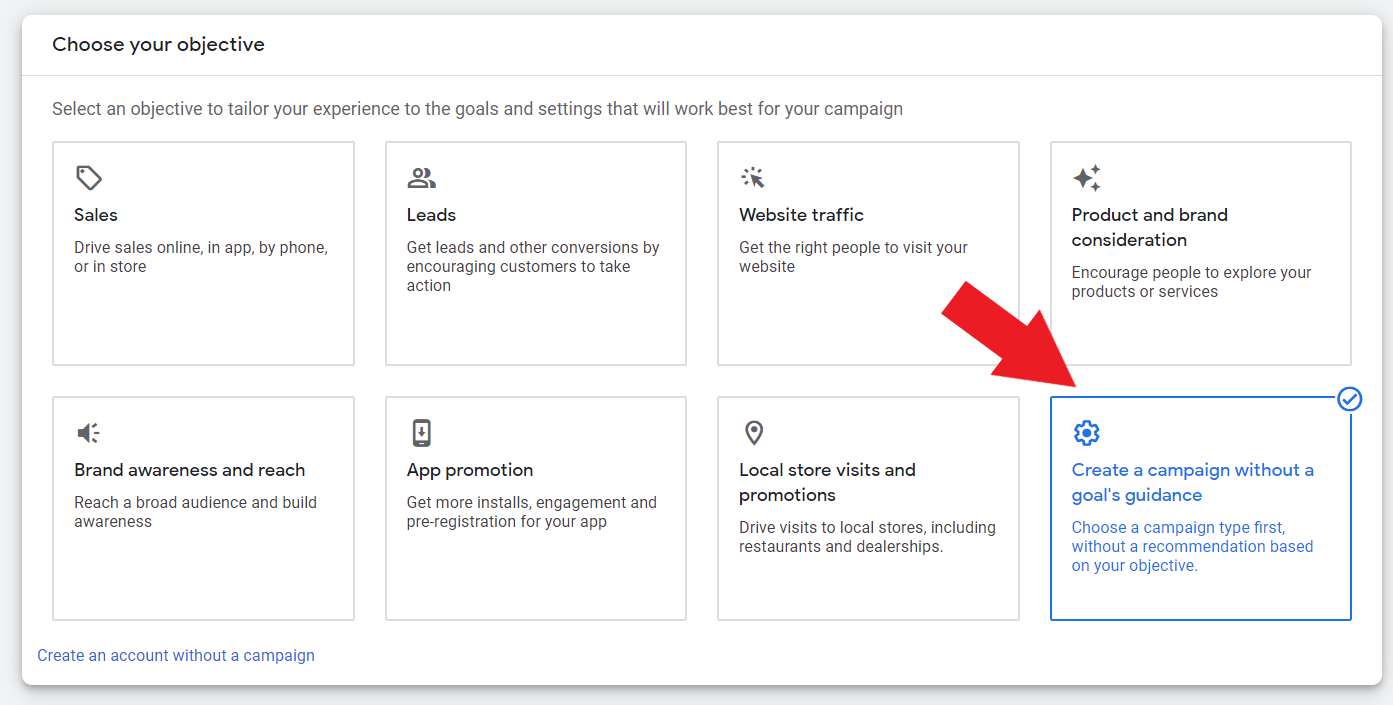
After that, you’ll be asked to choose your objective. Select “Create a campaign without a goal’s guidance.” This allows you to create ad campaigns based on your preference.
For the campaign type, choose “Search.” This will show your ad to potential customers who are actively searching for driving school services on Google.
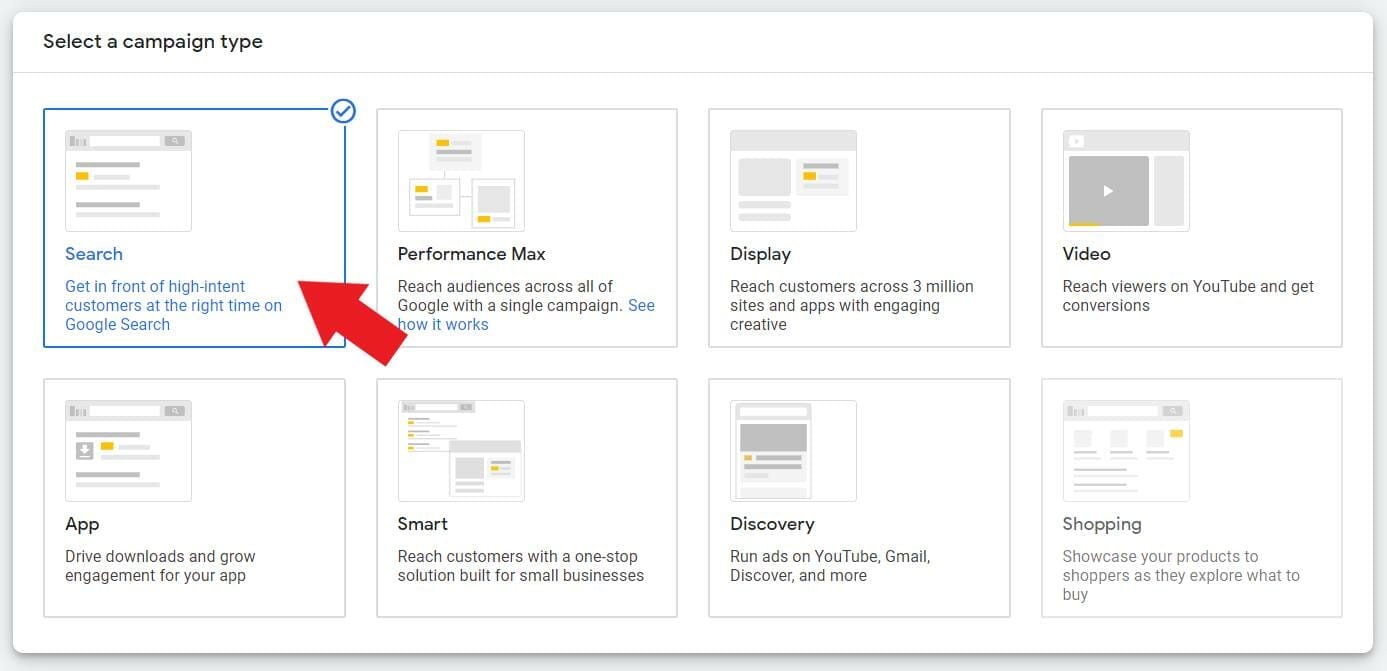
Select the results you want to gain from your advertising campaigns. There are three options that you can choose from, it can be to get more website visits, phone calls, or app downloads.
After choosing, click “continue.”

Then, add a name for your search campaign. For example, if you choose “search” as your campaign type, let’s write your campaign name as “Search-driving school.”

Since you are just starting out with your ad campaigns, uncheck Display Network and keep Search Network checked. This way, your advertising budget won’t be consumed on low-quality searches.
The main difference between these two is that in Search Network, your ads are shown to potential customers based on their search intent (suitable especially if your goal is to find individuals who have high intent of engaging with your brand) while on Display Network, your ads are shown to random people (which is only suitable if your goal is brand awareness).
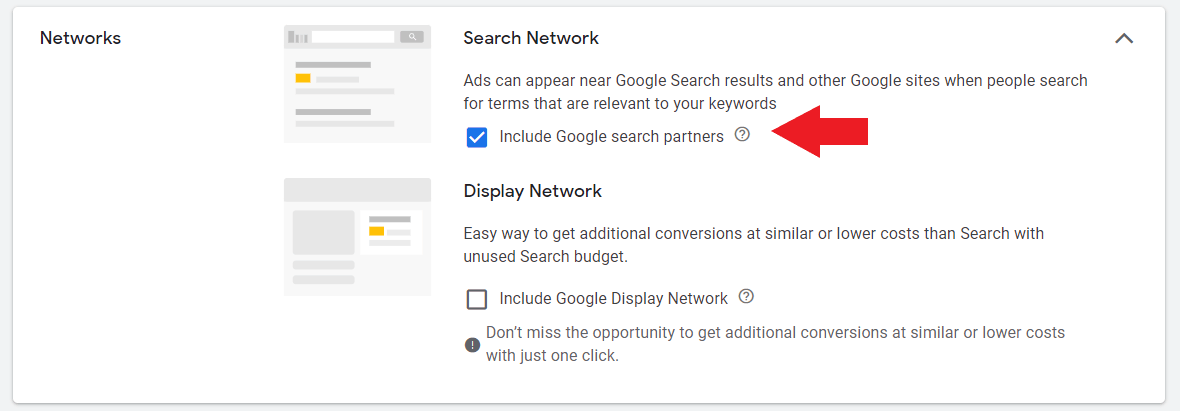
Then, click “show more settings.” Set the start and end date of your driving school ads. Here, you can set a specific date of when you want your ads to end or have them running as long as you want.

For the ad schedule, make sure that it’s set to the business hours of your driving school. This way, you can immediately respond to calls from potential customers.

Then, select your target location.
To add specific areas where you want your driving school ad to show up, click “Enter another location.”
Then, enter the specific areas where you want your driving school ads to be displayed.

For example, your target location is Mountain View, California. You have the option to choose if you’re targeting the entire city for a wider reach or want to limit your ad’s presence to the neighborhood.
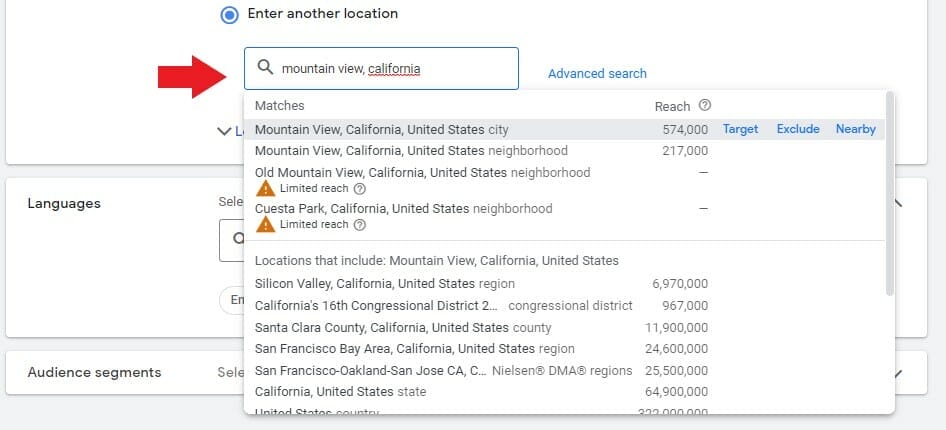
But, if you want to add your target locations in bulk or you want to set a specific distance from your business to your target audience, click “advanced search.”

Then, check the box that says “Add locations in bulk.” After that, enter the specific areas that you want to target.
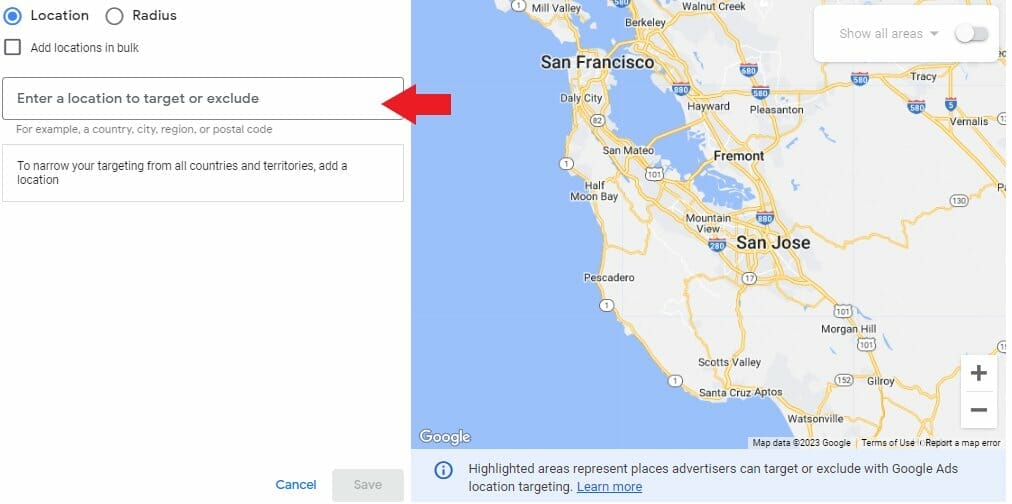
If you don’t want to set a specific city or neighborhood for your ad to show up, you can use radius targeting instead. Here, you can pin the location that you want to target, using the “pin mode” or enter the address of your preferred target location.
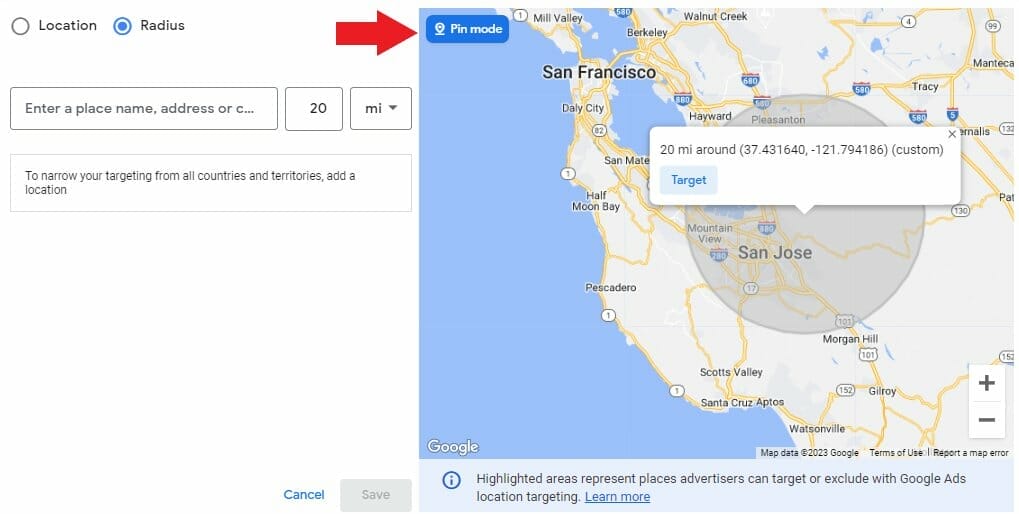
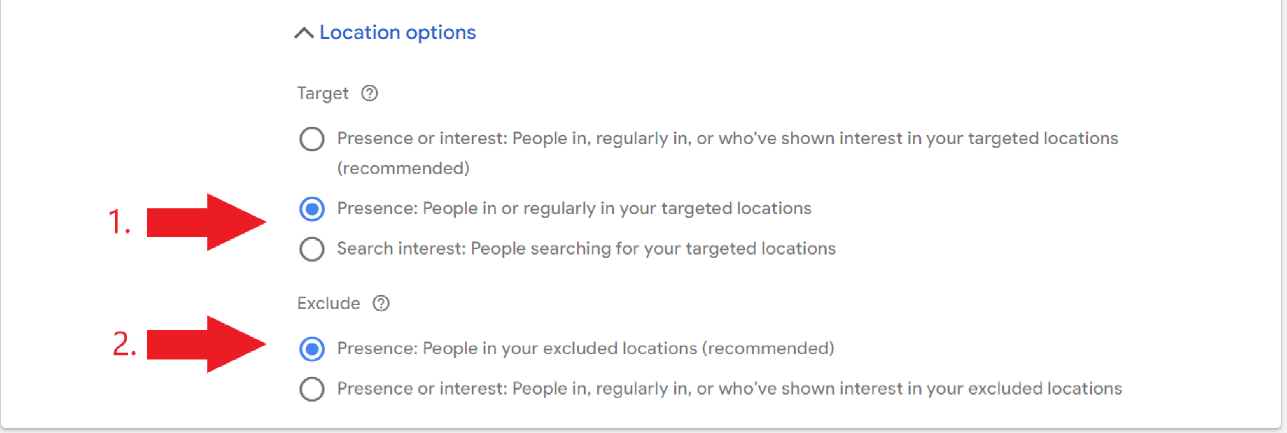
After that, click “location options” to choose your target audience.
Under “Target,” click “Presence: People in or regularly in your targeted locations.” This allows your ad to show up only for individuals who are within your target location.
Then, under “Exclude,” click “Presence: People in your excluded locations (recommended)” This prevents your ad from showing up to people who are not within your target location.
The next step is choosing the language that the majority of your target audience uses. In this case, let’s use “English.”

Set your average daily budget. This refers to how much you’re willing to spend on your ad campaigns on a daily basis.

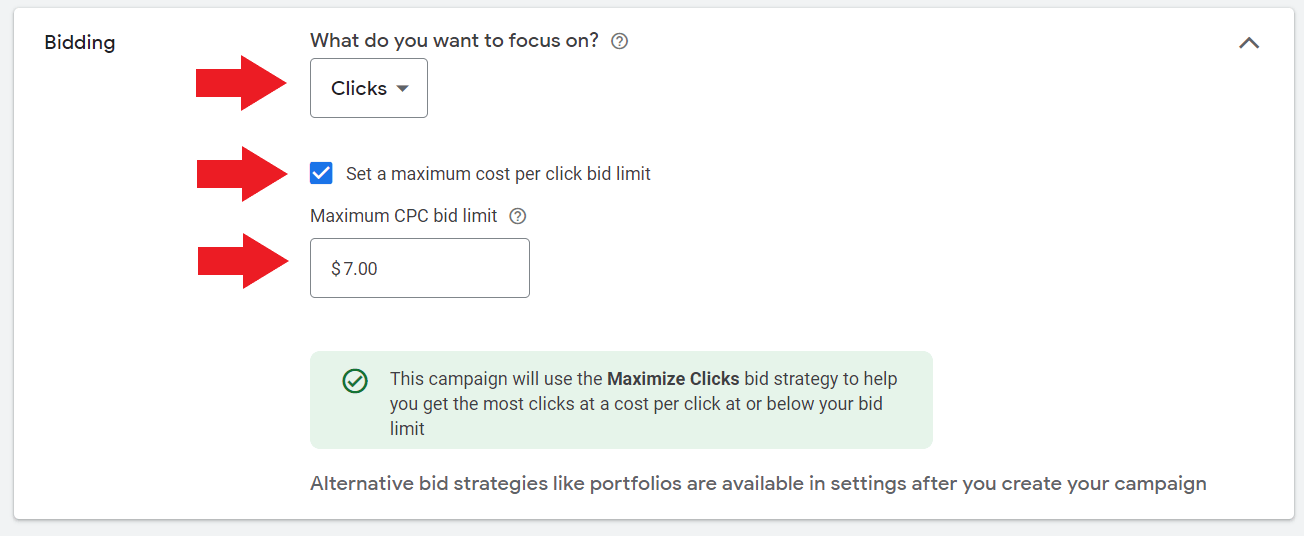
Under “What do you want to focus on?“, select “clicks.”
Then, check the box beside “Set a maximum cost per click bid limit.” This refers to the amount you are willing to pay for someone to click on your driving school ad.
We recommend setting your max CPC bid limit because it allows you to get more clicks without spending most of your advertising budget.
Note: Your CPC will depend on your specific area and the keywords you are targeting. Use Google Keyword Planner to get an idea of what you should set your CPC to.
After that, click “show more settings.”
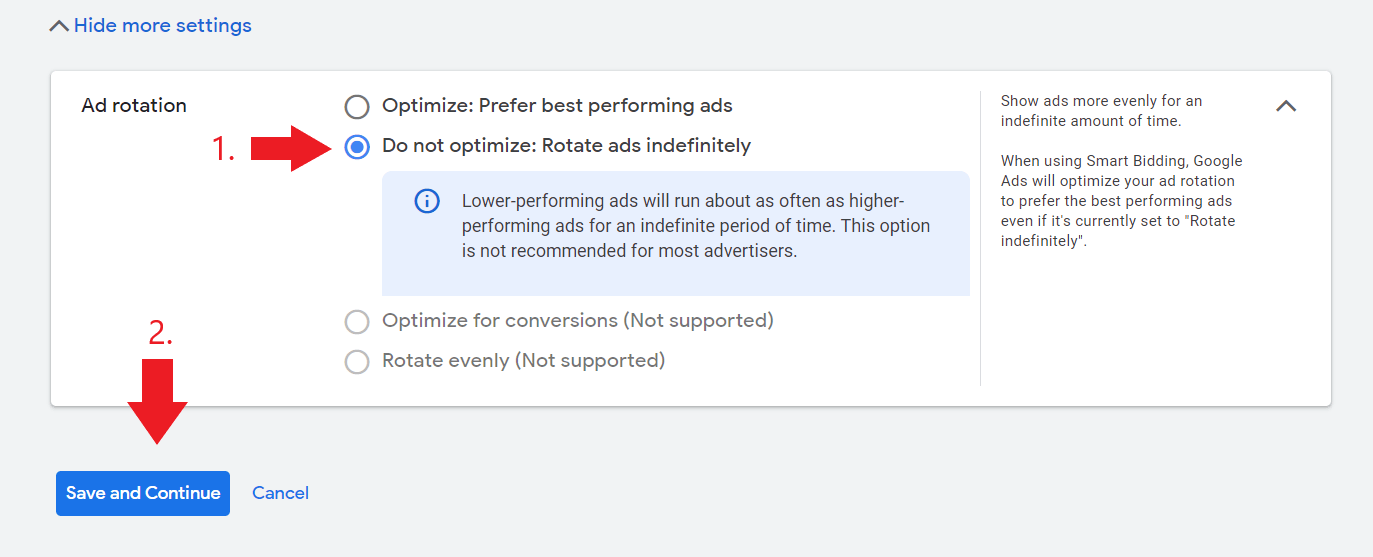
Then, select “ad rotation.” followed by “Do not optimize: Rotate ads indefinitely.” This gives all of your driving school ads equal chances of being shown to your potential customers.
Next, click “save and continue.”
For the ad group type, there are two options that you can choose from. It’s either standard or dynamic.
In this case, select “standard.” This allows you to create text ads, call-only ads, and choose your own keywords.
Then, create a name for your ad group.
 After that, start setting your target keywords.
If you need more suggestions about keywords that are relevant to your driving school services, you can either enter your Website URL so that Google can scan it for you or enter the services you want to advertise.
Then, click “save and continue.”
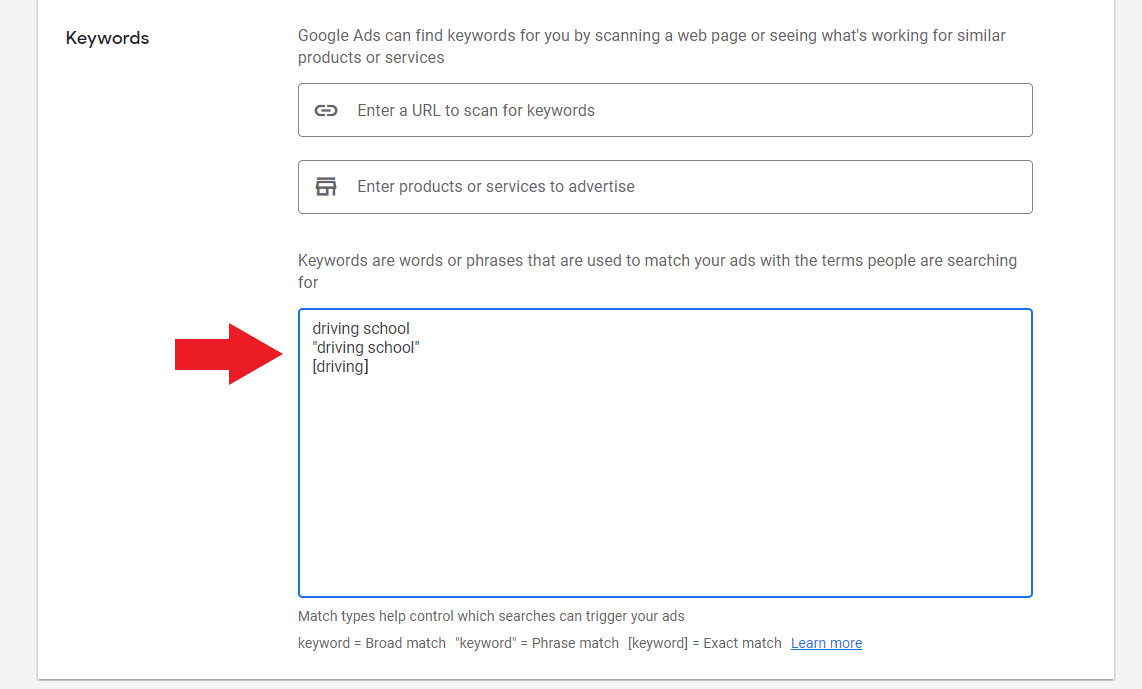
If you want to create another ad group, just click on “New ad group.” Then, repeat the steps earlier. Once done, click “save and continue.”

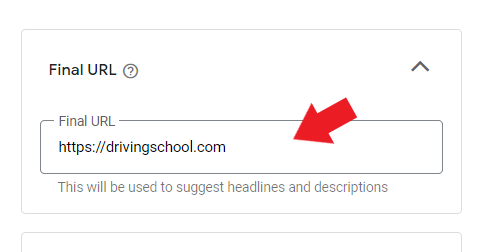
Then, start creating your ad copy. Enter the URL of your driving school website or the page where you want your potential customers to land after clicking on your ad.
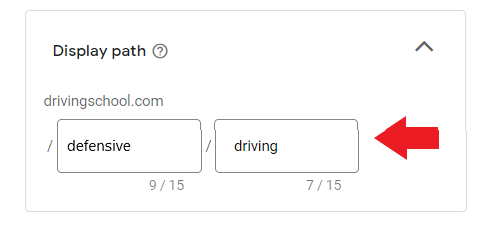
Enter your display URL. This gives your potential customers an idea of what page they should expect to see once they click on your driving school ad. You can write up to 15 characters for each display path.
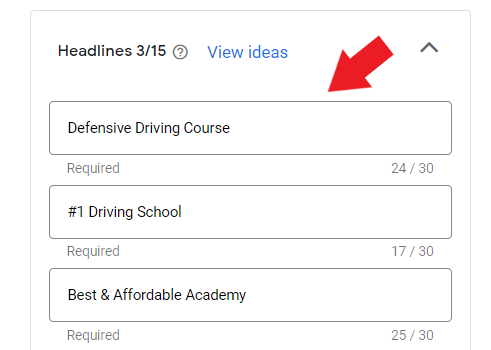
Write your headlines. For each ad copy, you can write up to 15 headlines with a maximum of 30 characters each.
Once done with your headlines, start writing your ad descriptions. This section allows you to tell more details about your driving school ad. You can write up to 4 variations of it with a maximum of 90 characters each.
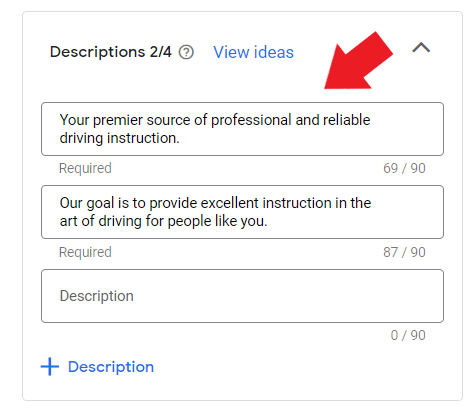
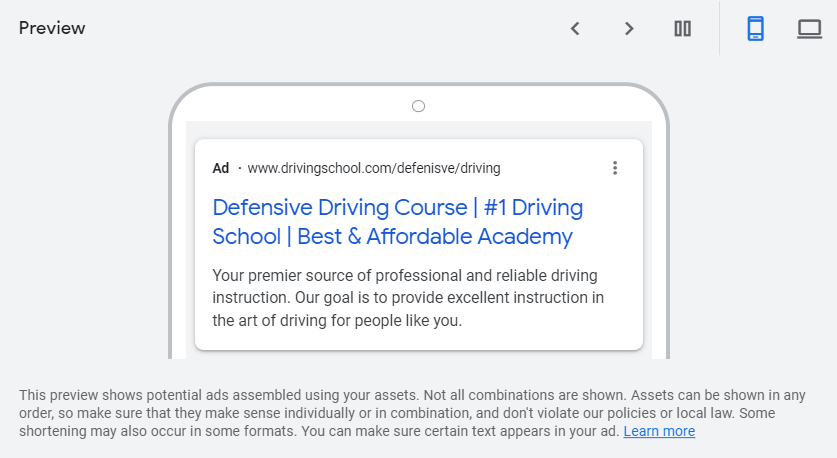
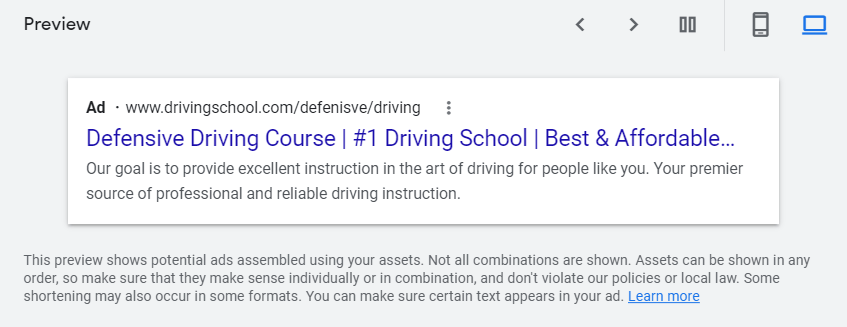
While you’re creating your ad copies, you’ll see two versions of it on the right side of your screen. Like this:
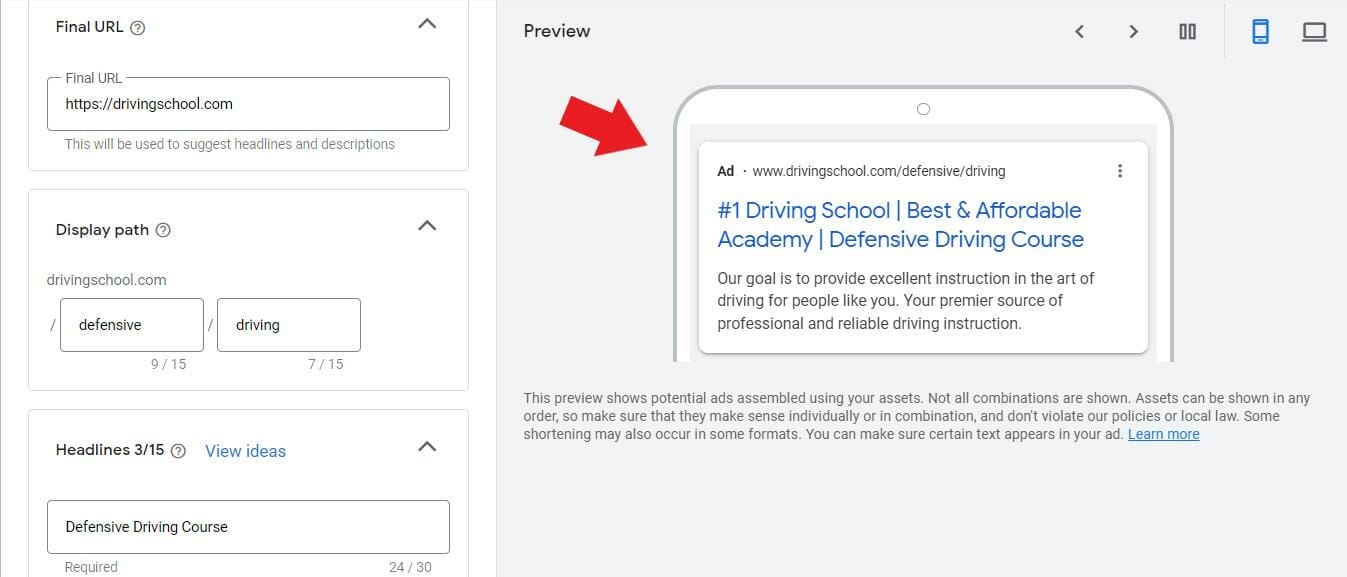
Mobile preview
Desktop preview
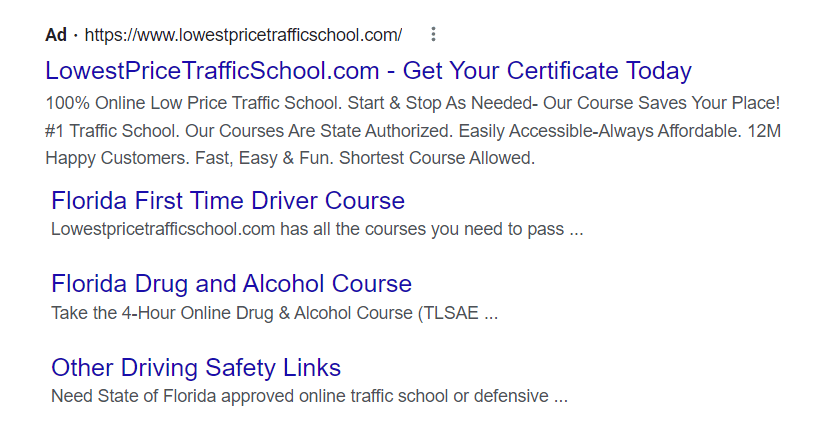
You can also add sitelinks so that your driving school ad will consume more space than other ads on the search results page.
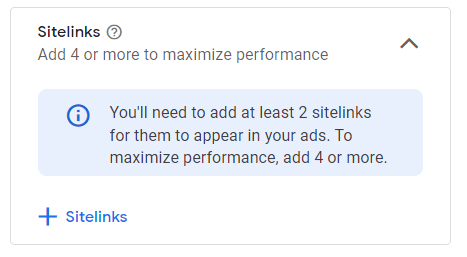
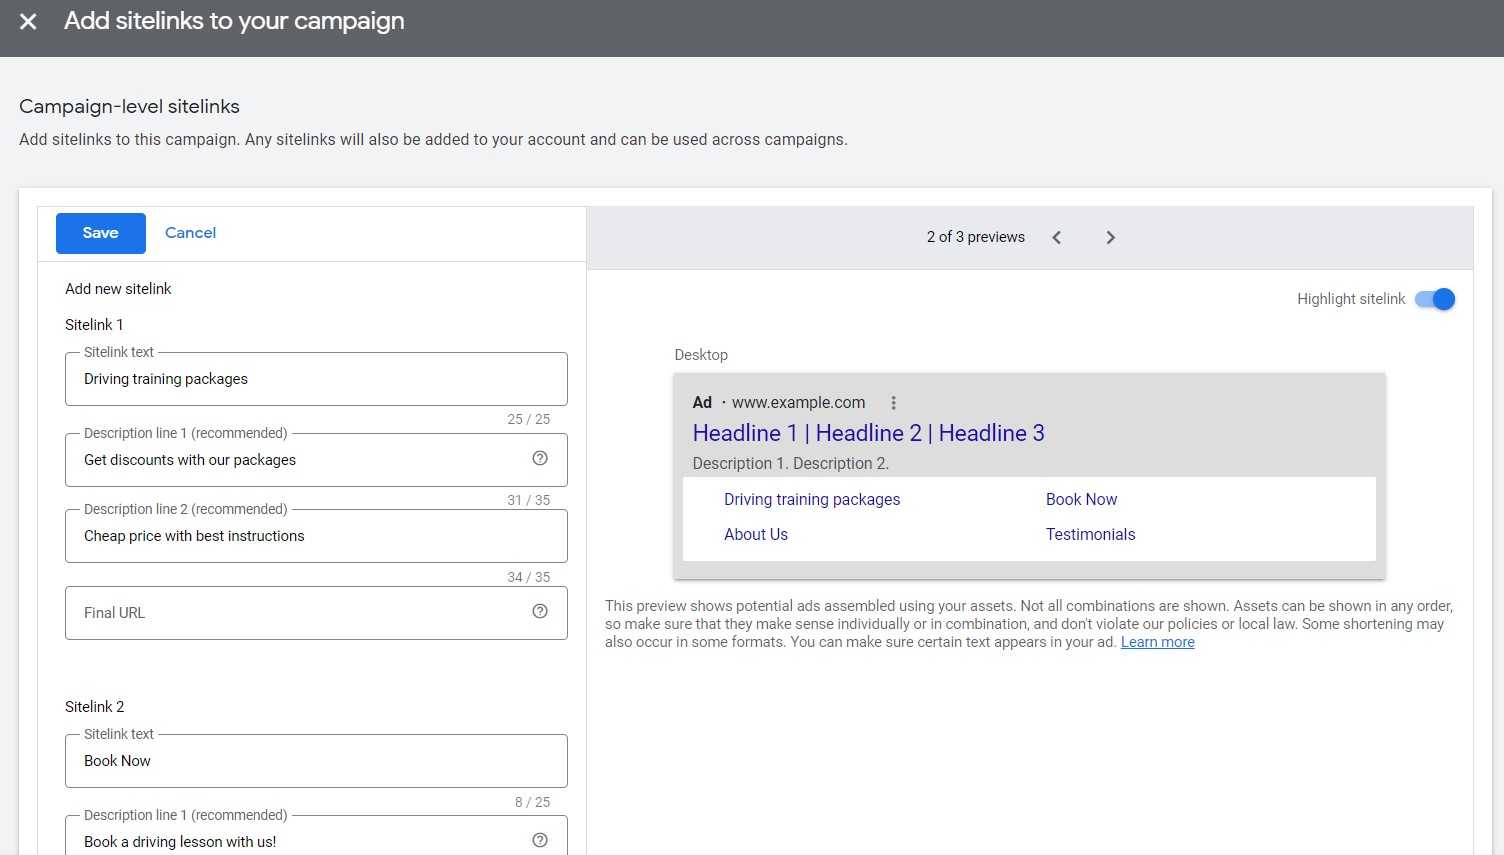
This is what an ad with sitelinks extensions looks like:
In addition to that, you can also add up to 7 assets to your driving school ad. This includes promotions, prices, calls, callouts, structured snippets, lead forms, location, and app extensions which are displayed below your ad descriptions.
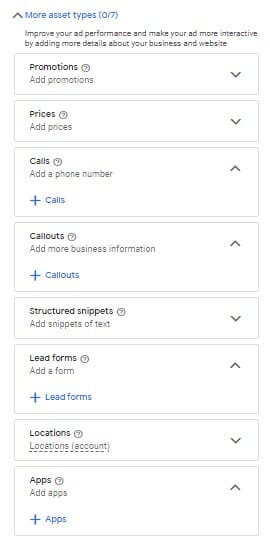
Promotion extension
- If you have an ongoing promo for your customers, you can showcase it to your potential customers by adding it to your driving school ad as a promotion extension. For example, “Father’s day promo” or “20% off on first 10 customers.”
Callout extension
- Callout extensions are another type of ad extension that you can use to highlight the unique aspects of your driving academy. You can add 2-6 callout extensions in each ad copy. One example of your callout extension can be the year that your driving school started “Since 2015.”
Structured snippets
- This kind of ad extension is used if you want to showcase the services offered by your driving school. Some examples include “Teen driver’s Ed” or “Online driver’s course.”
Lead forms extension
- You can use this if you want your customers to directly fill in a form when they click on your driving school ad. This makes it easier for potential customers that have high intent about your driving lessons.
Application extension
- If you have a mobile application that your customers can use and want to increase the number of installs, you can use this extension to make it easy for them to install your app without searching for it on Play Store or App Store.
Price extension
- If you’re getting lots of questions about the price range of your driving lessons, you can also add the pricing of services offered in your driving school with the use of the price extension.

Location extension
- This type of extension is used to highlight the exact location of your driving school. Clicking on a location extension will bring your potential customers to your pinned location on Google Maps.

Click “save and continue.”
Then, to confirm payment info, you’re going to add your billing country, time zone, and promotional code (if you have one).

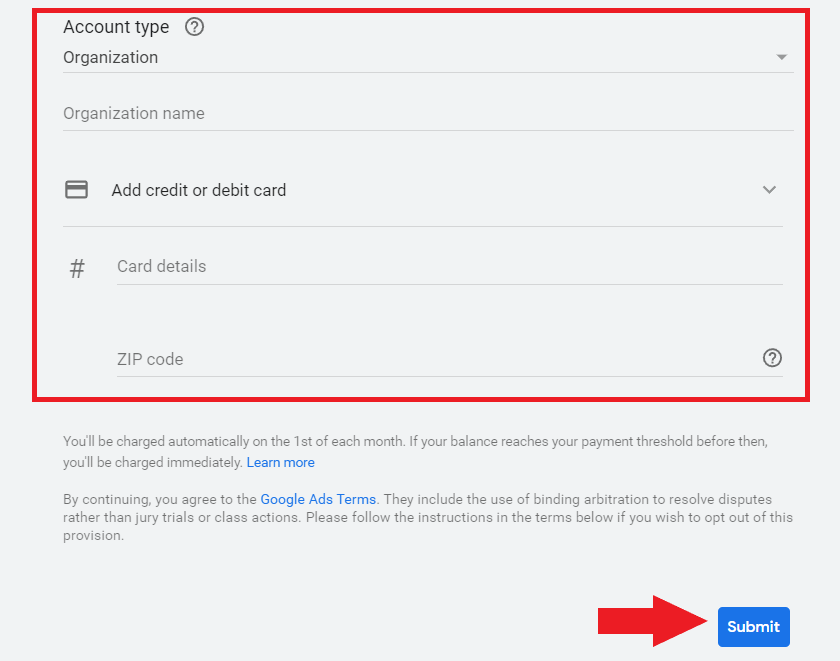
Then, for the account type, you can choose between “organization” or “individual.” After that, you’ll start adding your credit or debit card details, and zip code.
Once done, click “submit.”
Congratulations! You just finished setting up your first Google Ad campaign! Now, you just have to wait until Google approves your ad campaign. It usually takes one day to get approved, once approved, your target audience will be able to see it.
Do you find it hard to understand the terms used while setting up your driving school’s ad campaigns? Check out our blog about Google Ads Glossary to learn more.
Don’t have time to set up Google Ads for your driving school?
Google Ads Best Practices
Now that you have an idea of how to set up your ad campaigns, the next thing that you should do is optimize your ad campaigns to make sure that you are reaching the right audience.
1. Use Keyword Match types and Keyword Planner
There are various types of keyword match types that you can use on your ad copies. This includes broad match, phrase match, exact match, and negative keywords.
- Broad match
- This is the type of keyword match type that helps you get tons of traffic because it will trigger your driving school ad to show up even if it doesn’t have the exact words from your target keyword (as long as google finds it relevant).
- Phrase match
- This type of keyword match type allows your driving school ad to show up on search queries that have the same meaning and are close variations of your target keyword. To use phrase match keyword, add quotation marks along with your target keyword.” For example, “driving lessons near me.”
- Exact match
- This type of keyword match type triggers your driving school ad to show up search queries that use the same sequence as your target keyword. Exact match type keywords give you lesser traffic but high-quality leads compared to broad match and phrase match.
- To use an exact match keyword, add brackets along with your target keyword. For example, [driving instructor near me].
- Negative match keyword
- Negative match keywords are mainly used to prevent your ad from showing up on irrelevant search results. This is useful in preventing your ad from showing up on search queries that won’t convert.
For more details, check out our blog about Keyword match types to learn tips on how you can effectively use it.
Keyword Planner
Once you have created your Google Ads account, you’ll have access to the Keyword Planner. This tool helps you discover new keywords and look at keyword forecasts that will be helpful for your driving school ad campaigns.
How to find relevant keywords using Google Ads Keyword Planner:
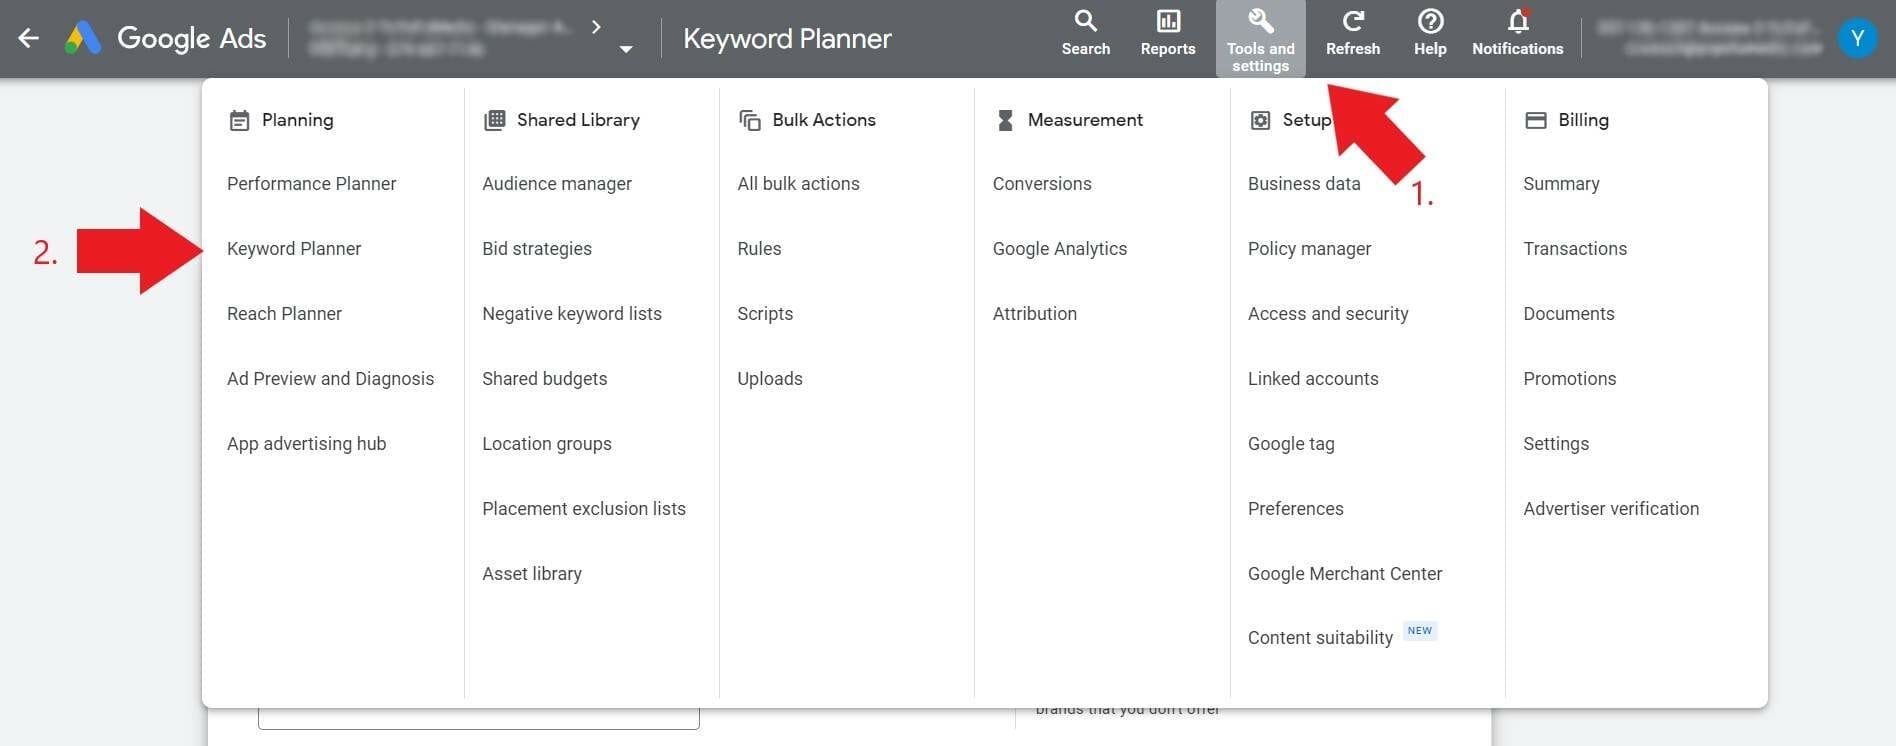
Go to “Tools and Settings.”
Then, under “Planning“, select click “Keyword Planner.”
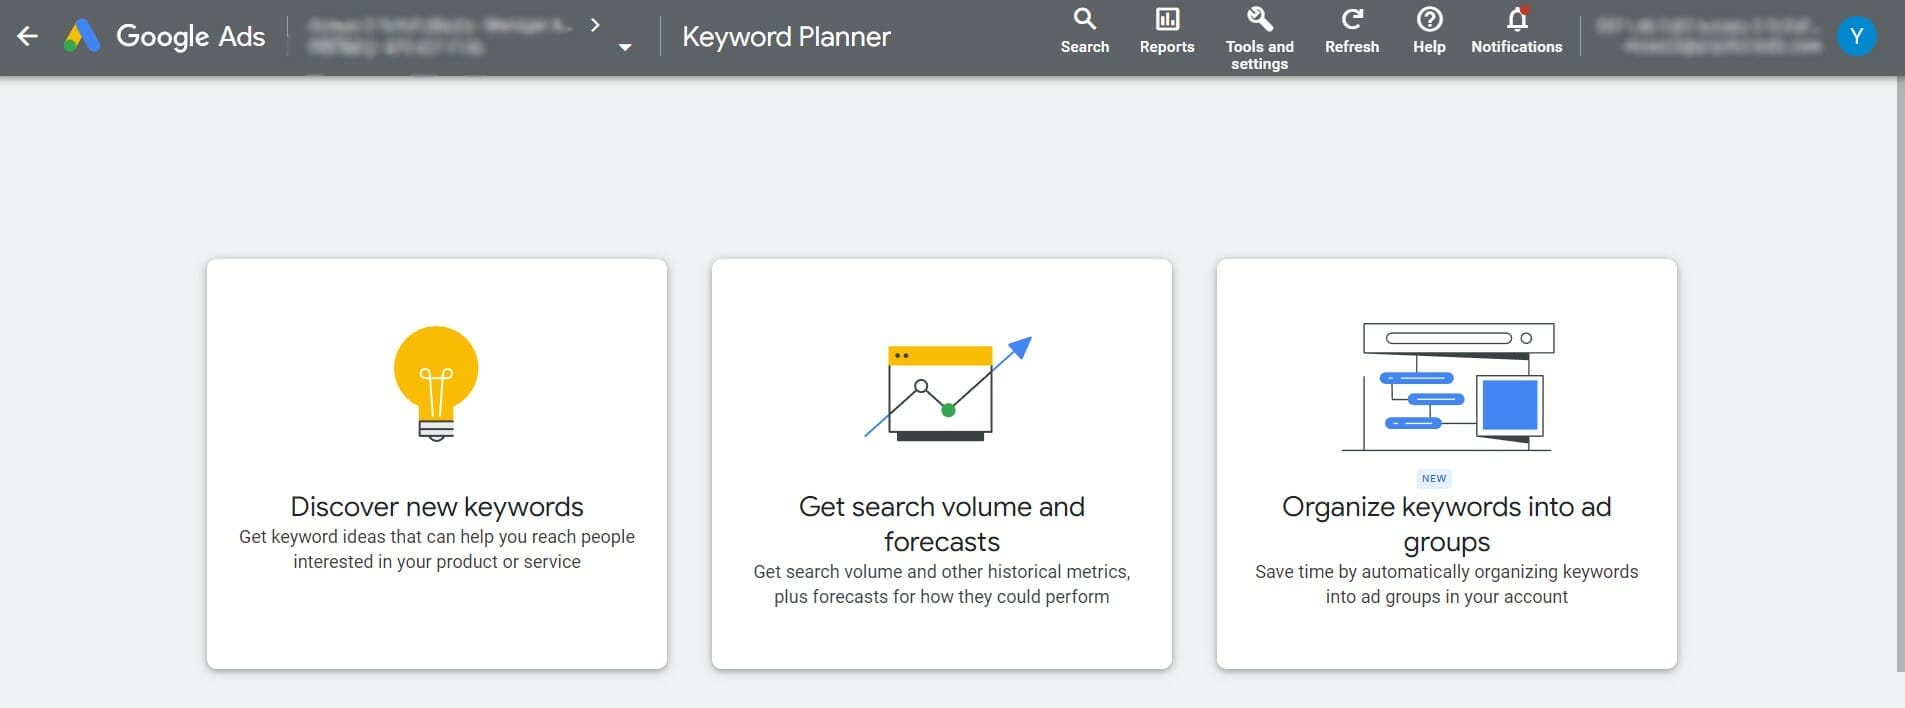
From there, you can select whether you are going to “Discover new keywords” or “Get search volume and forecasts.”
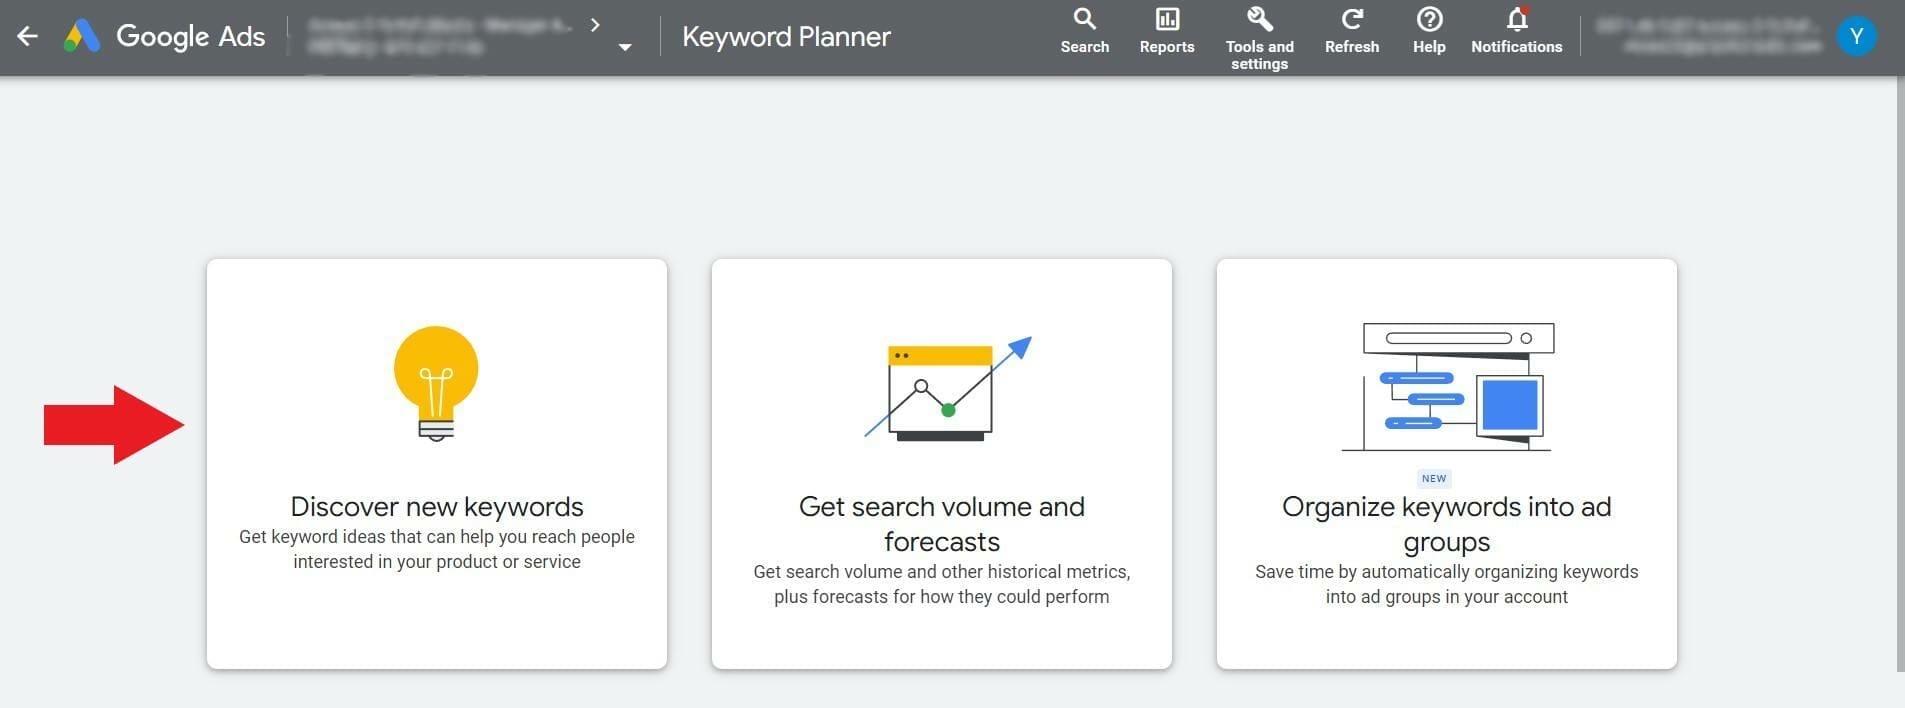
Discover new keywords
To get more keyword ideas for your driving school ad campaigns, click “discover new keywords.”
You’ll be given two options to discover new keywords. You can start by entering the services offered in your driving school or using your website as a source of relevant keywords.
Start with keywords
Enter the services that are relevant to your driving school. Aside from adding close variants of services offered in your driving academy, you can narrow down the results by entering your website URL so that it filters out services or branded keywords.

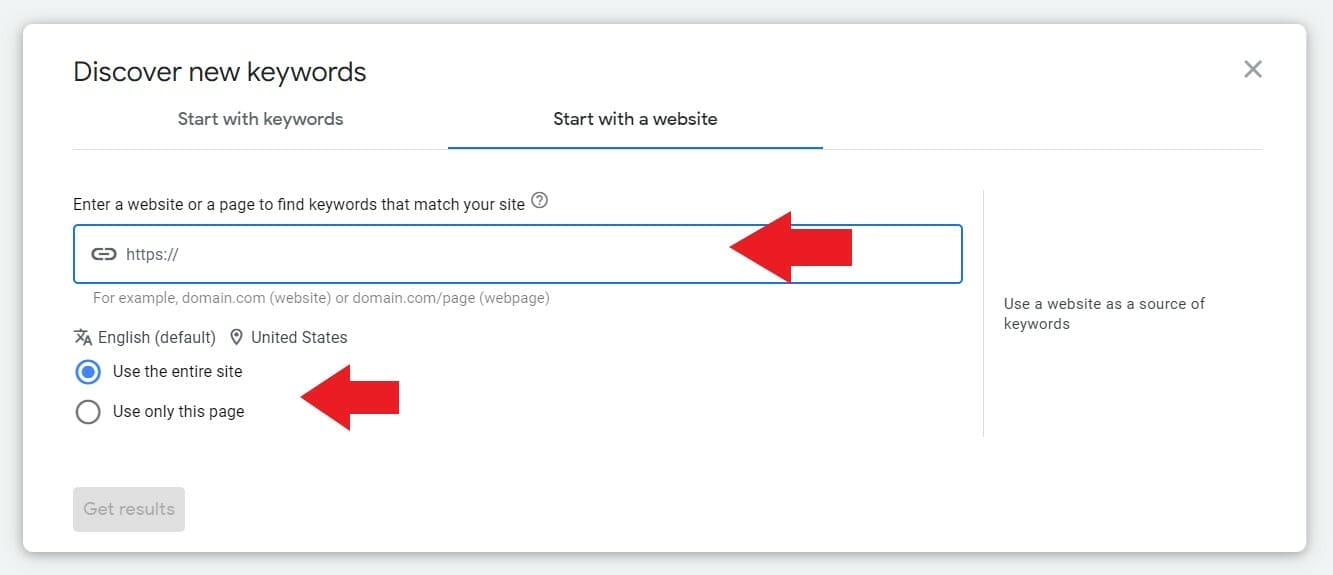
Start with a website
Enter the URL of your driving school website and choose if you are going to use your entire site or only a specific page as a source of new keywords. Then, click “Get results.”
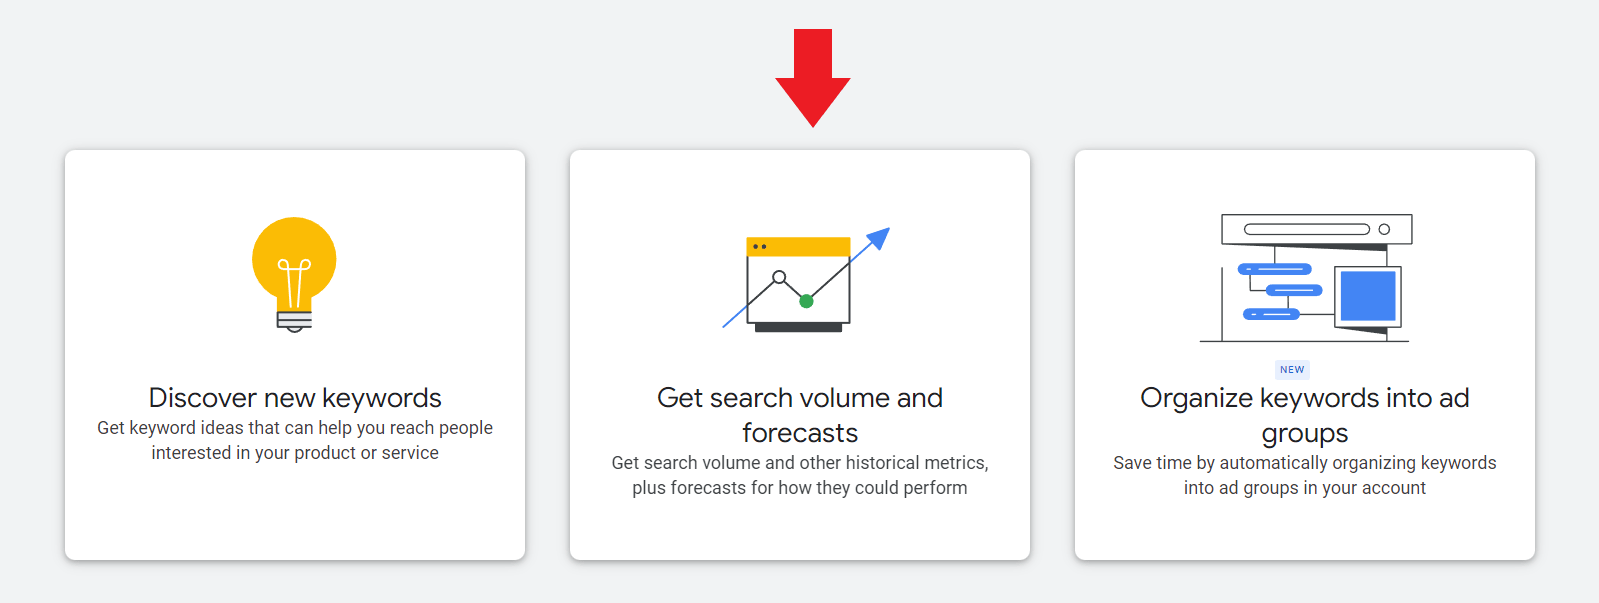
Get search volume and forecasts
To get keyword forecasts, click on “Get search volume and forecasts.”
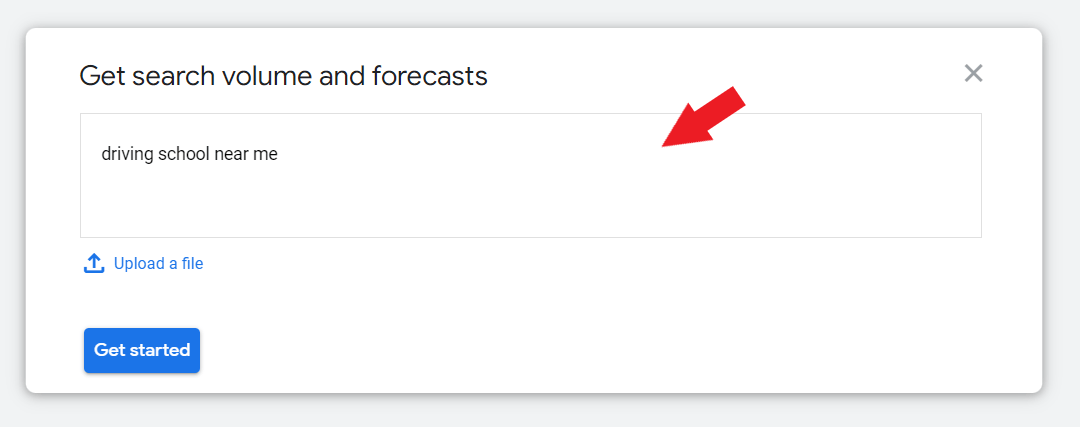
Enter the keyword you want to use on your driving school ads. For example, “driving school near me.” Then, click “get started.”
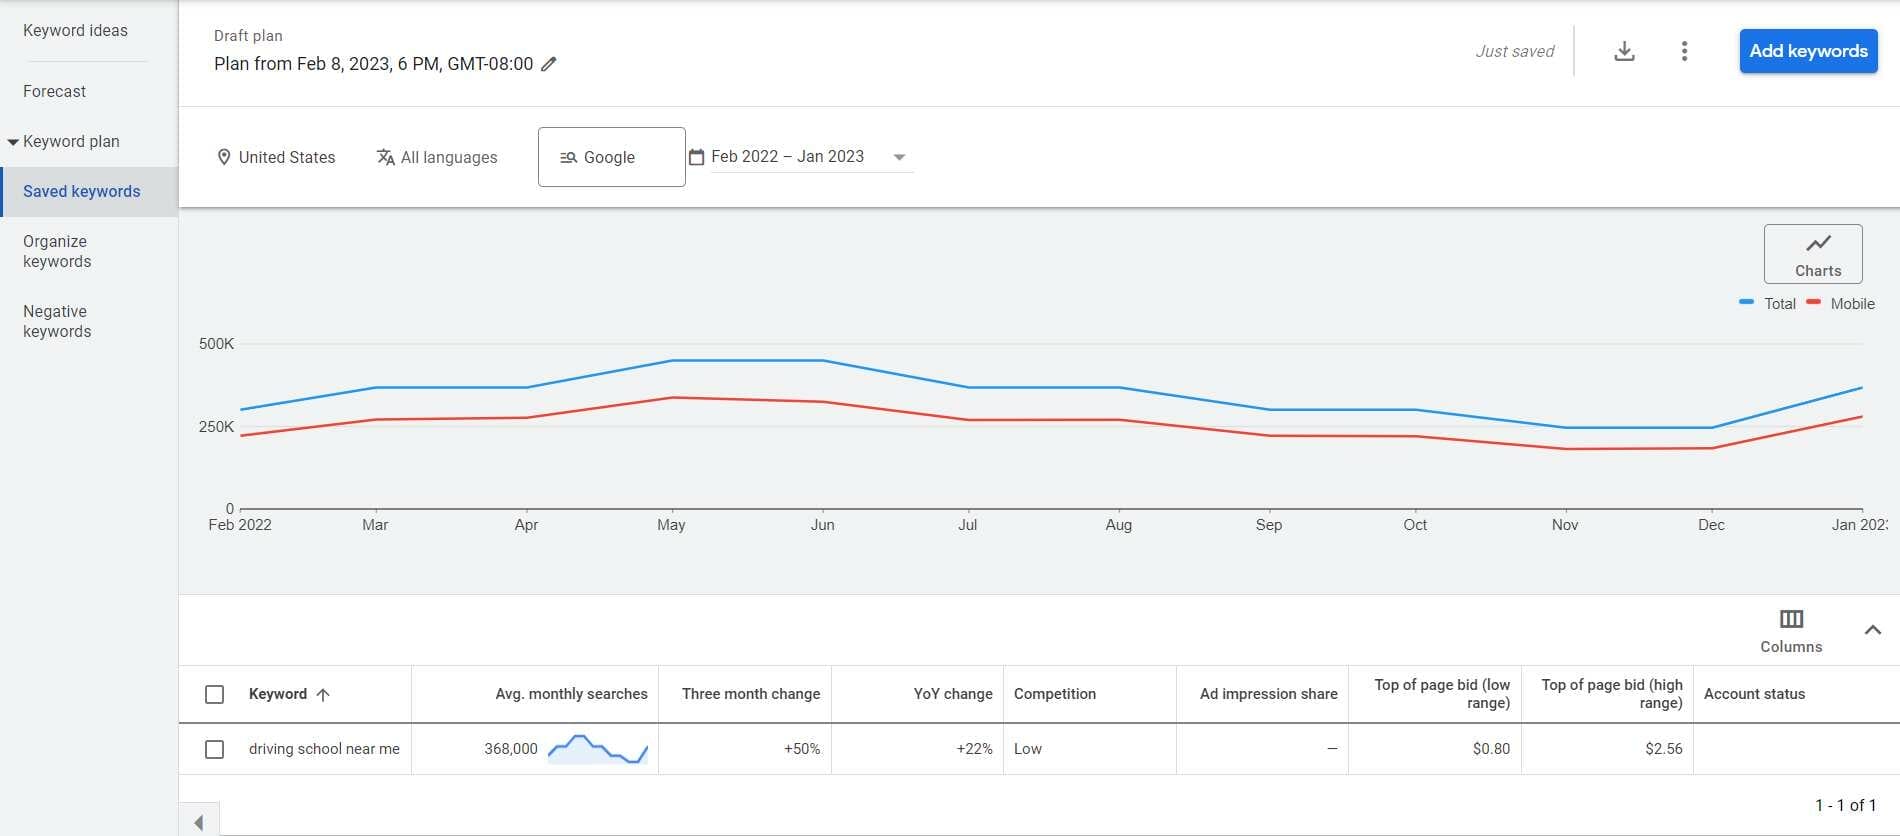
Then, it’ll show you the keyword forecast of your target keyword. This includes the keyword competition, top-of-the-page bid (low range), and top-of-the-page bid (high range).
2. Create your negative keyword list
As stated earlier, negative keywords are mainly used to prevent your driving school ad from showing up on irrelevant searches. It’s important that you have this on your ad campaigns because not only does it help you save your advertising budget for meaningful/high-quality searches but it also, helps you focus on keywords that are used by your potential customers.
Here are some tips that can help you in building your negative keyword list:
- Check out your search terms report
- If you see search terms that trigger your driving school ad from showing up but are irrelevant to the services you are offering, you can add them to your negative keyword list.
- Here are the steps on how to access your search term report:
- On your Google Ads dashboard, go to “keywords.”
- Then, click “search terms.” It’ll show you a table that contains all of the search terms that triggered your ad to show up along with relevant key metrics such as the number of clicks, conversion rate, and impression rate.
- Here are the steps on how to access your search term report:
- If you see search terms that trigger your driving school ad from showing up but are irrelevant to the services you are offering, you can add them to your negative keyword list.
- Be extra careful when adding negative keywords to your ad campaigns
- Using too many keywords in your driving school ads can be a factor that hinders the success of your ad campaigns.
How to add negative keywords to your ad campaigns:
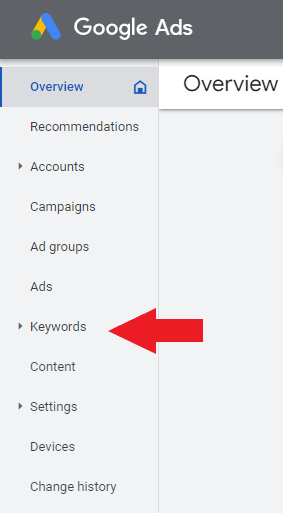
Step 1: On your Google Ads dashboard, go to “Keywords.”
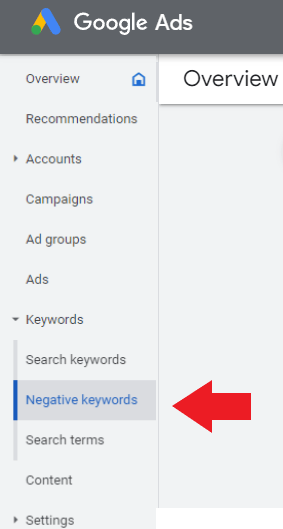
Step 2: Click “negative keywords.”
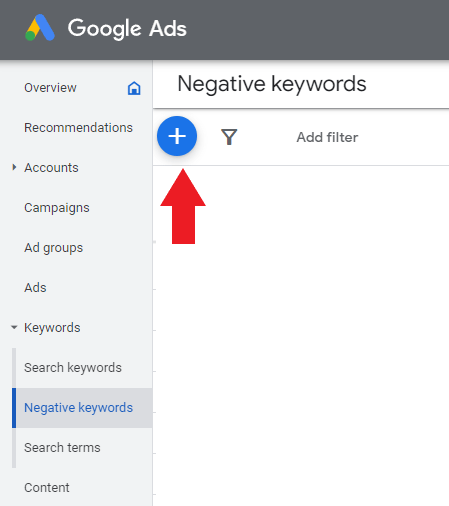
Step 3: Click the “+” button
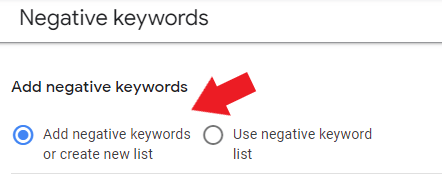
Step 4: Select “Add negative keywords or create a new list.”
Step 5: You can choose whether you’re going to add negative keywords to a specific campaign or ad group.

Step 6: When you’re done choosing, you can enter your negative keywords in the space provided (one keyword per line) or if you already have a list of negative keywords, you can paste it from there.
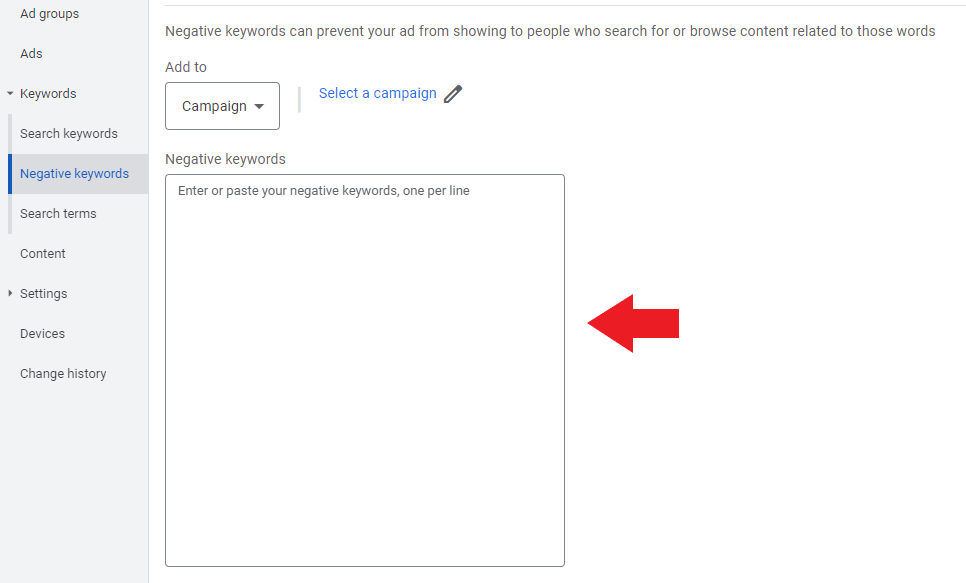
Step 7: Select the checkbox that says “Save to new or existing list.”
Then, enter a name for your negative keyword list.
Once done, click “Save.”

3. Test your ad copies
To see which ad copies help you get the best results, you have to do A/B testing. Here are some tips on how to do it:
- Choose a variable to test (e.g. it could be the length of your headline, words used in your ad description, or type of ad extension you use)
- Identify the goal you want to achieve from your ad campaign
- Run one test at a time so that it’ll be easier for you to analyze the results
- Give enough time to gather data
If you want to read more about testing your ad copies, check out this blog on How to Do A/B testing to learn more.
4. Optimize your landing pages
The reason why you should optimize your landing pages is that it helps you improve not just your conversion rates but even your web traffic. The more engaging your web pages are, the more likely your page visitors will stay longer on your driving school landing pages.
Here are some reminders when creating your landing pages:
- Use a simple design
- Instead of using a complicated website structure, make your landing pages easy to navigate with less clutter. This way, your potential customers can focus on performing a task instead of leaving your page without taking an action.
- It should have your location and contact details
- Your landing page should also have all of the basic details about your driving school. This includes your business name, phone number, email address, links to your social media pages, and your exact location.
- Your ad copy should be relevant to the content of your landing pages
- You don’t want your potential customers to get their hopes up by expecting to land on a page that doesn’t have the content they’re expecting to see.
- A sense of urgency
- Making your page visitors feel that they will miss out on something important if they don’t act fast is another factor that an effective landing page has. Here are some tips on how to add a sense of urgency to your landing pages:
- Add a special offer
- Use a countdown timer along with your special offer
- Use urgency phrases on your landing page (e.g. Hurry, Today, Now, Limited)
- Give them an assurance that your service will help them reach their goals
- Use color psychology to trigger their emotions
- Making your page visitors feel that they will miss out on something important if they don’t act fast is another factor that an effective landing page has. Here are some tips on how to add a sense of urgency to your landing pages:
- Clear call-to-action buttons
- Use first-person point-of-view
- A study has shown that call-to-action buttons that use the first person’s point of view are more likely to get 90% better conversion rates. So, if you’re using a second-person pov in your CTA, you should consider changing it to first person for best results.
- Use power/action words
- The words used on your call-to-action buttons don’t have to be long. In fact, the recommended length is 4-5 words. Some of the action words you can use on your CTA are “Call Now”, “Book an Appointment”, and “Get My Discount.”
- Find the best color
- For your CTA to be easily noticed by your potential customers, make sure to choose the color that contrasts your landing page’s background.
- Button size
- Along with the color of your call to action button, you also have to make sure to use the appropriate button size. It shouldn’t be too small or too big. Just the right size to be noticed by someone who visits your driving school page.
- Use first-person point-of-view
5. Improve your ad’s quality score
Your ad quality score serves as a gauge of how relevant your ad copy is to your potential customers. For best results, you should aim to have a score that’s either “good” or “excellent.”
Factors that affect your ad quality score:
- the relevance of your ad to your target audience
- the expected click-through rate of your ad
- landing page experience
Tips on how to improve ad quality score:
To improve your driving school’s ad quality score, make sure to follow the recommendations from Google. Some of it includes adding more headline variations, making each headline and description unique, and use of popular/ relevant keywords on your ad copy.
Need help improving the quality of your driving school ads?
Key Takeaway
If you’re looking for a marketing strategy that will help you reach your potential customers and get fast results, Google Ads is the way to go! Although running ad campaigns for your driving school can be quite challenging at first, as soon as you become familiar with its features, you’ll be able to control your advertising budget, and keep track of and manage your advertising campaigns.


