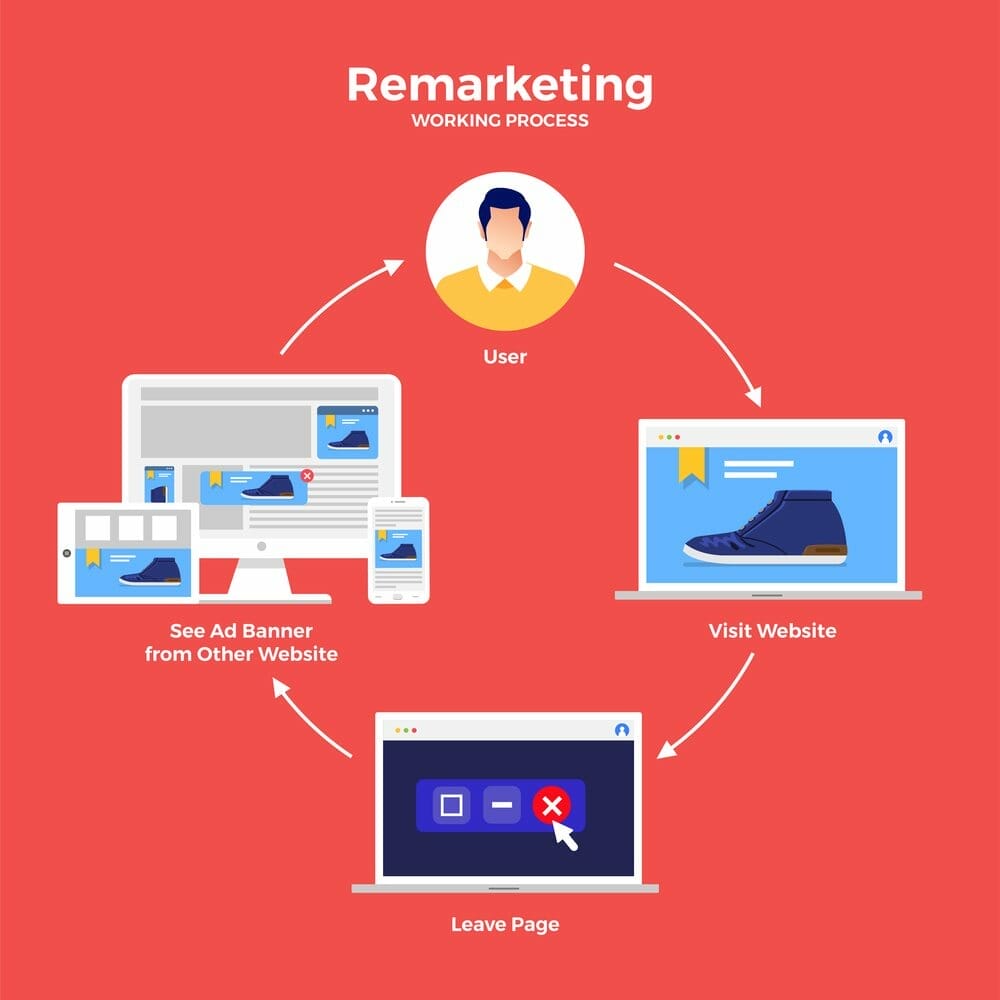
Google Dynamic Remarketing Ads are crucial to the success of your business’ Google Ads campaigns. If you don’t currently use remarketing ads for your products within your Google campaigns, you’ve come to the right place for help. I’m going to teach you how to set up Google Dynamic remarketing for beginners.
Table of Contents
ToggleWhat is Dynamic Remarketing?
Before I show you how to best setup Google dynamic remarketing ads, you need to understand what they are and how they work.
Google remarketing ads allow you to show ads specifically to people who have viewed your website or products before.
Almost everyone who uses the internet has most likely seen some form of retargeting in paid advertising. If you’ve ever been shopping online, only to have the product you looked at advertised in your Facebook or Google shopping feed at a later date, you’ve seen a remarketing ad. Facebook and Google Shopping aren’t the only places you can find remarketed products, they can also appear in your Google search feed or on other websites.
Google remarketing ads are some of the most successful paid advertising a commerce business type can do. These ads are extremely successful for a company with a commerce business type because they target users who already have shown an interest in a product or property. Most people will not convert on your paid advertising, such as buying a product, the first time that they are shopping, and see your products in their feed. Dynamic remarketing will help you build up your product commerce and brand identity by getting your products to display in front of a user’s feed multiple times.
Types of Google Remarketing Ads

Although this article primarily focuses on setting up dynamic remarketing advertisements, it’s essential to understand the purpose of each Google remarketing ad.
- Standard: These types of ads work within Google’s display network and show your commerce ad on an external website feed that a consumer is shopping on. Standard remarketing is the most popular form of remarketing.
- Dynamic Display Ads: Utilizing dynamic display ads is particularly useful for a Commerce business type because it is product specific. These Google dynamic display ads will display a particular product directly in the feed of a consumer that is Google shopping the web for similar types of products.
- Mobile Apps: These remarketing ads target people who have viewed your mobile app or mobile website.
- In Search: Similar to standard Google remarketing ads, In Search allows you to target the search feed of users who’ve viewed your website or products. The difference compared to dynamic display is that these ads appear when the consumer is doing a google search related to your products or website. Unlike dynamic display, these Google ads will appear in the actual google search results feed.
- Video: These Google ads target people who previously viewed your Youtube video. By linking your Youtube to your Google Ads account, you can retarget consumers who saw your video through the display and search network feed.
Benefits of Remarketing Your Product Feed

Many benefits come with using Google remarketing ads that you don’t get with traditional Google Ads. The first of these is the help it provides to reach people when they are most likely to purchase your product or property. You will gain more data analytics in your account, the longer a consumer is on your website. The data that Google Analytics collects on consumers will help you sell more products.
Another benefit of utilizing dynamic remarketing is the ability to create tailored lists of consumers for different attributes. Remarketing isn’t just about your past visitors; it’s about recent visitors that have taken specific actions on your website. By creating tailored lists, you can create ads targeting people with different attributes such as who visited particular pages, products, or abandoned their cart. For example, if a consumer had a cart full of products but didn’t checkout, you can create ad copy encouraging them to finish their purchase.
The Google display network feed has an enormous reach that can be hard to navigate with traditional paid advertising. Google Remarketing ads allow you that same reach with the benefit of being able to better convert on your paid advertising thanks to customer data attributes. It helps ensure you can have better control over your advertising spending and receive higher-quality traffic.
Through Google Ads remarketing, you receive a lot of detailed analytics reporting. This analytics reporting can give you tremendous insight into specific attributes of traffic you are getting on your website. This data allows you to understand better what types of consumers your audience is.
Remarketing is beneficial because 99% of people won’t buy your product the very first time they visit your product feed.
That’s why it’s so important to do remarketing and to continue advertising to your customers.
Creating Top Google Dynamic Remarketing Ads
Now that you understand the benefits and types of remarketing ads available, I’m going to teach you how to best setup dynamic remarketing. There are several steps you need to take when beginning to remarket your products. I’m going to take you step by step on how to set up and optimize this advertising method in your Google Ads campaign.
Step 1: Generate Your Remarketing Tag In Your Google Ads Account

The first thing you need to do before you can create your dynamic remarketing is to generate your remarketing tag from your Google Ads account. I’m going to teach you how to make, edit, and test your remarketing tag to ensure it is working correctly with Google. The first thing you’re going to want to do is to navigate to the tools and settings button in your Google Ads account. Once you click that, you are going to select Audience Manager under the Shared Library section at the top.
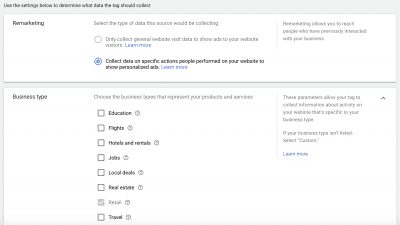
Now that you are at the Audience Manager page, you are going to click Setup an Audience Source. Once you click that, you are going to select Setup a Google Ads tag. When generating your remarketing tag in your account, Google is going to ask you which data Google analytics source you would like to collect. Since we are creating dynamic remarketing ads, you want to collect data Google analytics from specific actions people performed on your website. Next, you are going to select the business type of your website.

The next step in generating your remarketing tag is to set how you would like to install the Google Analytics tag on your website. If you do not have direct access to the code of your business’ website, then we recommend emailing the tag to someone within your business who can install it. If you do have access to the code of your website, then you can set to either insert the Google analytics tag yourself or to use the Google tag manager. Based on which option you choose, Google will generate a remarketing tag for you to copy and paste into your website’s code.
Step 2: Add the Tag to Your Website To Get Google Analytics
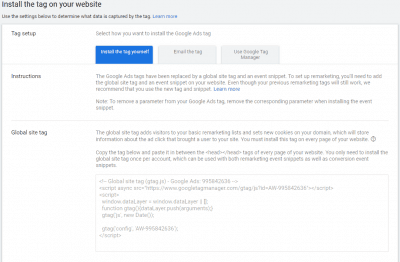
Once you have generated and copied your Google remarketing tag, you need to go back to your website to add it. The reason you add the tag to your website is so when someone visits your webpage; Google will drop a data cookie within their browser. That cookie id joins the advertising audience within your Google campaign, and you can easily target that consumer again.
Keep in mind that your Google remarketing tag should be a part of every webpage that you want to track data on your website. We recommend using a global tag that you can insert into the footer of your website. You should put the Google Analytics tag within the footer of your website instead of the top so that it doesn’t slow down webpage load time for consumers with a bad connection.
If you are having any trouble adding the tag to your website, we recommend trying Tag Assistant (By Google). This Google Chrome extension will give you data insight on any problems found with your tags. This extension is extremely useful for installing various other Google analytics tags as well.
Step 3: Create Your Rule-Based Dynamic Remarketing Lists
Once you have added the Google Analytics tag to your website, go back to Google Ads. Google will create a default all visitors list for your website. To maximize the success of your retargeting ads, however, you are going to want to create separate audience lists based on specific attributes from google analytics. You can utilize rules to categorize consumers into particular audiences. These audiences can include people who visited relevant webpages or particular products. Here are 4 audience ad groups that you can create based on what you think will work best for your products:
- Product Viewers: Dynamic remarketing that creates and assigns generated ads to users based on data about the specific product pages they visited.
- Shopping Cart Abandoners: Dynamic retargeting based on product pages visited by users who added products to their cart, but decided not to make a purchase. This form of dynamic remarketing optimization reduces the amount of money lost to product and shopping cart abandonment.
- Buyers 3-60: Retargeting ads for users who bought a product within the last 2 months. This dynamic remarketing optimization uses data collected on your website for strategically upselling related products.
- Non-Product Viewers: Dynamic remarketing that targets users who have been to a page on your site other than a product page. This advertising strategy generates ads based on the data of the pages that the user has been to.
For this example, we are going to create an audience of consumers who didn’t purchase the products that they placed within their cart.
Now that we have generated and added the Google Ads remarketing tag to our website, we need to create our first remarketing audience. To start, you are going to go back to the Audience Lists section and create a new audience from Website Visitors. As an example, I will specifically build an audience for consumers who visited the product page and cart page for a Razer Gaming Keyboard.
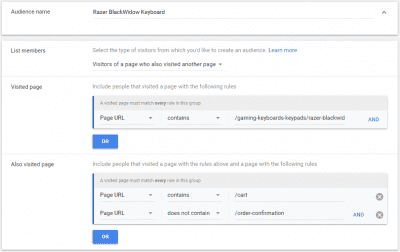
To set up a Dynamic Ad audience for your product, we need the list members to be the visitors of a page who also visited another page. We are going to create a rule that the visitors went to the page URL of our product. To do this, create a rule that the page URL contains your product URL. In the example given, this is a Razer Black Widow gaming keyboard.
In the next step, we are going to create a rule that the consumer also visited the cart page. Select Page URL contains and insert the URL for the cart page on your website. When setting up dynamic remarketing, we want only to target people who visited our product and cart page but didn’t order the product. The ensure this, we need to add another rule for our products. The rule should be Page URL does not contain our order confirmation page. Here you should put what your order confirmation page URL is. This will ensure we do not target people who already purchased the product.
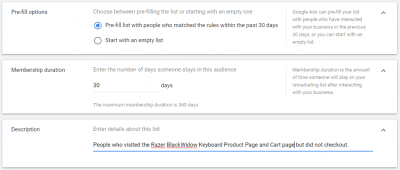
Now that we have created our rules, you can either choose to have your audience list filled will members who met your rule attributes over the past 30 days or to start with an empty list. Next, you can decide how long members of your list will stay in your audience. The default for this on Google is 30 days; however, you can change this in your account based on the duration of your sales funnel. Lastly, you can write a short description of the data attributes assigned to the people you are retargeting with your products.
Step 4: Create Your Dynamic Remarketing Campaign
Now that you know how to make remarketing lists, it’s time to create your remarketing campaign for your products. I’m going to show you how to create a dynamic remarketing campaign using the Razer Keyboard product audience we created earlier for optimization. Follow along using a product from your own product feed. To start, you are going to go to the Campaigns section of Google Ads and click Create a New Campaign.
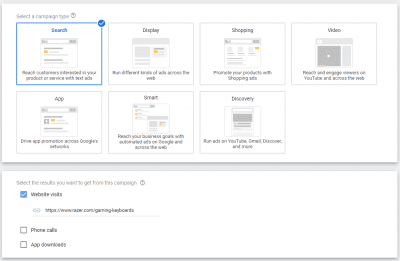
When you create a new campaign, you have the option in your account feed to choose from several different campaign types at the top. These types include Search, Display, Shopping, Video, App, Smart, and Discovery. We are going to select the Search type because our goal is to remarket to people while they are naturally using the Google search feed. The type of results that we want to get from this campaign is website visits.
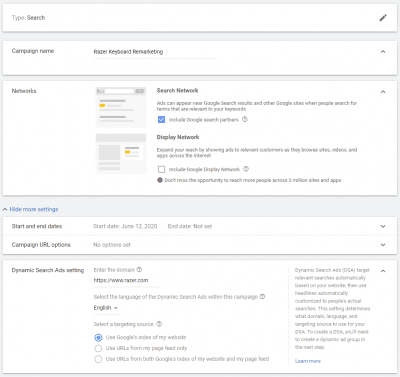
Once you have declared the goal of your campaign, you can begin to configure your campaign’s settings in your account feed to meet that goal. Under your campaign’s network settings, we recommend selecting only the search network. The reason for this is because Google’s display network feed is massive and can be harder to navigate at times. By narrowing down your Google advertising to just the top of the search network feed, you can better control your spending and receive higher-quality traffic to your website.
After setting your network to Search, you are going to click the Show More Settings button below it. Scroll down to the Dynamic Search Ads setting and enter the domain you are remarketing. Here we recommend using Google’s index of your website feed for search ads.
You also have the option to set a start and end date for your campaign as well as an additional URL setting for data tracking conversions. Below these settings, you can set local or global locations and languages you would like to target. Local commerce businesses can set these attributes to help increase sales for certain demographics.
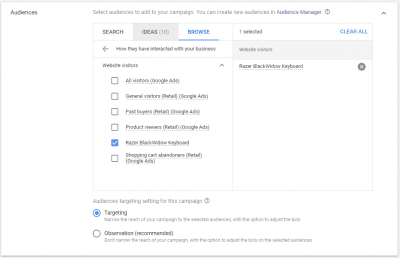
Next, we are going to set the audience type we want to add to our campaign.
You must add the remarketing audience that we created earlier to your campaign for it to be successful.
After you have added your remarketing audience, you should set your audience setting to Targeting. This setting will narrow the reach of your campaign to just your selected audience feed and allow you to adjust your bids.
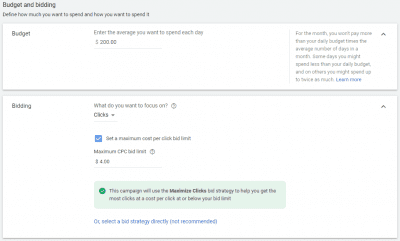
We recommend setting your bidding strategy to clicks and your maximum bid at around the high end of your category. The reason we are going to place our maximum bid this high is that the quality of your conversions is much better than standard ads. Dynamic remarketing will help drive consumers to your website feed, who are already looking for similar products to yours.
For your budget, make sure to set this to the maximum you are willing to spend in a day on ads. After configuring your bidding settings, you also have the option to add site links, call, and callout extensions to your campaign. Adding these can help commerce stores acquire more leads and sales.
Step 5: Construct Your Ad Group and Dynamic Remarketing Ad
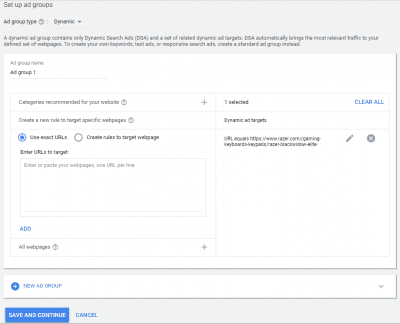
The next step in getting your dynamic remarketing running is creating your ad group. Here you are going to set your ad group type to dynamic. Once you’ve done that, create a new rule to target a specific webpage feed. You want to add the exact URL of the webpage you would like your remarketing audience to go. After inputting your URL, simply hit Save and Continue.
Writing Dynamic Remarketing Ads For Your Business
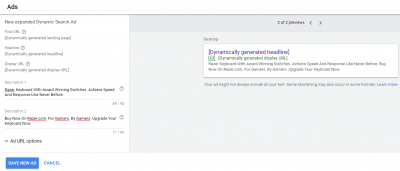
Now that we have created both our campaign and our Ad group, it’s time to create your actual custom ad. The benefit of using dynamic remarketing is that Google Ads will help by automatically generating a custom ad headline, display URL, and final URL for your ad. All you are responsible for contributing to the actual ad is a custom ad copy for the Description 1 and Description 2.
Keep in mind when writing your descriptions that the only people who are going to be seeing our ad are people who have been to our product page and added products to their cart.
We recommend checking out our post on the secrets to creating successful Google ads copy to help you write compelling custom descriptions for your advertisements. This can help you drastically improve product or property sales for your commerce business.

