
Using Google Ads for Pest Control Businesses to rank high on Google’s Search Result Page can result in a significant increase in clients. This is because as the top digital marketing platform that uses the PPC (Pay Per Click) system, you can get more new customers consistently. Google Ads is very effective in helping you reach your marketing goals, which other marketing platforms can’t offer due to its level of predictability and reliability to deliver the results you want.
Google Ads for Pest Control PPC Campaign
1. Key Terms for Creating Google Ads
- Campaign: A campaign consists of all the ad groups, keywords, and preferred settings that make up your advertisement.
- Ad Groups: Ad groups are the umbrella that the keywords go under. They are the main themes your keywords will follow.
- Keywords: Keywords are the more specific phrases and words that are under the ad groups. This is what people will likely be searching to find your business.
- Conversions: A conversion is a set of actions people may take to contact or secure service for your business (i.e. someone calls your company to set an appointment for fumigation).
- Landing page: This is the page people will be directed to when they click on your advertisement.
- PPC: This is the pay-per-click. Every time someone clicks on your advertisement, you will pay this amount to Google Ads.
2. How To Create Campaign for Google Ads for Pest Control Businesses
Start by logging into the email account primarily used by your business for easy access to your campaign. If this is your first time using Google Ads, formerly known as Google Adwords, you should see a similar starting page.

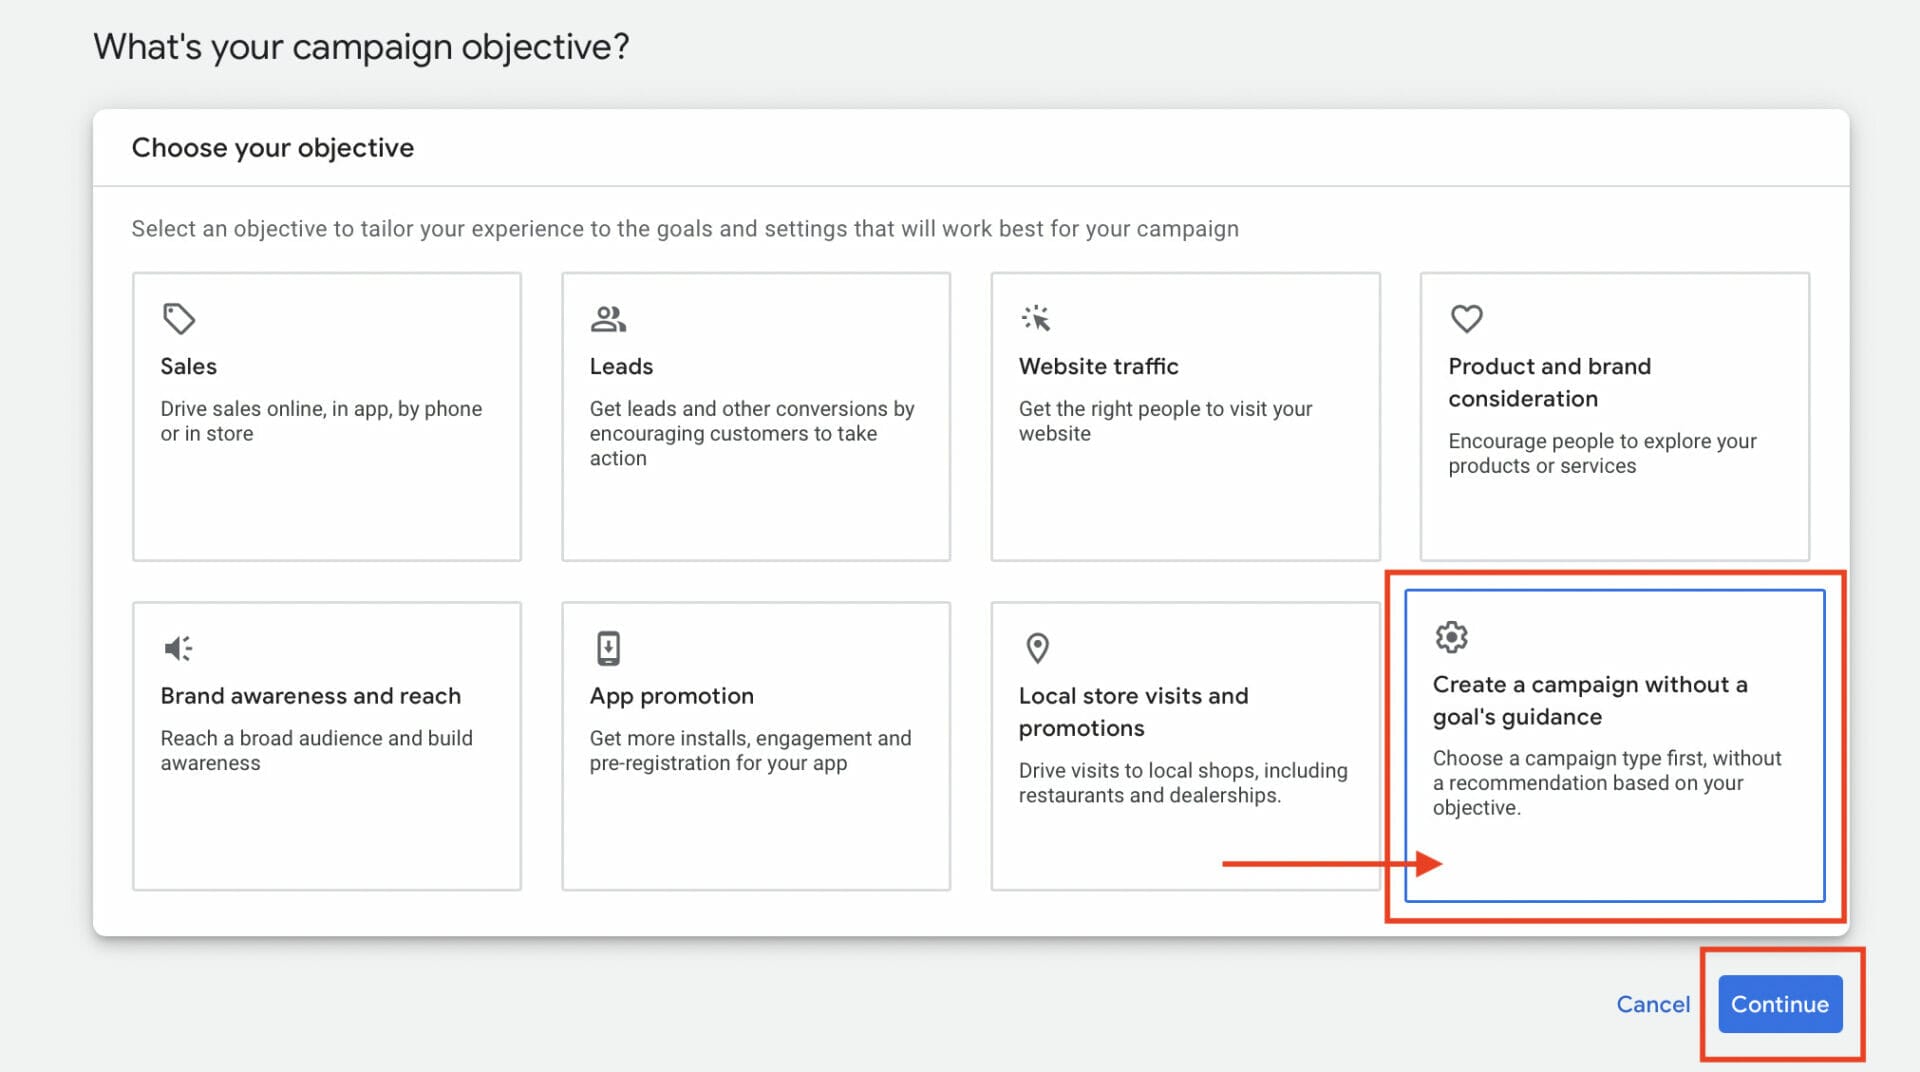
Next, you will be asked to set the goal for your campaign. You will be able to choose among many preset options, but for the case of this campaign, choose to Create a campaign without a goal’s guidance. This will give you full control of how the Google Ads for pest control campaign will run.
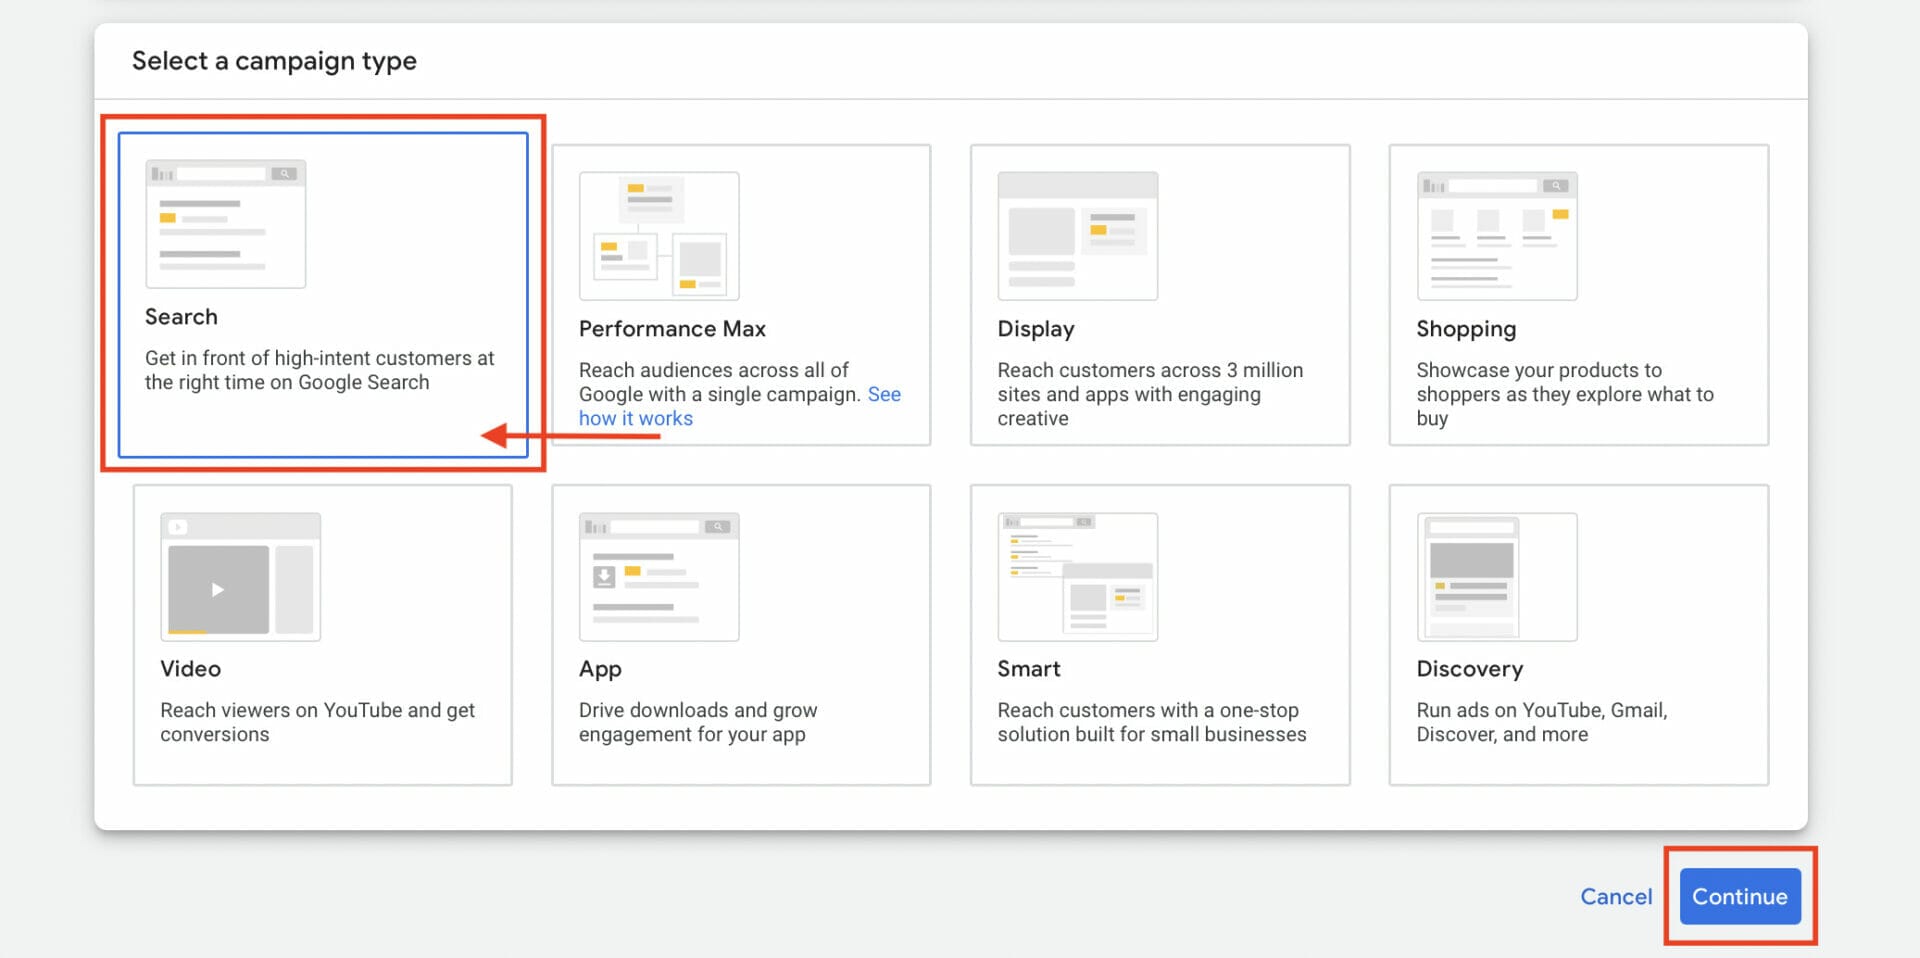
Next, you will be asked to select a campaign type. We recommend you choose Search. Considering pest control is not considered a regular service for most people, choosing a campaign other than Search will not generate many clients.
By choosing Search, your pest control services will be shown to the people using the search engine with an immediate need for extermination, meaning they are more likely to follow through with contacting the business.
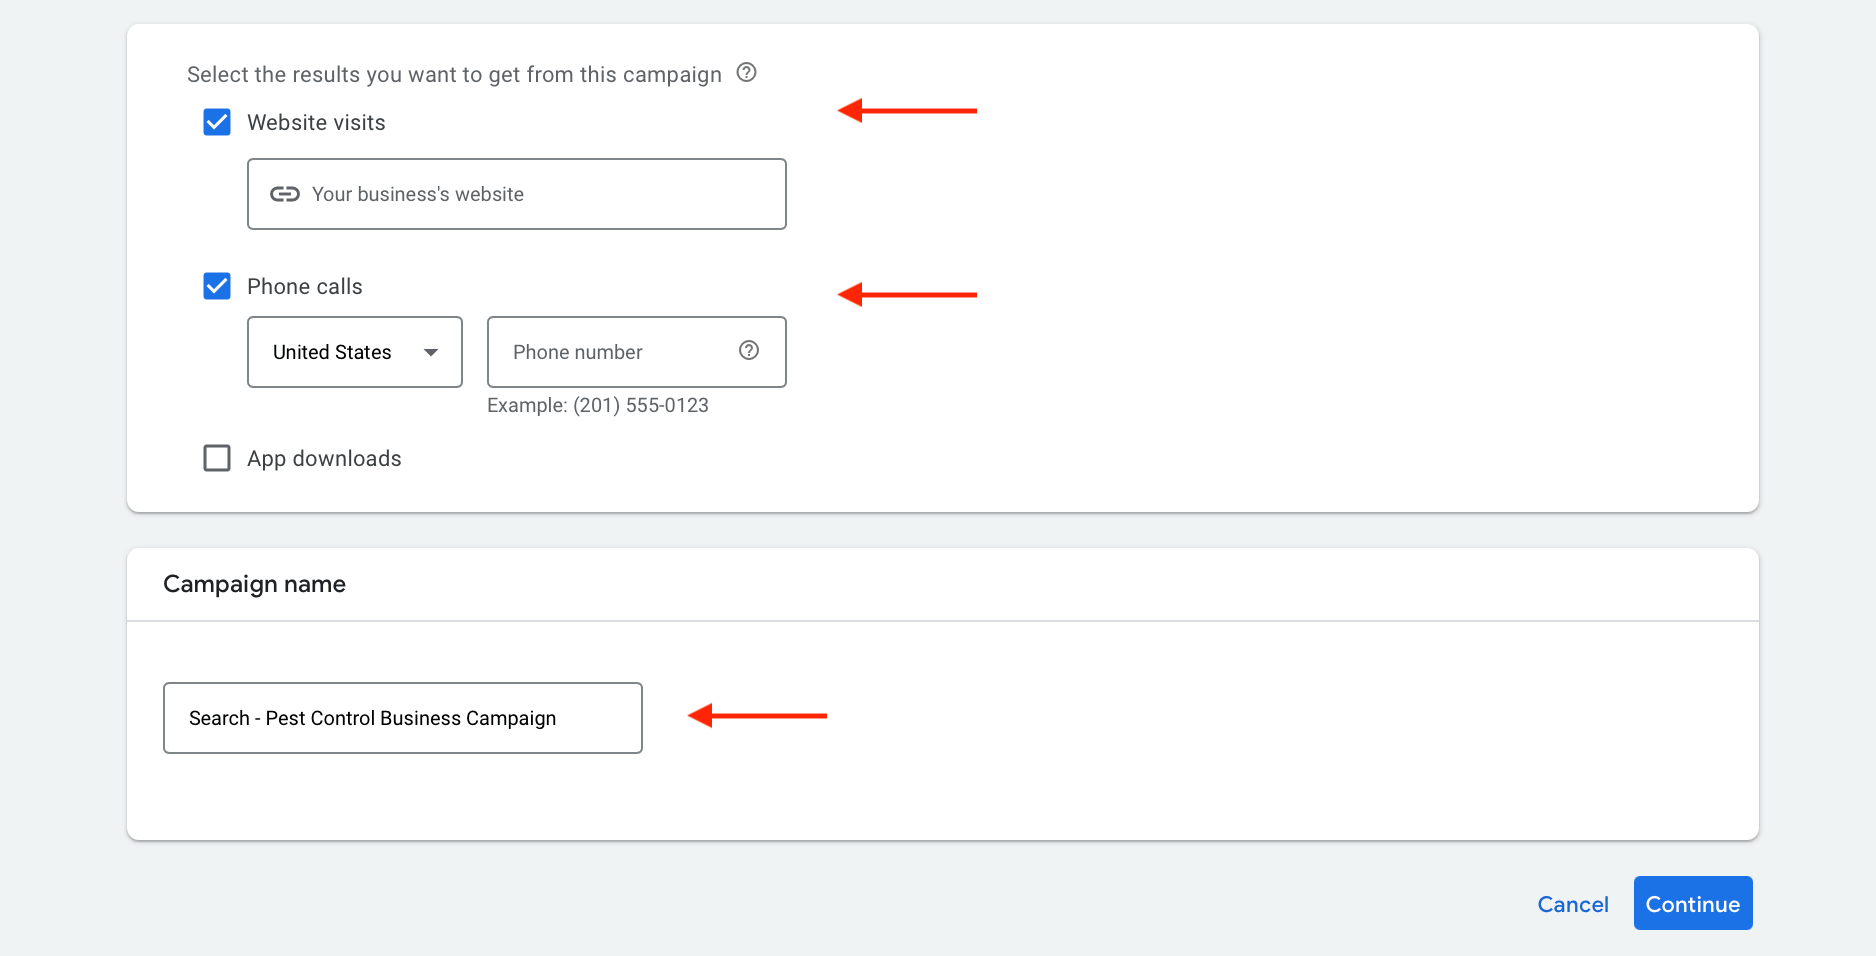
Next, you will be asked to pick the Results for your campaign. This is essentially asking about the action, or conversion, taken to increase the clientele of your pest control business.
You can pick Websites and Phone Calls as those are the only options relevant to Google Ads for pest control campaigns. Then you will need to enter your Campaign Name. While it is up to you how creative you would like to be in the naming process, we recommend that you keep it simple and easy to remember.
Network Settings
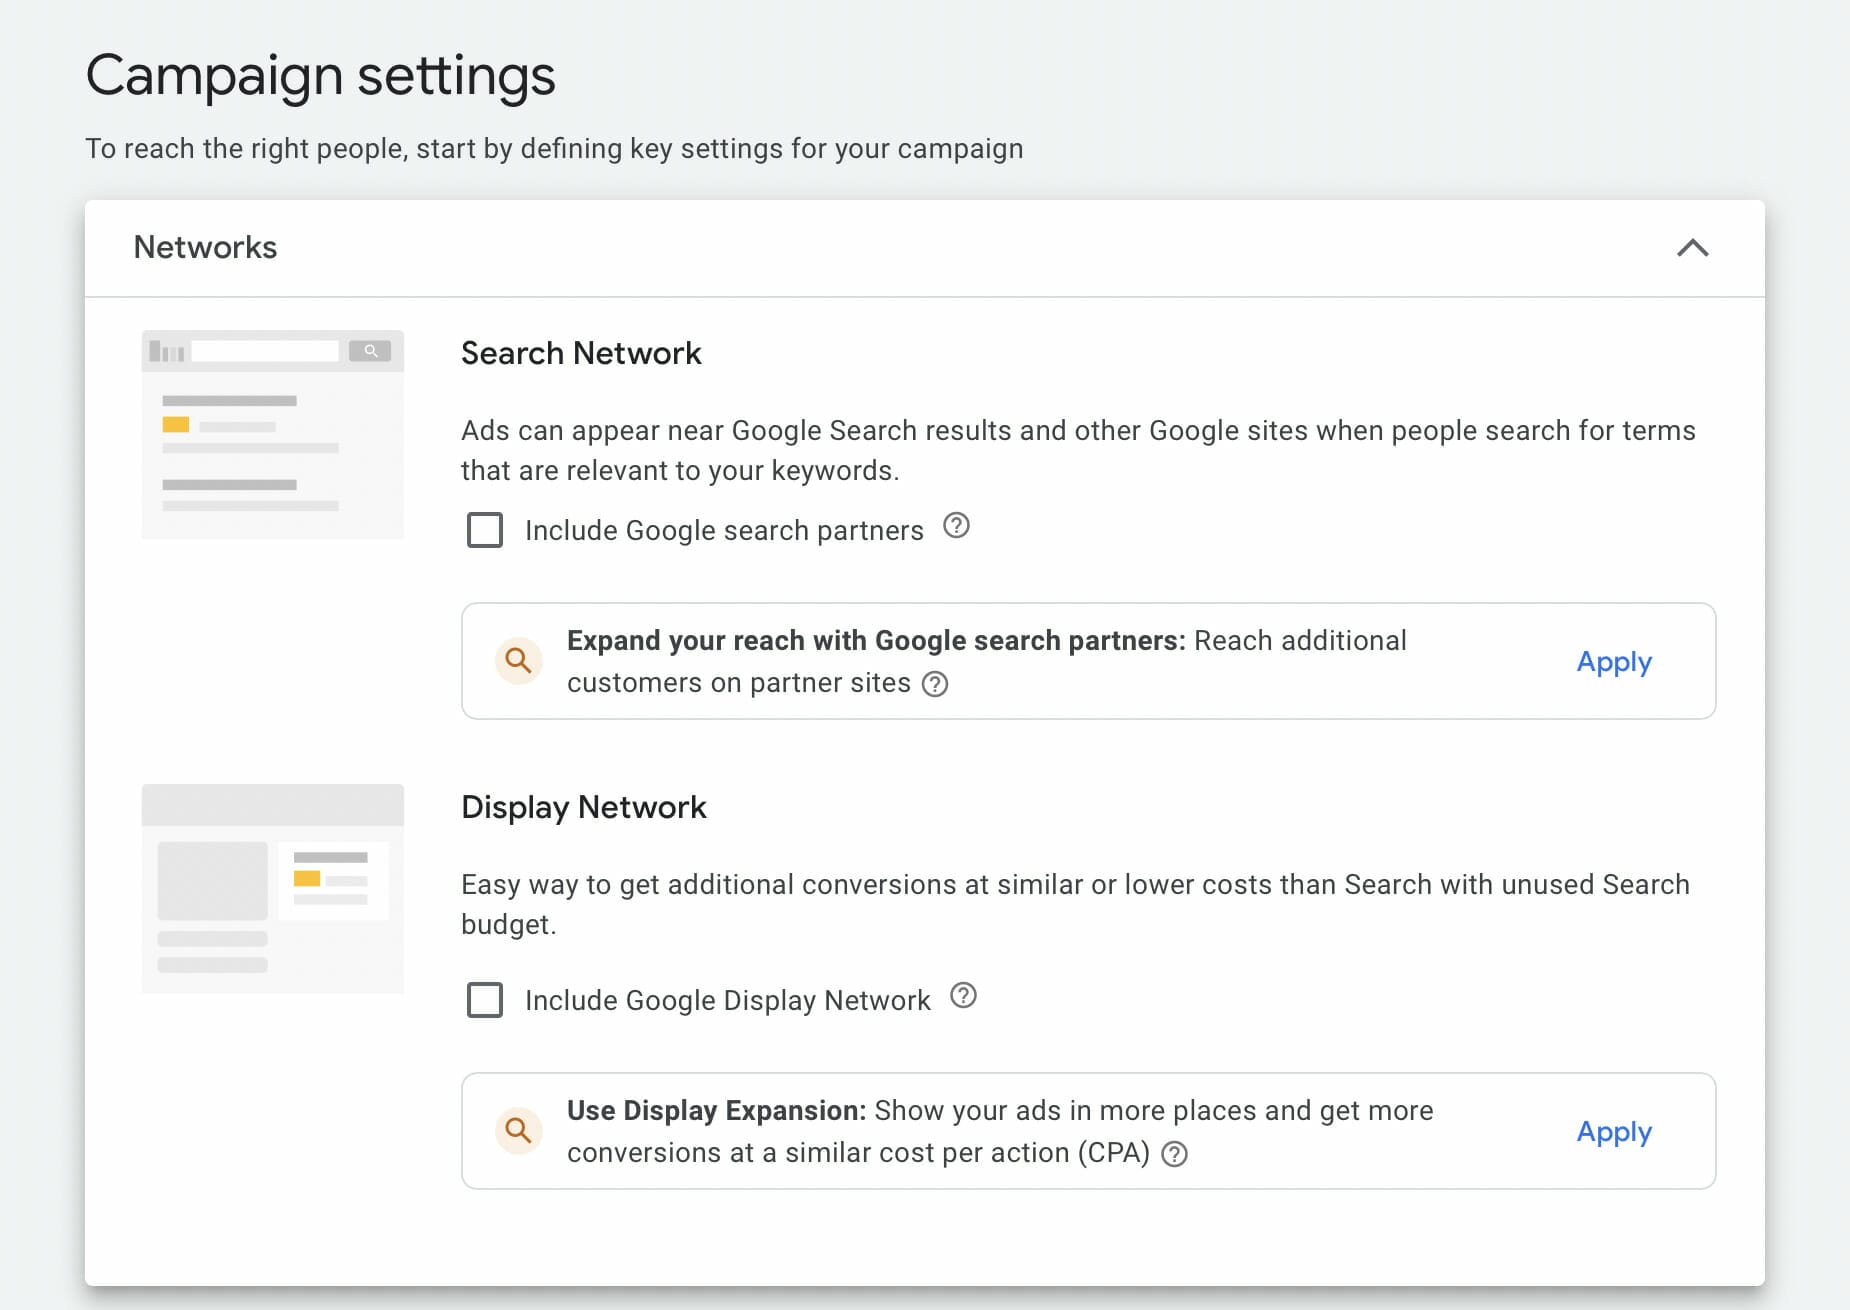
In the next set of settings, both Search Network and Display Network will be pre-selected in your campaign. Unselect both Display Network and Search Network. These settings are not beneficial for Google Ads for pest control campaigns, because Display Network relies on high-quality images to advertise your ad in different ways such as banners on other platforms.
Although we selected Search as our campaign type, unselecting the Search Network setting will ensure that your ad won’t be shown on Google’s search partners when people aren’t actively looking for pest control services, but you can always change this in the future when you know your way around Google ads.
In your ad rotation setting, you want to select Optimize so that the best-performing ads are the ones that show up to users searching for your products and services.
Pay attention to the Start and end dates for your campaign. Because rodents and bugs do not follow a seasonal schedule of when to torment your clients, you should not set an end date.
When you want to finish up your Google Ads for pest control campaign, go into the campaign manually to shut it down.

Audience Segments
Next, we are going to be editing Targeting and audiences. This is a critical component of any successful campaign, so make sure you follow this portion to the best of your ability.
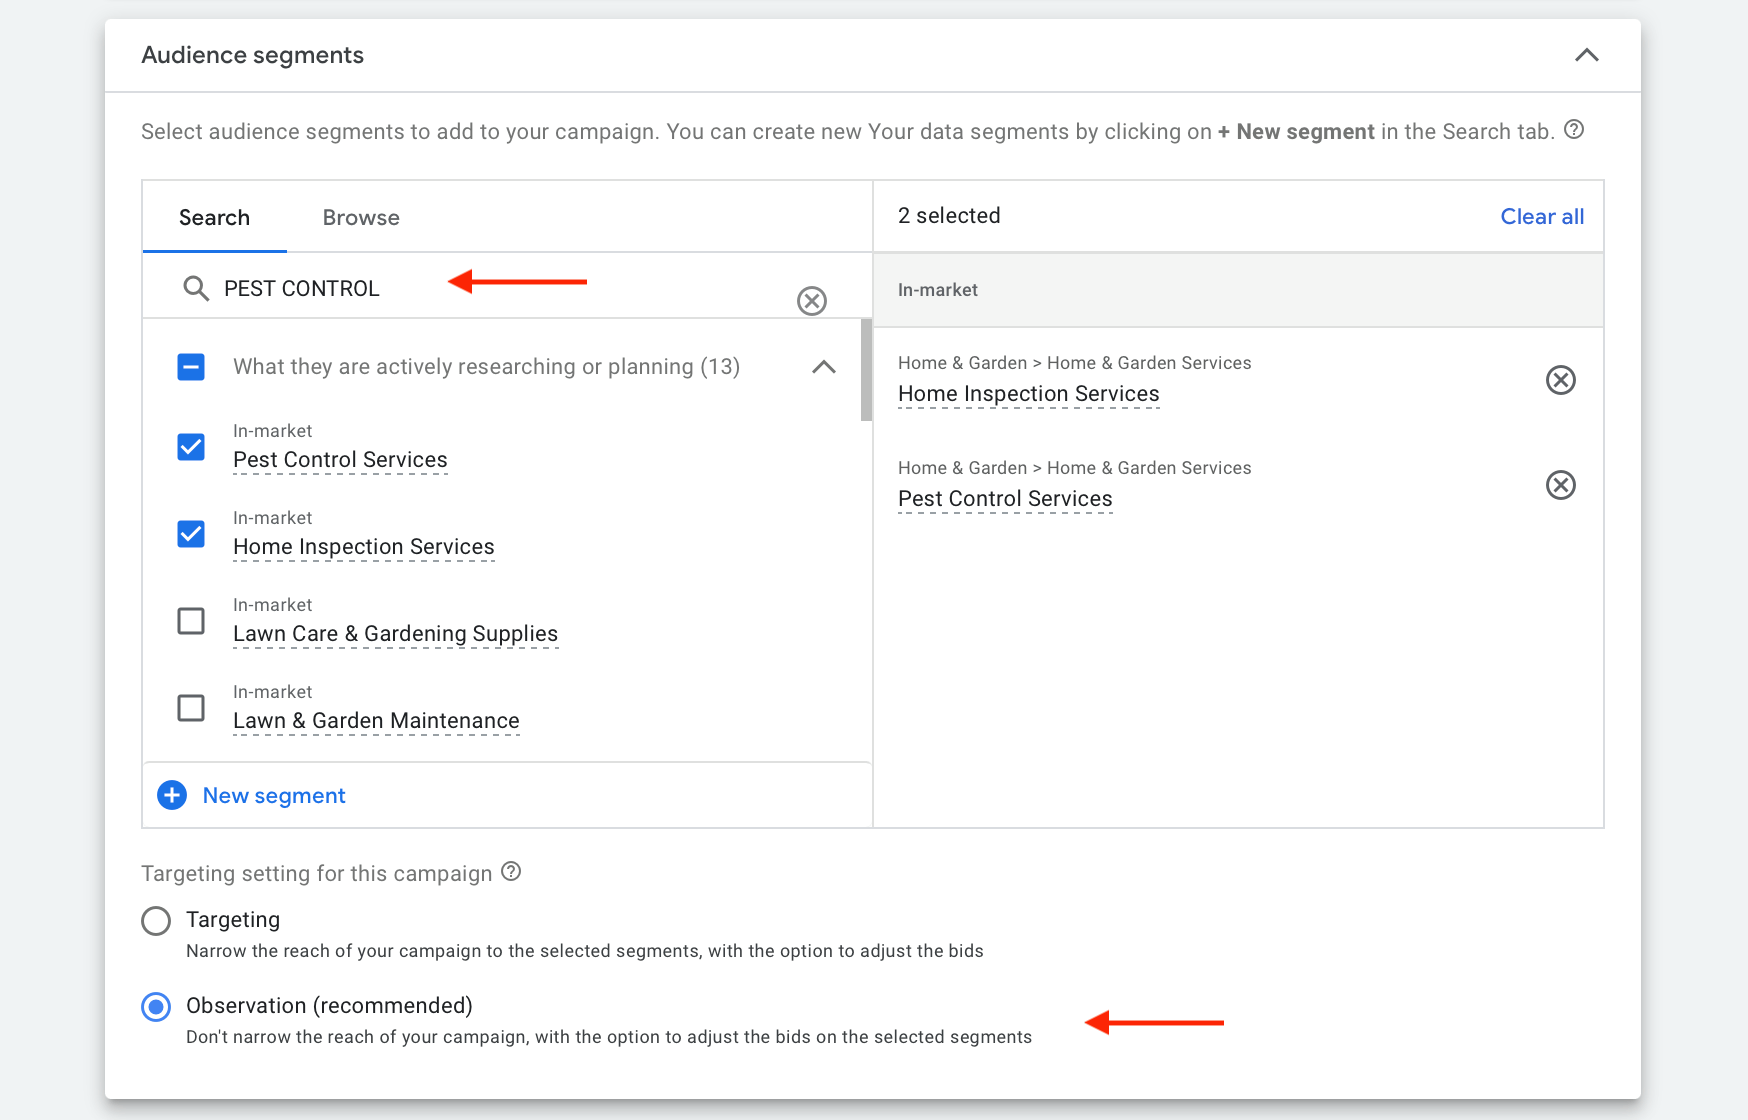
First up, set up your audience segments. Type in the industry of your business, for instance, Pest Control, and options will show up for potential audience segment settings. In this example, we can select Home Inspection Services and Pest Control Services. Audience segments allow your ad to target users who are looking for products or services within the industries you’ve selected.
You want to make sure that Observation is also selected. This ensures that your ad won’t narrow its reach, and it can work simultaneously with other targeting strategies you may implement in your ad campaign.
Location Settings
When you enter into Locations, change the preset to Enter another location. Enter all locations that your pest control services can really cater to so as to not miss out on any potential clients.
Make sure that Presence or interest setting is selected. This helps target users who are regularly or who have shown interest within your target locations.

For a more targeted location setting, select Advanced Search. Using this feature will allow you to target locations using the radius setting, using kilometers or miles.
If for instance, your business is located in Irvine, California and its reach potential is too wide for your business, you can also use the advanced search settings by adding locations, towns, or cities you want your ad to be excluded from showing up to. This change in settings will allow you to target only those in your location.
In short, someone in Dallas with a rat infestation will not be shown your services that are limited to San Francisco. It will save you the hassle of having to explain that you cannot help someone’s situation.

Language Settings
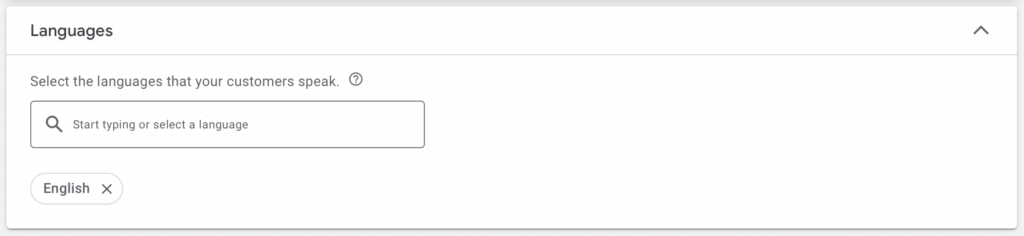
Next, you will be asked to select the Language you are going to use for your Google Ads for pest control campaign. If you or your staff can speak other languages, make a note of it, but do not include it in this campaign.
We recommend you create a separate campaign for each language spoken for a better ad experience for your potential customers. Creating multiple campaigns may seem like a hassle, but this will be incredibly helpful to increase your clientele and track performance.
2.1 Manual CPC and Bidding for Google Ads Campaigns
We will now be going into the Manual CPC and Bidding. Normally, we would recommend you budget at least 40 to 50 dollars for your daily average budget, but this might not work for a Google Ads for pest control campaign.
It is also important to note, that if you decide to stretch your budget too thin and enter a much smaller amount for your manual CPC, you could risk your ad underperforming, meaning it may not give you the results you want, and you won’t have measurable data to analyze what key elements are actually performing well in your ad campaign.
We recommend you schedule a free consultation with us to help you out with your budget.
You will see this later in the guide, but the bidding for keywords is pricier than a lot of other industries. Furthermore, the price is subject to change depending on your location.
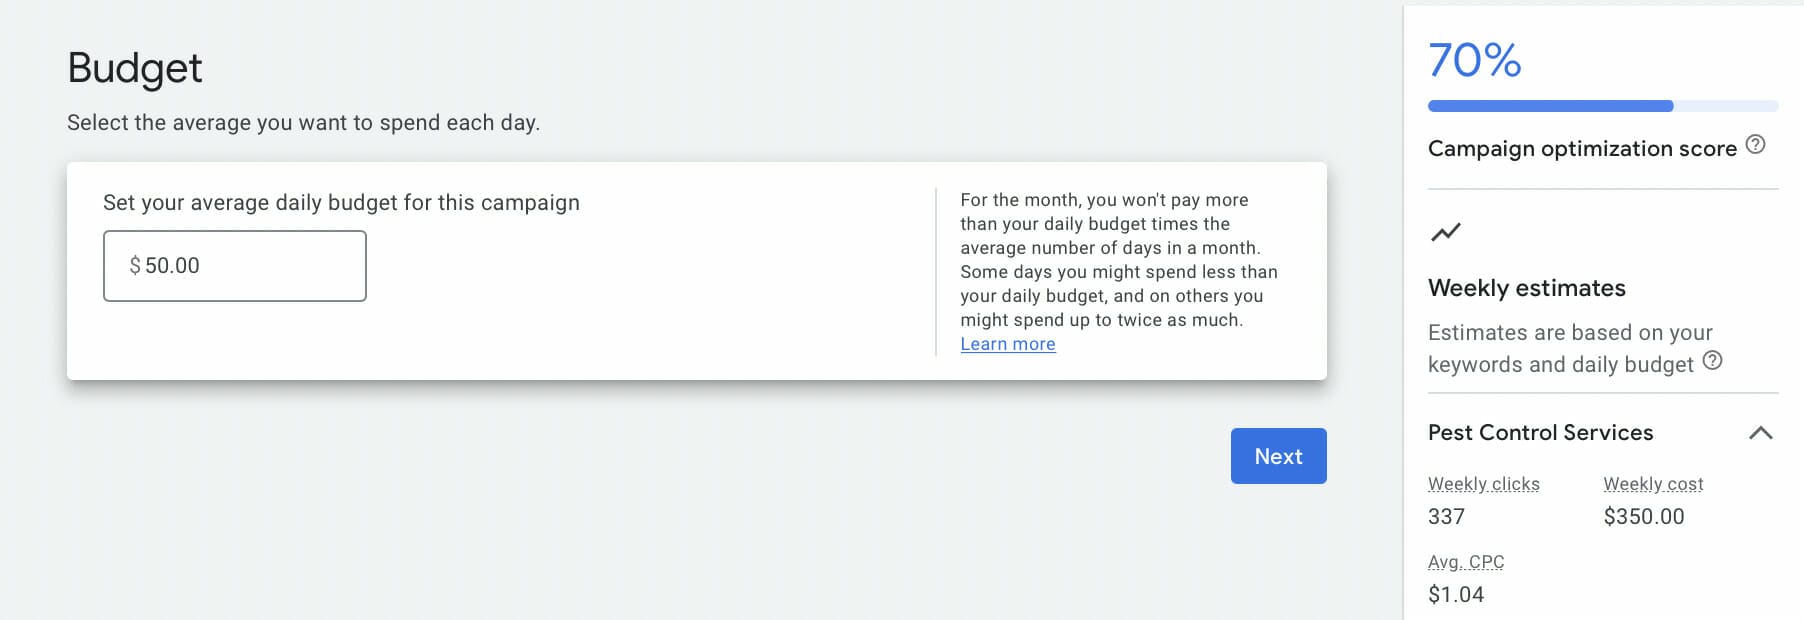
Locations with a larger population will require a higher bidding price, meaning you are going to have to spend more money to have your ad viewed by the public. For this example, we will enter $50 for our manual CPC (Cost Per Click).
When you enter your starting daily budget, Google will provide you with an estimate of weekly clicks, weekly costs, and average CPC that you can expect from your ad campaign. Keep in mind that this is only an estimate and not 100% accurate.
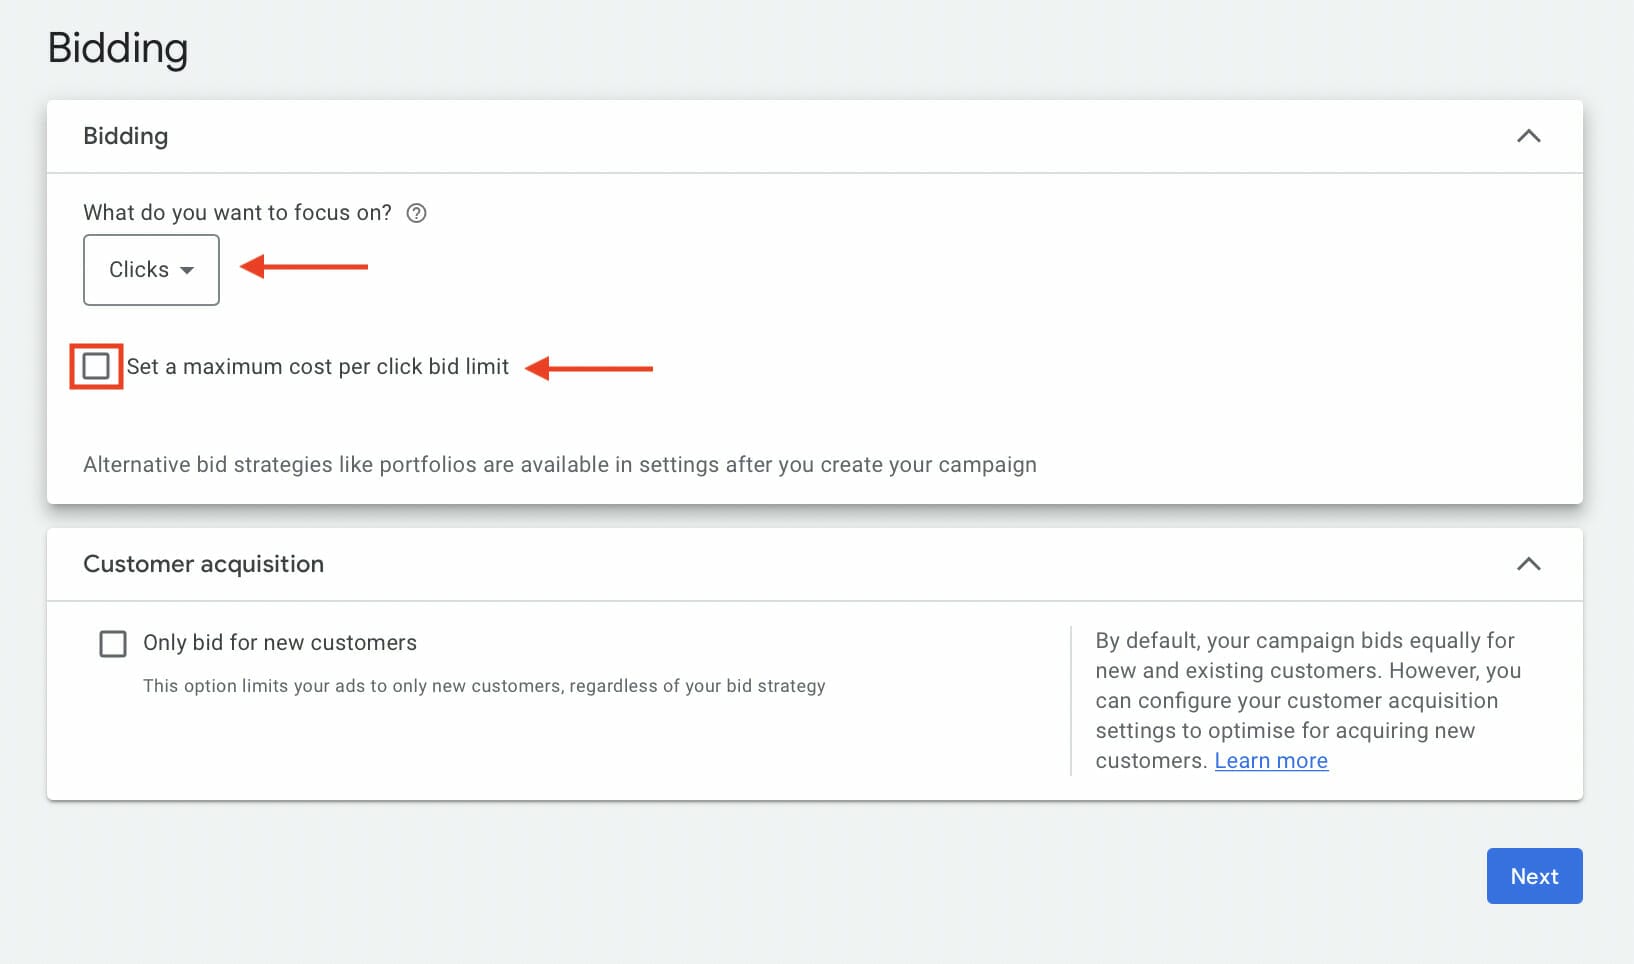
Now, for the bidding settings, set the focus on Clicks. As mentioned before, you should schedule a consultation should you have any issues with setting your daily budgets.
PPC, most commonly known as pay-per-click or cost-per-click, refers to the amount that you will pay each time someone clicks on your ad and ends up on your landing page. You have the option to set a maximum cost per click limit to have more control over your ad spending, but in this guide example, we will leave it unchecked.
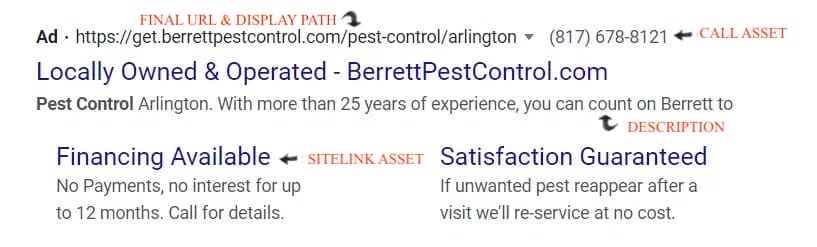
2.2 Ad Assets
Now, we will start working on creating the three ad assets for your Google Ads for pest control campaign.
You will need to create your sitelink assets by entering your sitelink text, along with descriptions for the text and the final URL. This is what will show up underneath your main ad when your services are found through the search engine on Google.
We recommend that you take your service into account when crafting the ad assets.
Say you offer a specialized service for the removal of Africanized bees. This is a service that not many offer because of its high-risk factor.
If you offer this service, you are going to want to highlight that within the sitelink assets. The same can be said for any other specialized service your pest control company has.
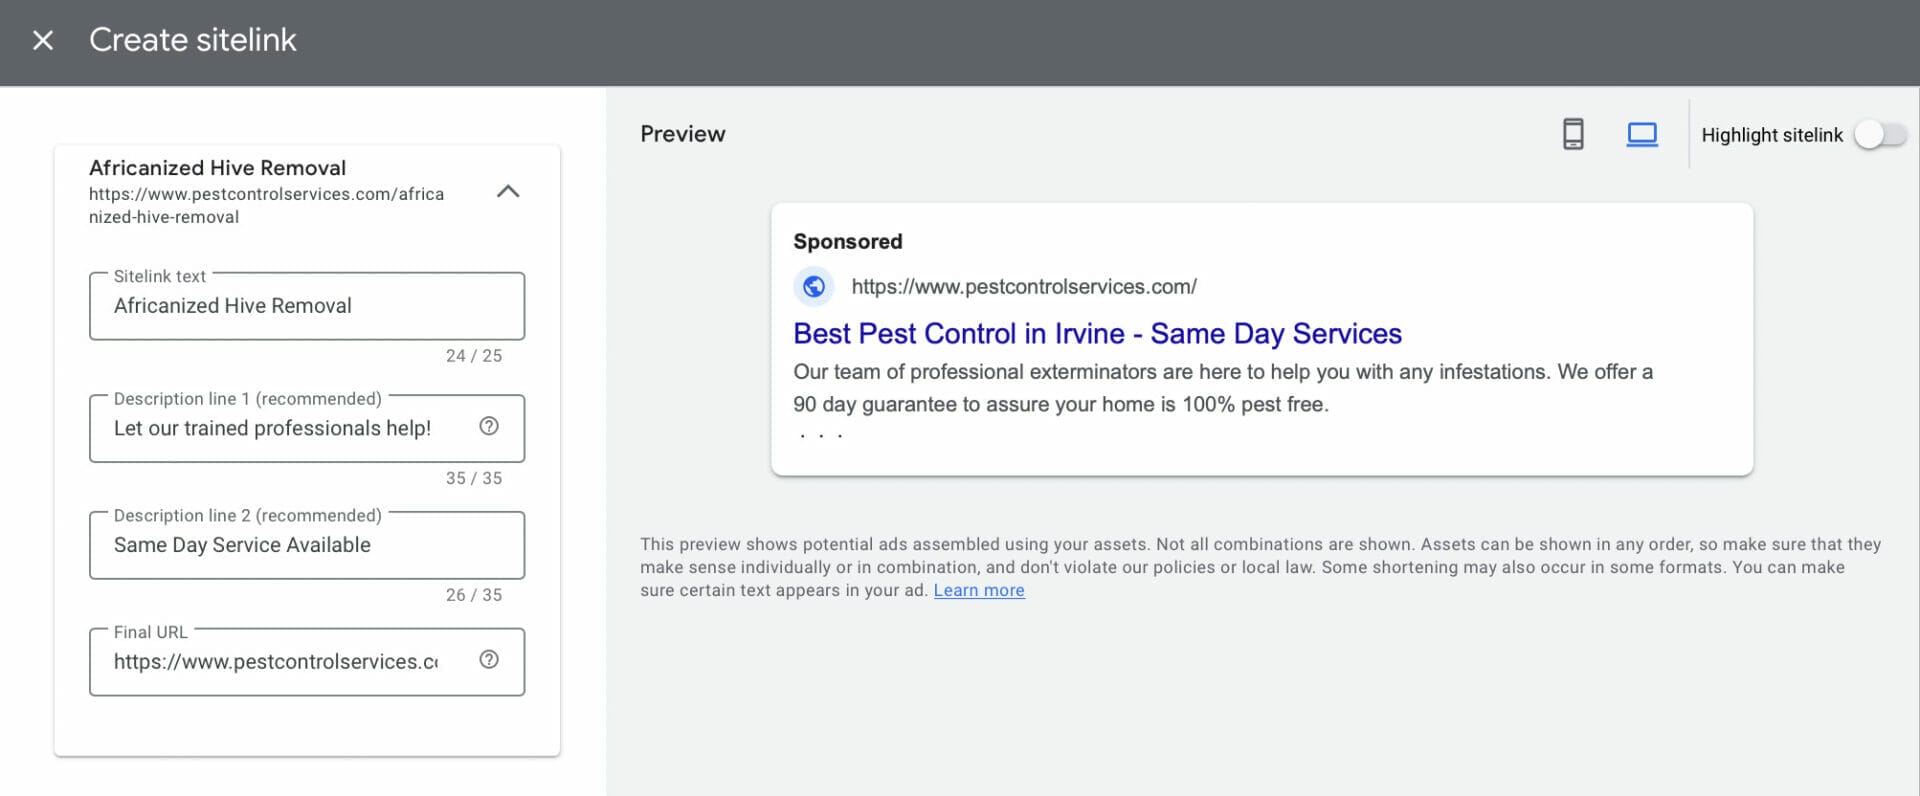
You may notice that Google Ads offers four spaces for sitelinks.
Use them all.
The more space you take up, the more likely people will click on your advertisement. Once you have created all four sitelink assets for your campaign, select them then click Save.

Next, we will get started on the Callout assets. This is another chance to highlight the things that make your Google Ads for pest control campaign stand out from the rest.
Think of all of the services you offer, and write them as callouts. These could be offers such as 24-hour Services. This will show beneath the main URL leading to your landing page.
If you need any help coming up with things that set you apart from the rest, schedule a free consultation with us to help you get started.

Finally, you should add and fill out the Call assets. Just enter the number used by your company and click Advanced Options.
When you hit advanced options, it is critical that you add the date and time that your company is available to take calls. If you do not set this up appropriately, you will miss out on potential clients by not picking up the phone.
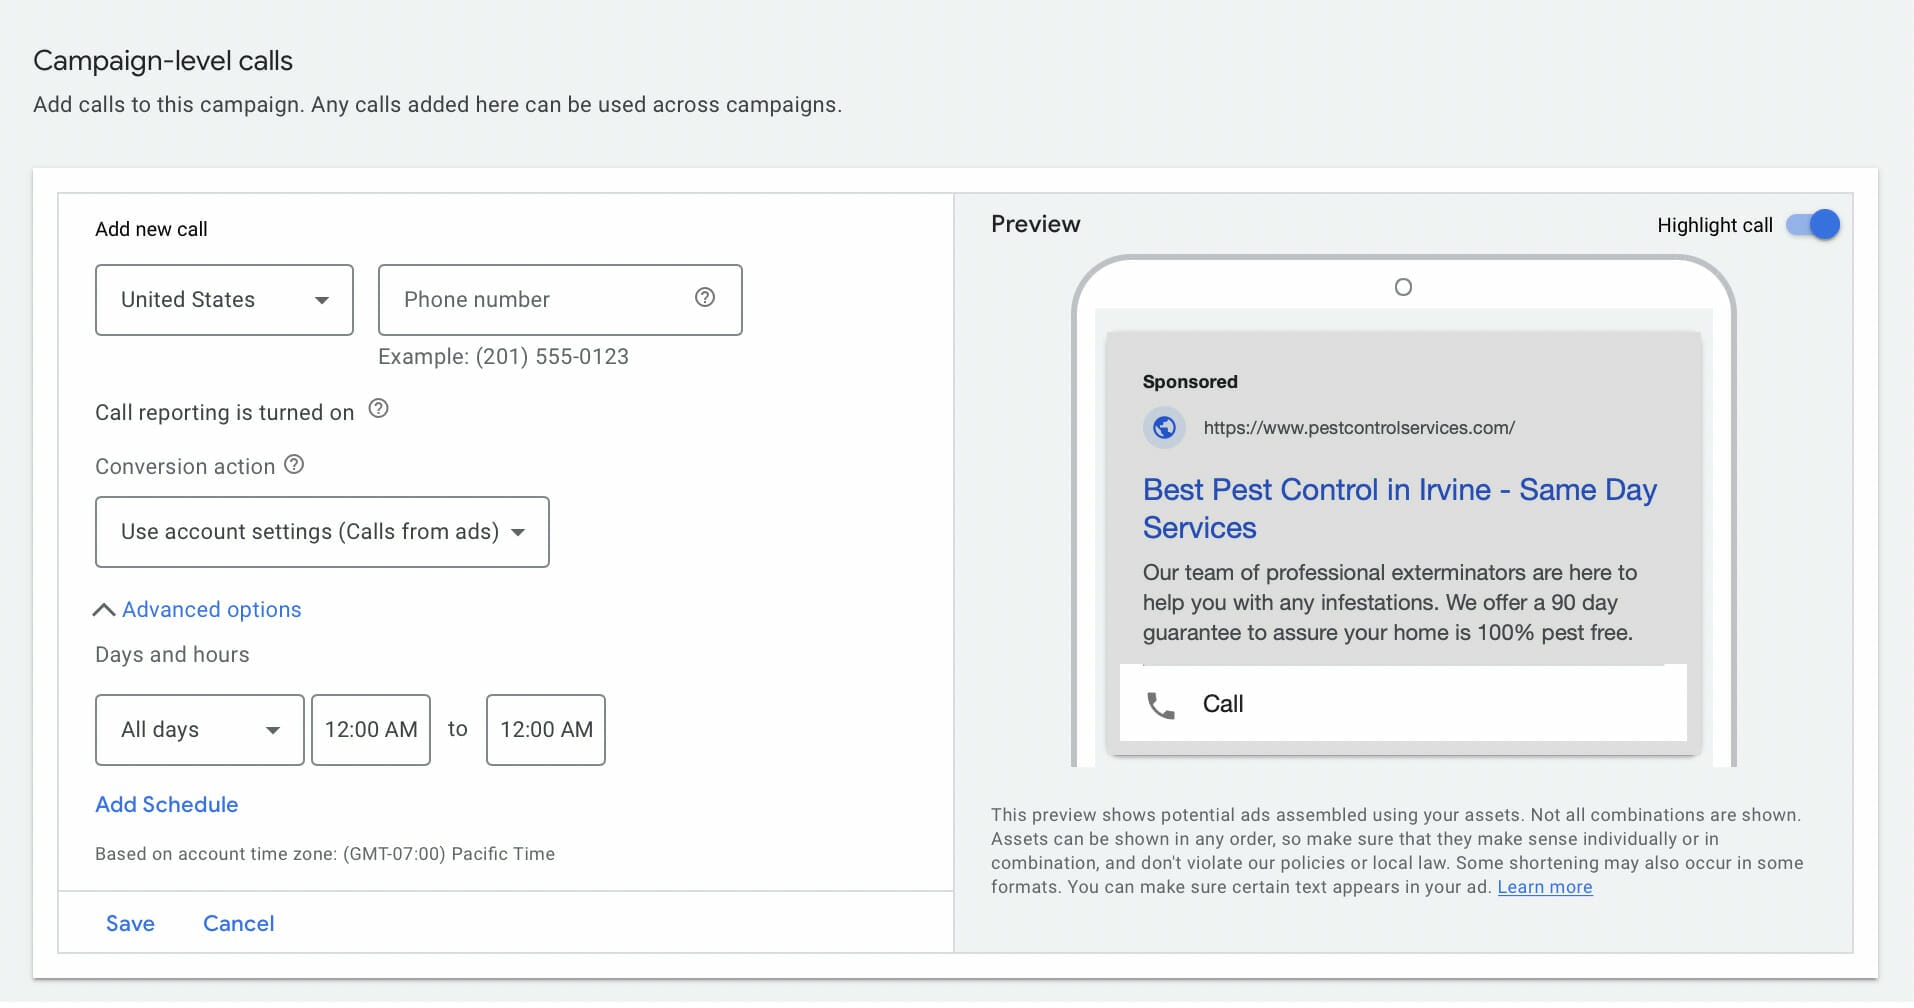
What this setting does is show the number associated with your business alongside the advertisement. Should you choose a specific set of hours for the number to show up with your ad, there will be a brief period of time throughout the day when your number will not be readily available.
This should only occur during those hours that you or the receptionist are not available to pick up calls. The example above shows the settings set for a 24-hour 7 day work week. Save and continue when satisfied with your work.
2.3 Creating Google Ad Text for Pest Control Advertising Campaign
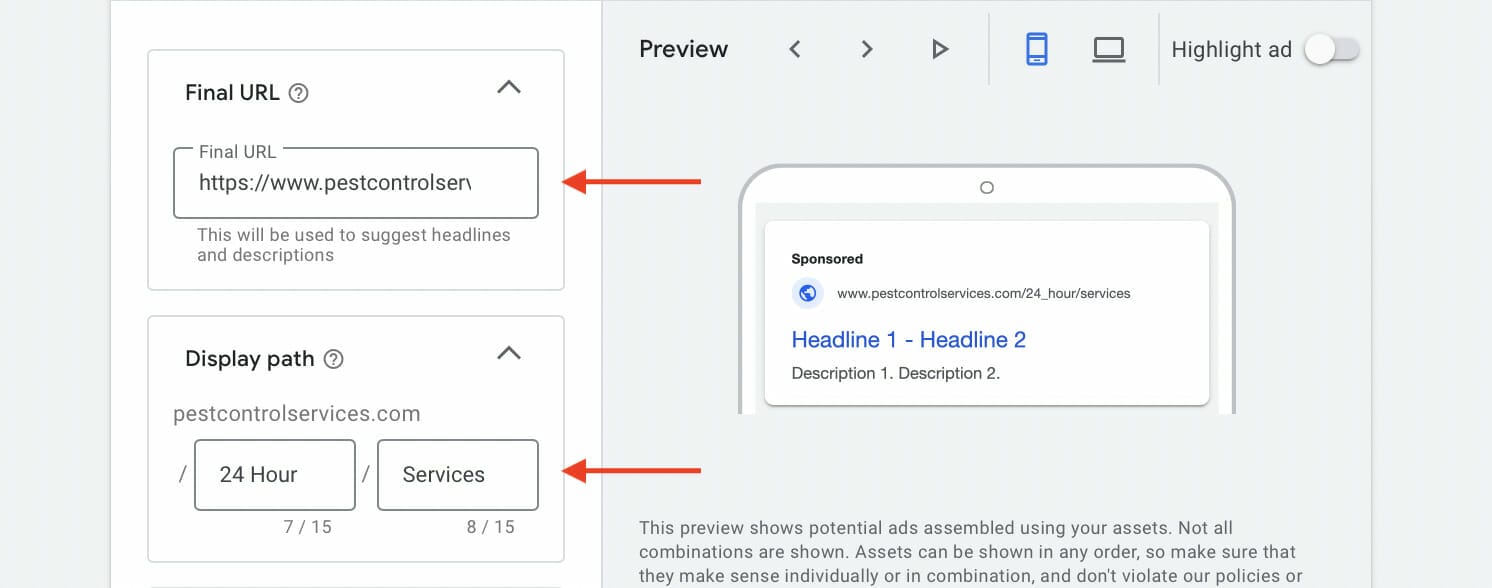
Final URL and Display Path
You’ll begin by entering your URL website as well as what you would like to name your Display path. We recommend you use relevant keywords in your ad groups throughout the entire process to increase the click-through rate.
Headlines
Following the same idea of using a high volume of relevant keywords, write up your headlines. You only have 30 characters, so you want to make it count. Some examples you could use are Best Pest Control in Irvine and Experienced Professionals. Adding your location in headlines assures the user that you are based within their location.
You are required to create 3 headlines, but you can add up to 15 headlines. Since these don’t have additional costs we recommend using as many as possible. Again, keep in mind that you want to use keywords in your headlines relevant to what you are advertising.

Descriptions
Finally, you will need to write up the descriptions. Use as many high-volume keywords as you can while still sounding natural and highlighting the best services your pest control company offers. These descriptions should contain information that can help you stand out from your competitors.

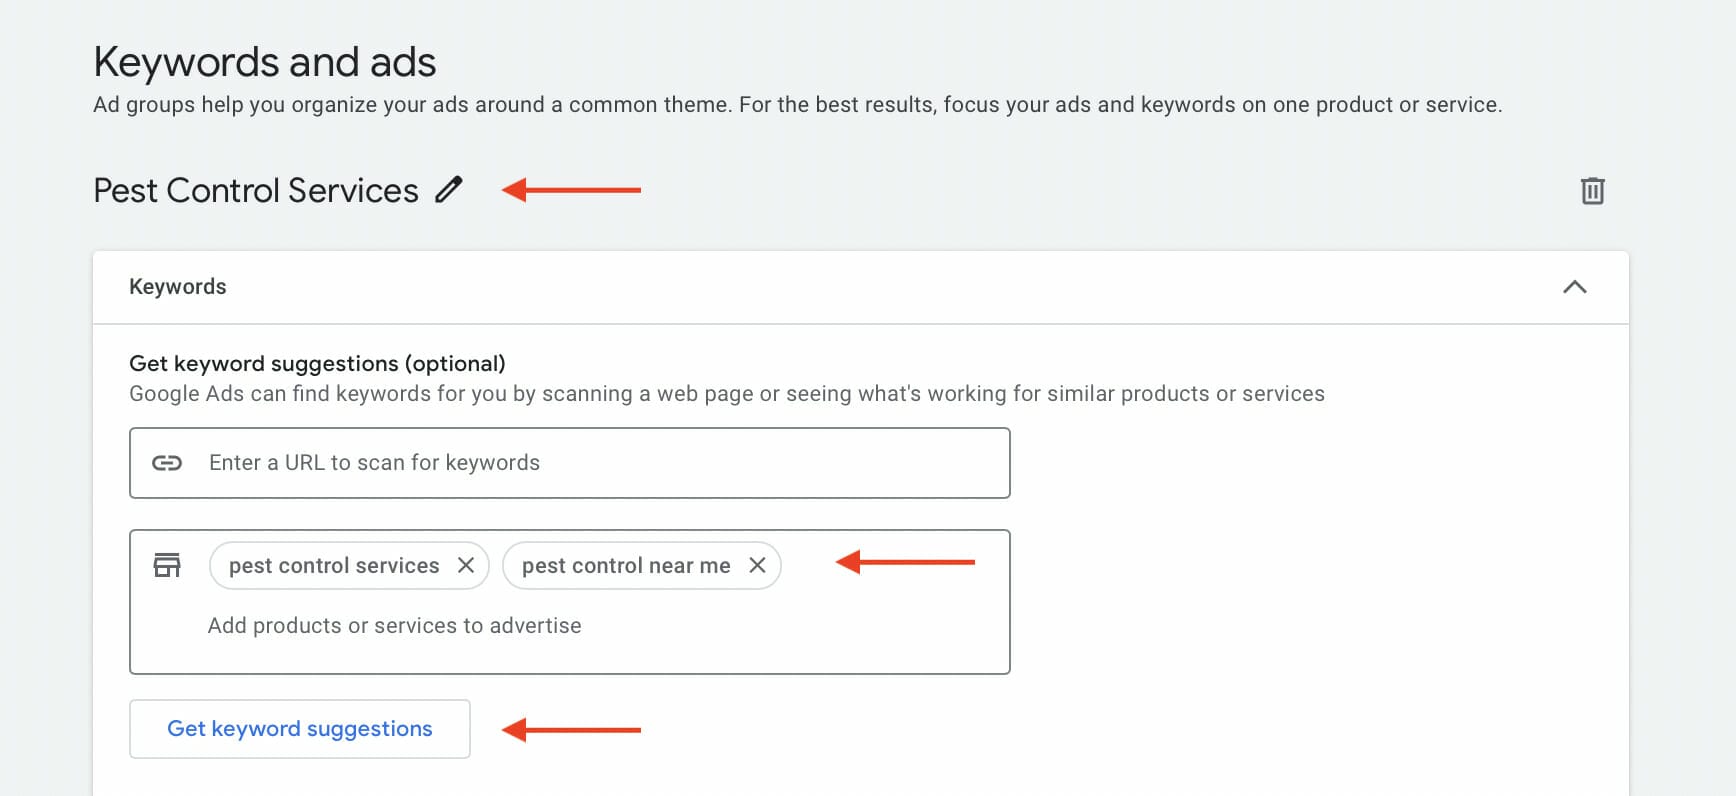
Ad Groups and Keywords
The first thing you need to do is enter your Ad Group title. In this example, we will enter Pest Control Services.
For the keywords, we recommend using buzzwords like “near me” or “in my area” to generate a higher click-through rate. We also recommend that you bid for your competitors’ brand names. This means that people who will be targeted by your ad are in the buying phase and have a chance to choose your business over the brand name.
You can do this by either entering your competitor’s website URL to scan for keywords relevant to your ad or entering keywords such as pest control near me.
Click Get keyword suggestions.
Once you have your keyword suggestions, you want to review them all first and remove any that are irrelevant to your ad or services. When you are done reviewing these, make sure you format your keywords into keyword match types like in the example below.
Formatting your keywords into specific match types allows Google to aggressively or restrictively trigger your ad to show up in a user’s search queries.
There are 3 keyword match types available when advertising on Google Ads. These are Broad Match, Phrase Match, and Exact Match.
- Broad Match types allow your ad to appear in searches that are related to your keywords and these usually have the highest reach.
- Phrase Match types allow your ad to only appear when a user’s query involves key phrases using your keywords, and these are usually in quotation marks ” “.
- Exact Match types are the most specific and restrictive. These allow your ad to only appear using the exact keywords in your campaign, or extremely close variations of those keywords. These will usually be formatted in brackets [ ].

Keyword Research
Keyword research is critical for your Google Ads for pest control businesses to be successful. This is because choosing the right keywords will ensure your advertisements will be seen by users most likely to click.
When you conduct your keyword research for your Google ads for pest control, consider the following factors:
-
Target common pest issues. Brainstorm common pest issues and potential keywords that people are most likely searching for regarding their pest problems.
-
Consider search intent. You will want to target keywords that will signal a strong intent from a user to learn about your services, such as queries like “roach traps”, “pest exterminator near me” and “termite inspection”.
-
Target long-tail keywords. These will usually generate less search volume than short-tail keywords, but they will give you a better chance at conversion since they’re more specific search queries and less competitive.
Once you are happy with your keywords, save the campaign and enter your billing information, and congratulations! You have now created your first Google Ads for pest control campaign.
When published, your ads should look something like this below.
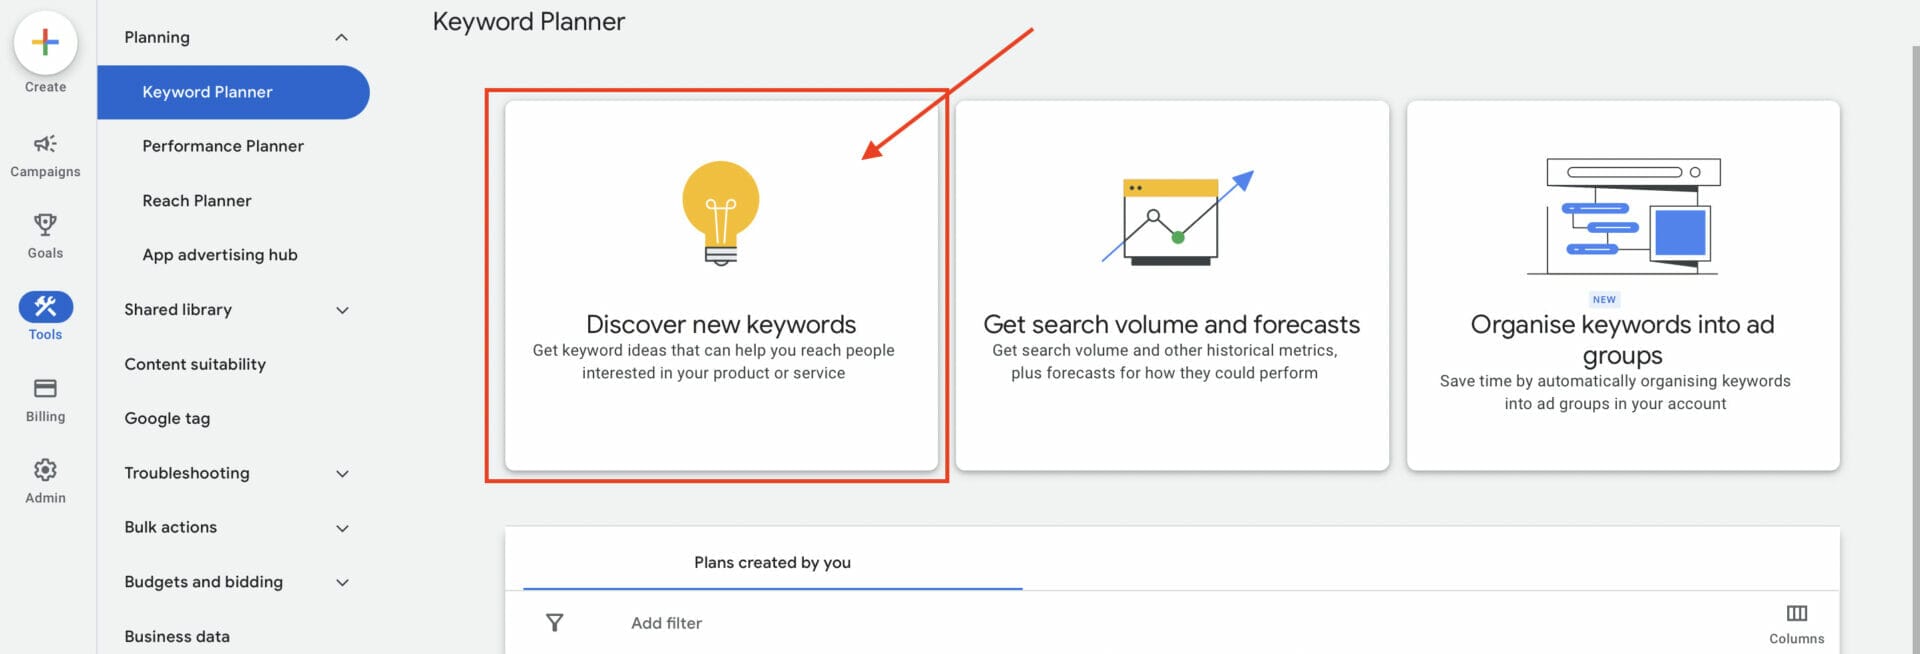
3. Using Keyword Planner for Google Ads for Pest Control
To optimize your Google ads for pest control business campaign, go to Google’s Keyword Planner. You can use Keyword Planner to add and fill in your ad group with relevant keywords needed for a successful campaign.
Click on Discover new keywords first.
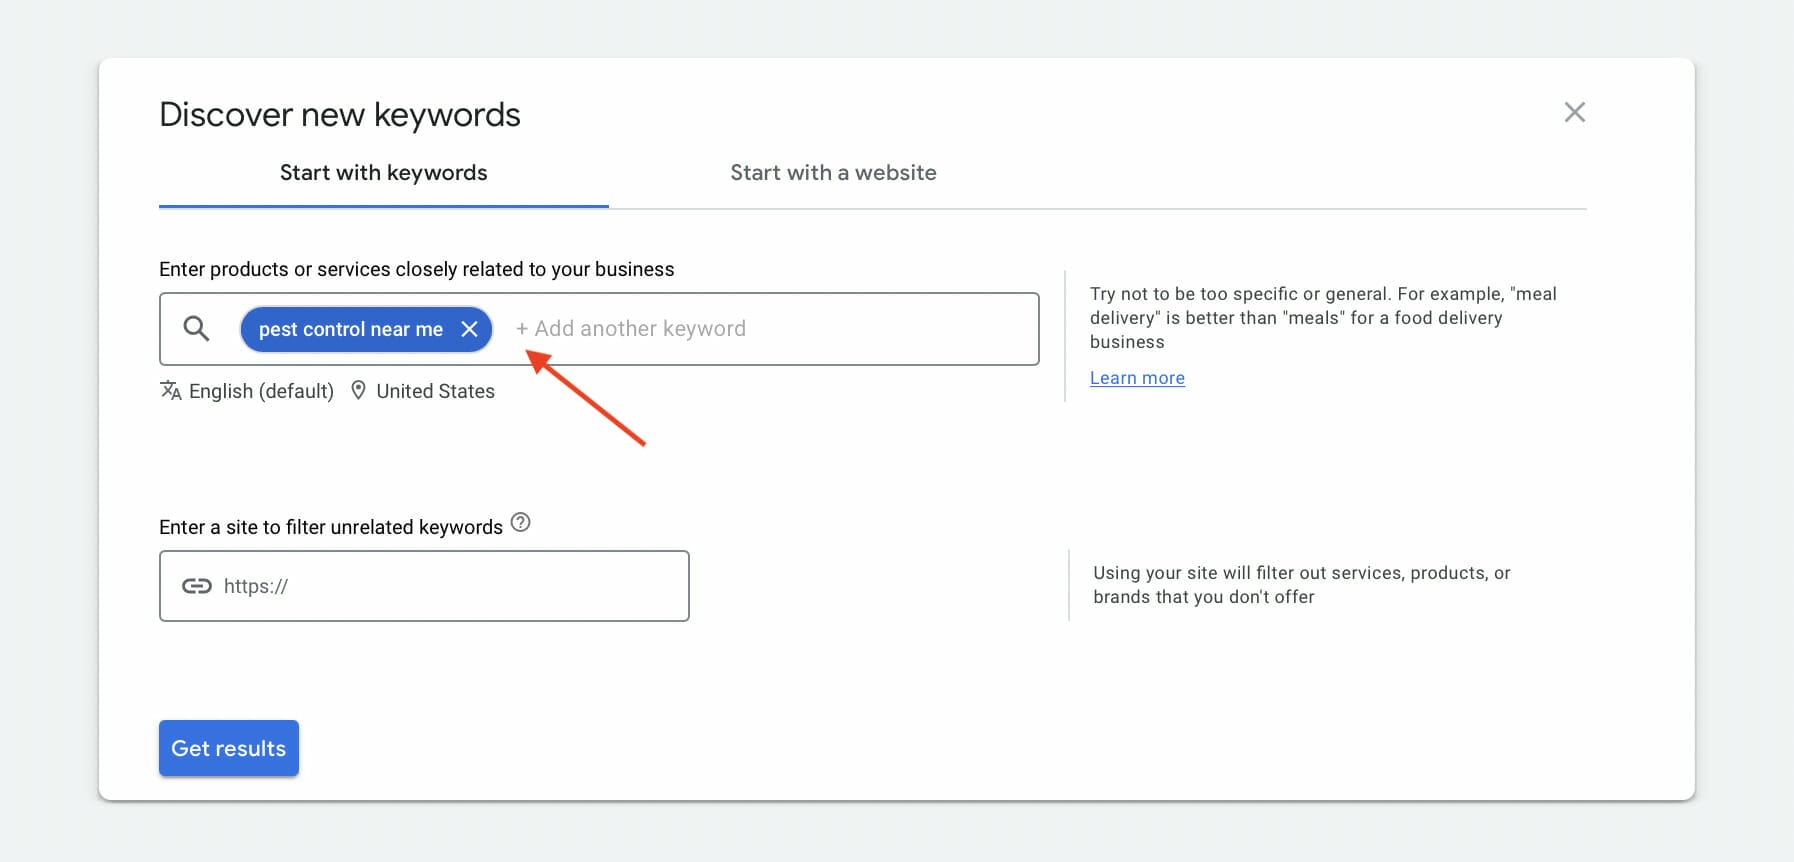
Enter products or services relevant to your business, or key terms that people will usually search for such as pest control near me then select Get results.
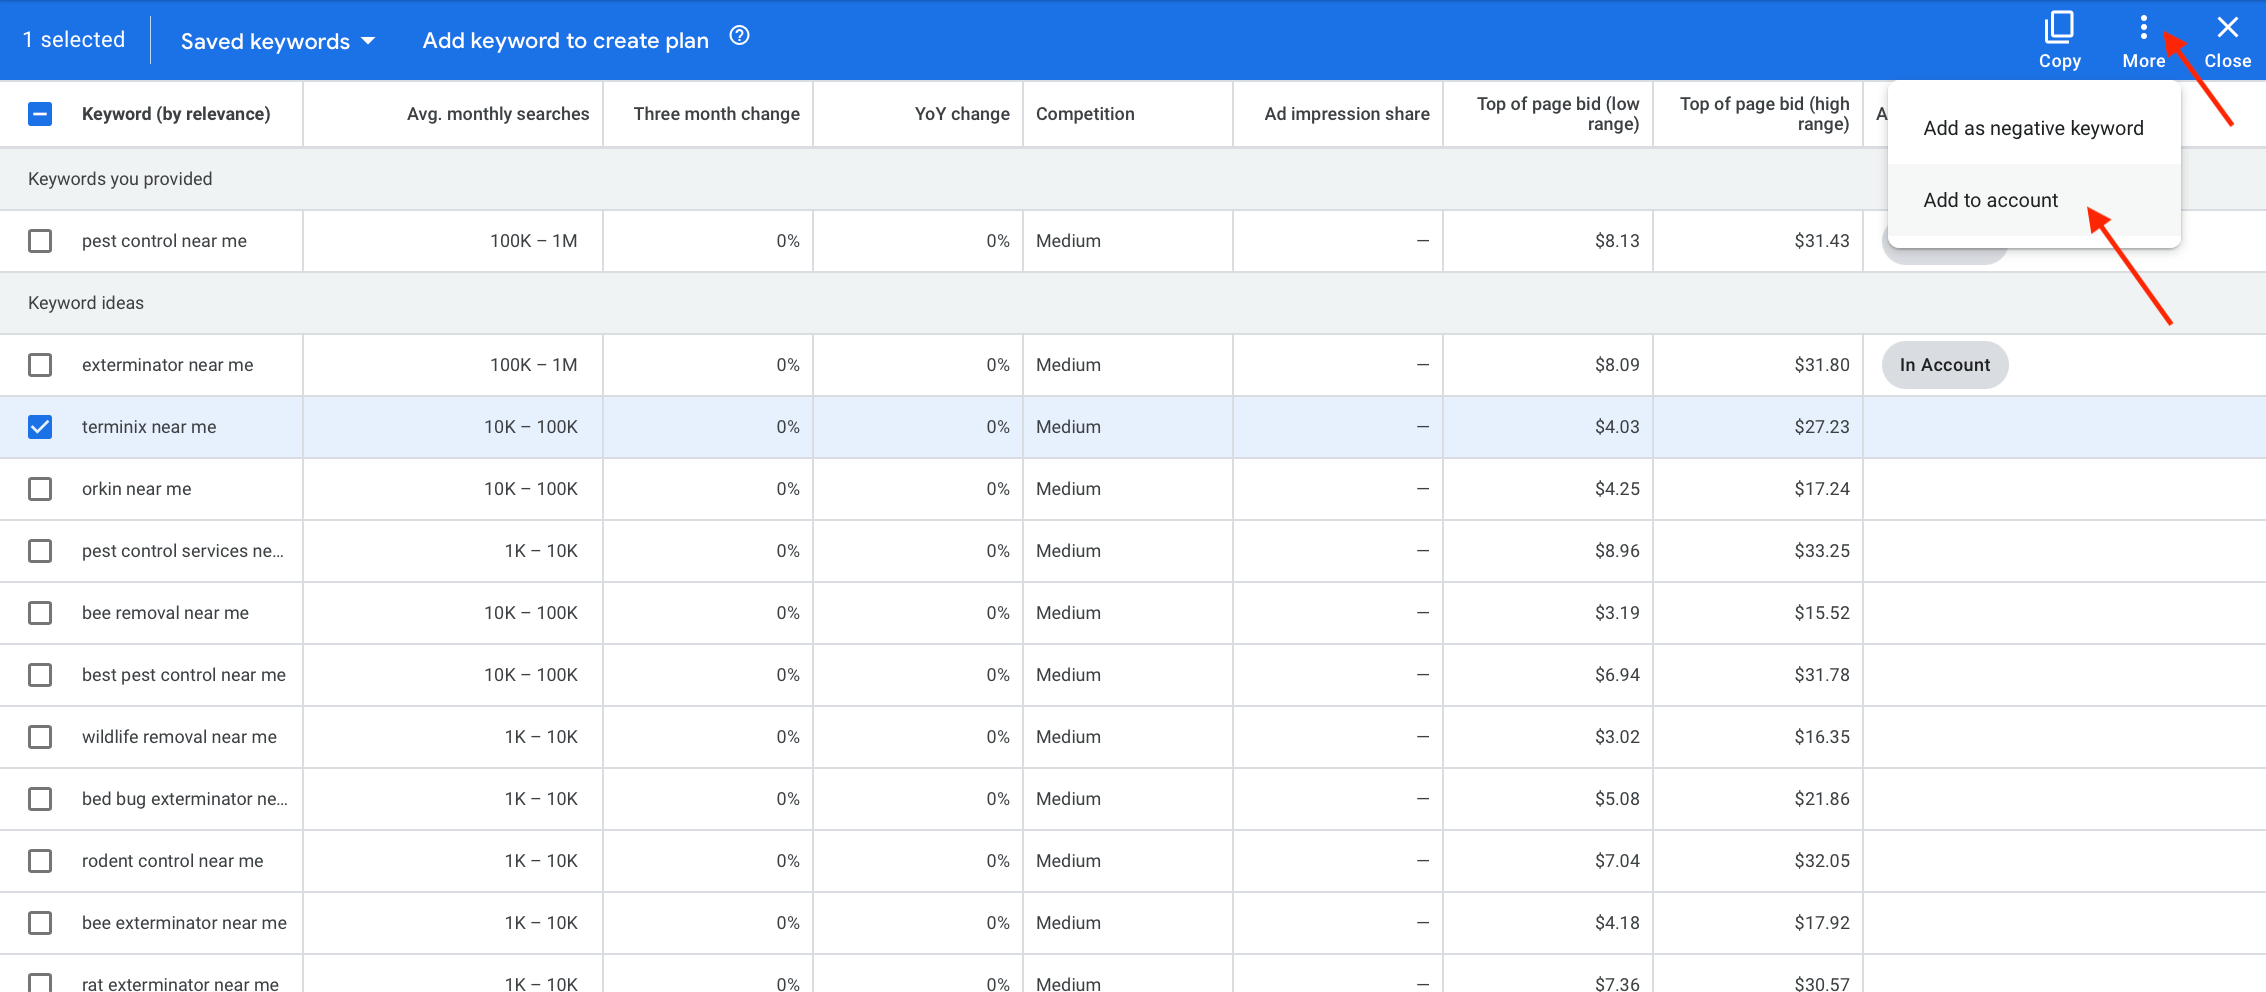
You will now see all the keywords that show up when the keywords pest control near me are used in a user’s search query. You will also find keywords that are already in your account under Account status.
Keyword Planner is a great tool available for Google Ads to see a keyword’s average monthly searches, their competition level, and their top-of-page bids.

To add keywords from keyword planner to your ad group, select the keyword you want, and then click on more to add them to your account.
Negative Keywords
With Keyword Planner, you can also add any keywords as negative keywords for your Google ads campaign.
Negative keywords are another form of keyword match type. They work specifically to exclude your ad from showing up to certain trigger keywords from a user’s search query.
These can be the name of a competitor or words or phrases that are either too broad or highly irrelevant to your ad.
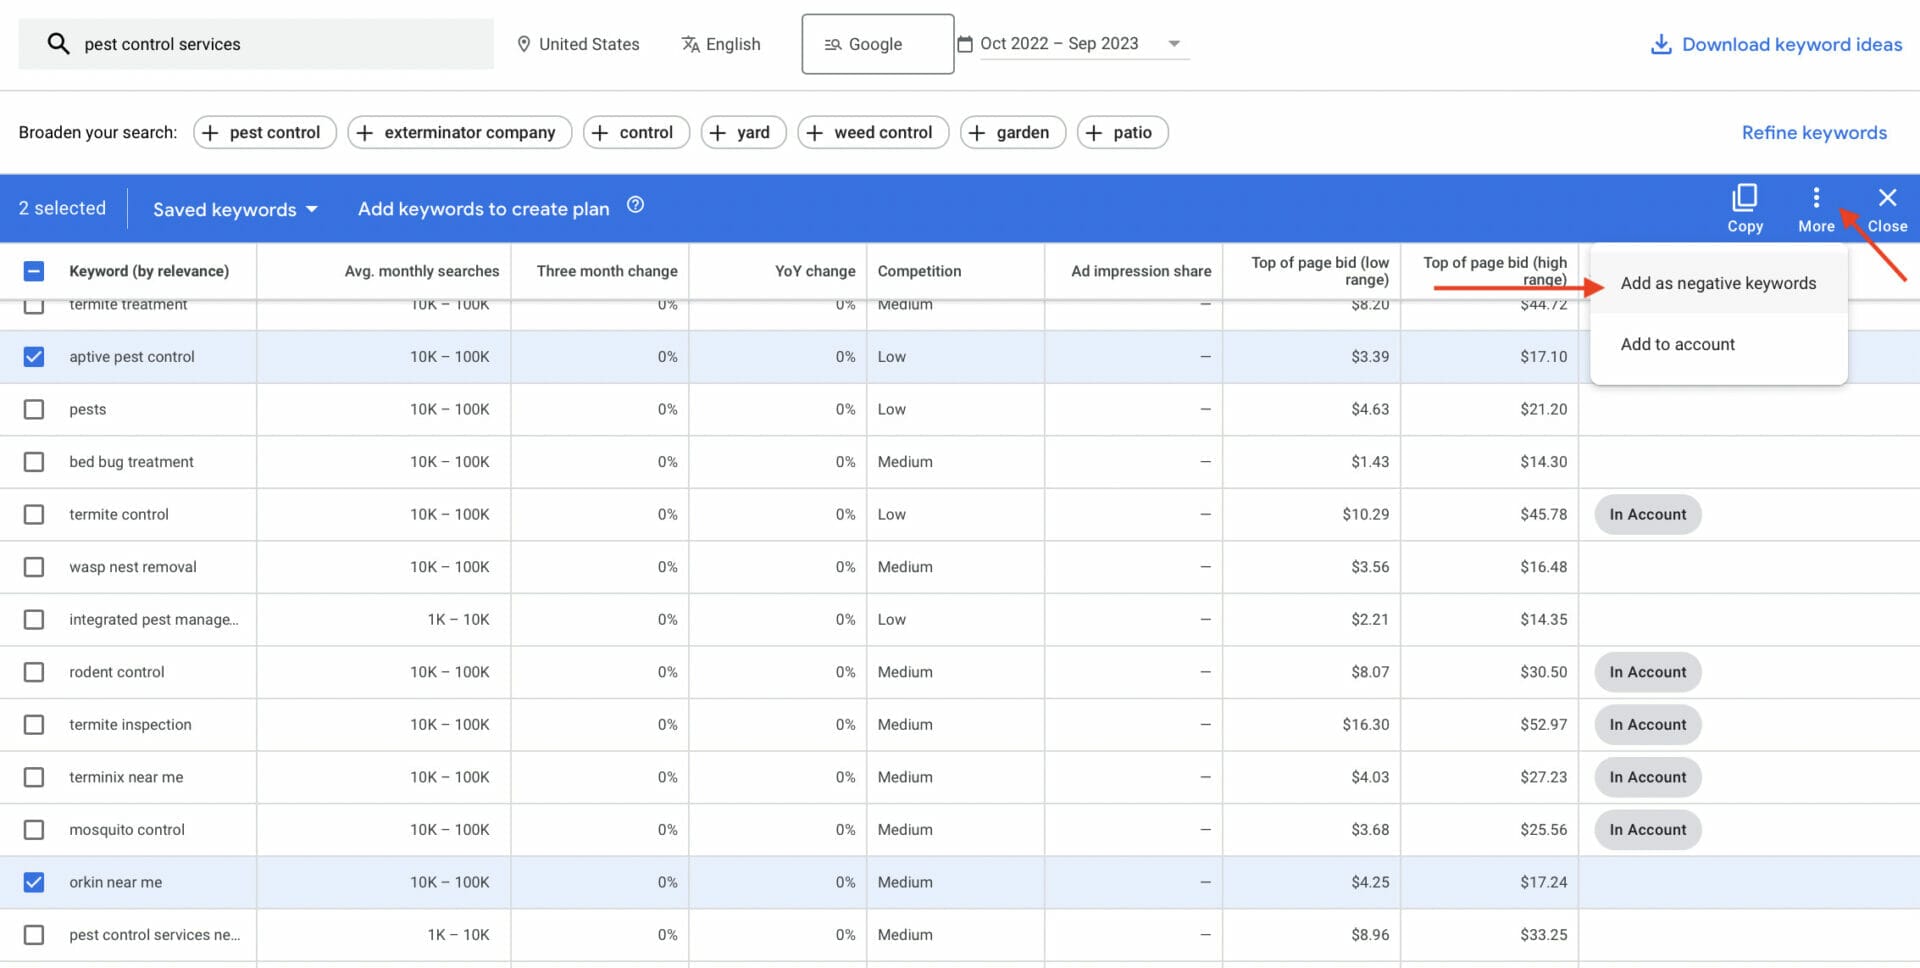
When added as negative keywords, these will be seen and labeled in red, under your account status.

Using negative keywords for your Google Ads campaign helps improve your click-through rate, ensuring that your ads only show up to search queries with more interested impressions (in this case those who are actively searching for your services such as immediate pest control service).
When used properly, negative keywords reduce the number of wasted clicks. As a result, it will lead to more conversions and most importantly, help improve your Return On Ads Spend (ROAS).
As mentioned before, the average PPC for these keywords are in the higher range regarding price because of their competition level, making them very high-intent keywords. On average, for one click you could be paying $41. This could be due to a myriad of factors such as your location, the average price of services, and the demand.
Be prepared to spend money to make money.
We will discuss a tactic to lower this price later on in the guide. Create as many ad groups as necessary to your Google Ads for pest control campaign then save and continue.
4. Adjusting Your Landing Page for PPC Purposes
The landing page is another critical part of your Google Ads for pest control campaign that is not typically addressed.
Though your campaign ads may be filled with keywords that increase relevance to the service, the same needs to be said for your landing page.
Just like in your actual Google ads, you want to include a high volume of keywords in your landing page in a natural way that attracts potential customers to both choose and recommend your services.
Below is an example of a landing page that uses keywords to increase both relevance and click-through rate. It also uses key elements needed for an effective landing page that encourages and convinces the website user to purchase your product or make an inquiry through interaction points such as making calls or booking an appointment.
The example below also uses a unique selling proposition of their business being an award-winning pest control company, key benefits of the service, along with a CTA Call button, and trust indicators from accredited companies that guarantee the quality of their services.
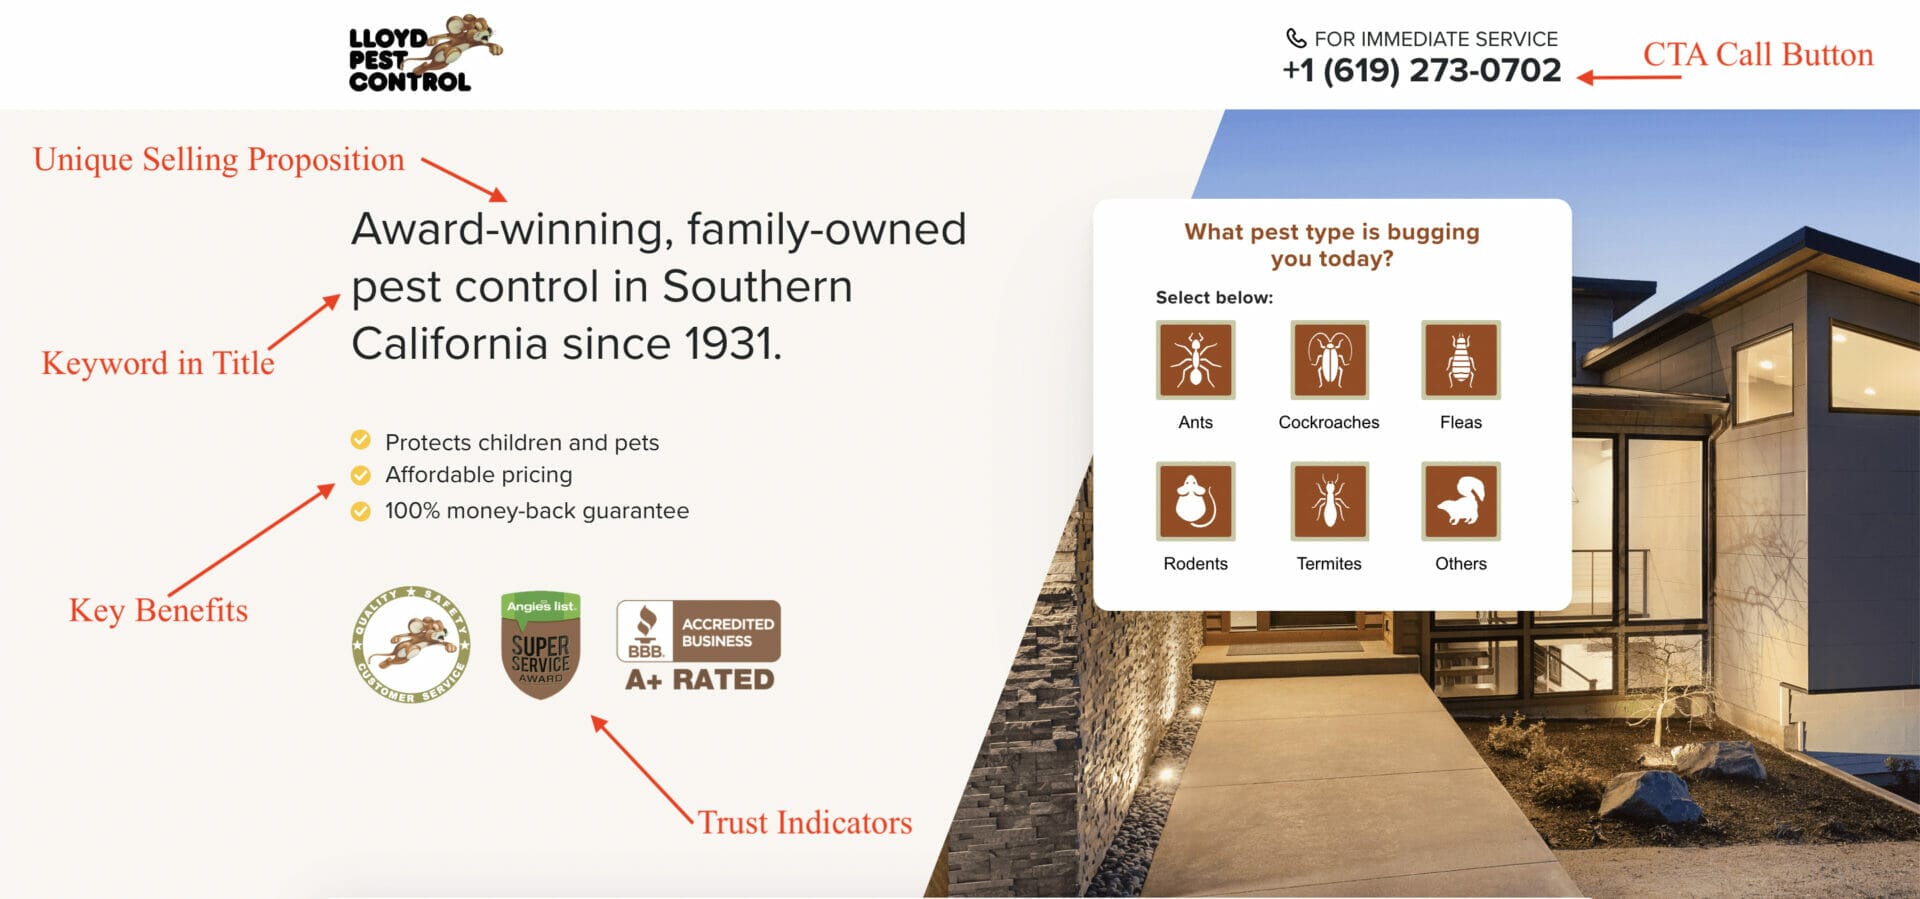

As we scroll down the landing page, we can see CTA buttons throughout the page, with each being customized for specific pest control needs the user may have.

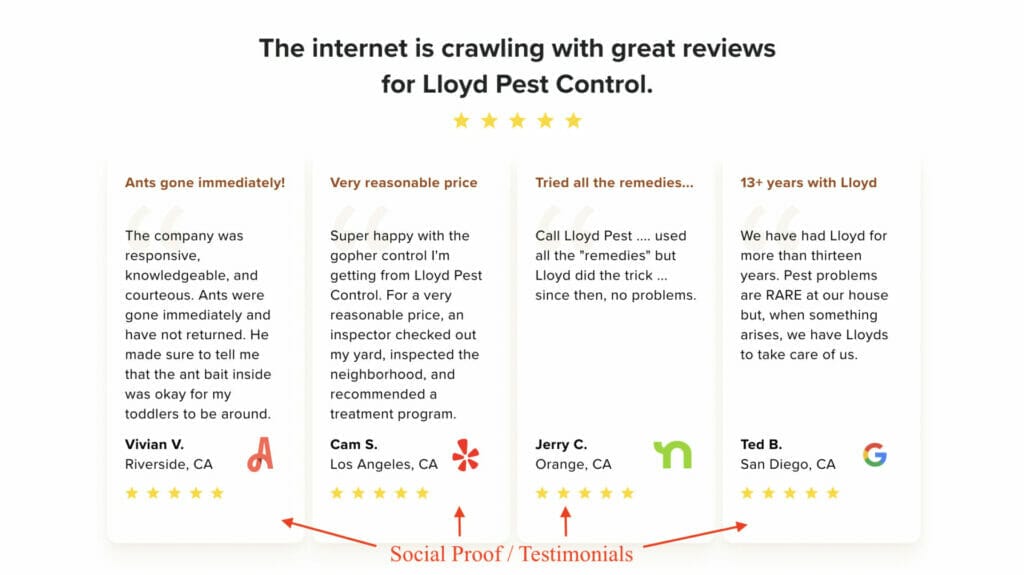
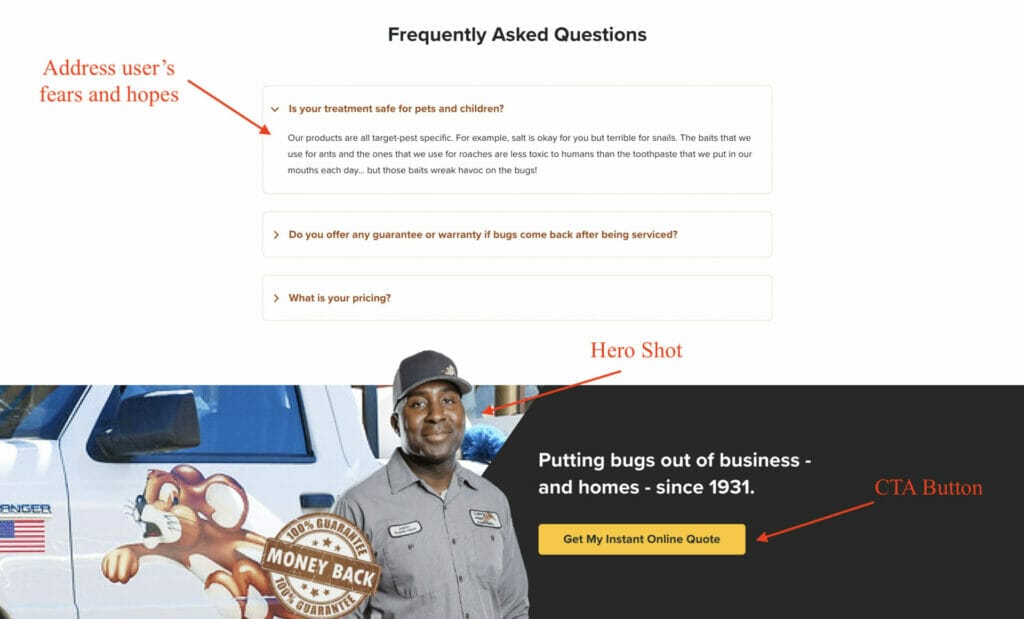
Hero Shots are effectively used to visually convey the service being offered, along with the expertise from years of experience. The key benefits of this service are also reinforced with supporting copy and plenty of social proof or testimonials from previous customers.

For the landing page of your pest control business, you want to implement plenty of key elements that make a good landing page effective for better conversions, just like the example above.
Keep in mind that apart from key elements you need to include in your landing page, you want to also address a user’s fears and hopes, by providing solutions to their problems regarding pest control, and earn their trust, which can be done through social proof or testimonials, and trust indicators.
Need assistance optimizing your landing page for better conversions?
5. Increasing Your Quality Score Through Keyword Relevancy
When making a Google Ads for pest control campaign, there are multiple factors that contribute to the overall success of the ads.
One of these factors is the quality score, and as mentioned before, this can also help lower the PPC. It can ultimately lead to saving a few dollars while increasing your ad and click-through rank.
The equation for the PPC is as follows.

Increasing your quality score decreases the price therefore it is critical that you do everything possible to increase your ad’s quality score. For more information on how Google ads ranking works.
6. How to Review the Results of Your Google Ads for Pest Control Campaign
To further optimize your campaign in the future, you will need to set up Google Analytics. Remember that this might not be helpful at the beginning of your campaign, but in the future, you will rely on this almost every day.
Go into the Tools & Settings in your Google Ads for pest control campaign and hit Conversions. Hit the large plus button on the page to get started.
You are going to be setting up multiple methods of campaign tracking, but for this example, we will focus on Phone calls. This is because this is going to be the main point of contact between you and your potential clients.
This process is more difficult than setting up a Google Ads for pest control campaign, so we recommend you use the free consultation to your advantage.
Need help with campaign optimization?
![]()
For the purposes of this guide, we will be selecting the option Calls from ads using call extensions or call-only ads, but you should go back in and create a tracker for each of the options shown.

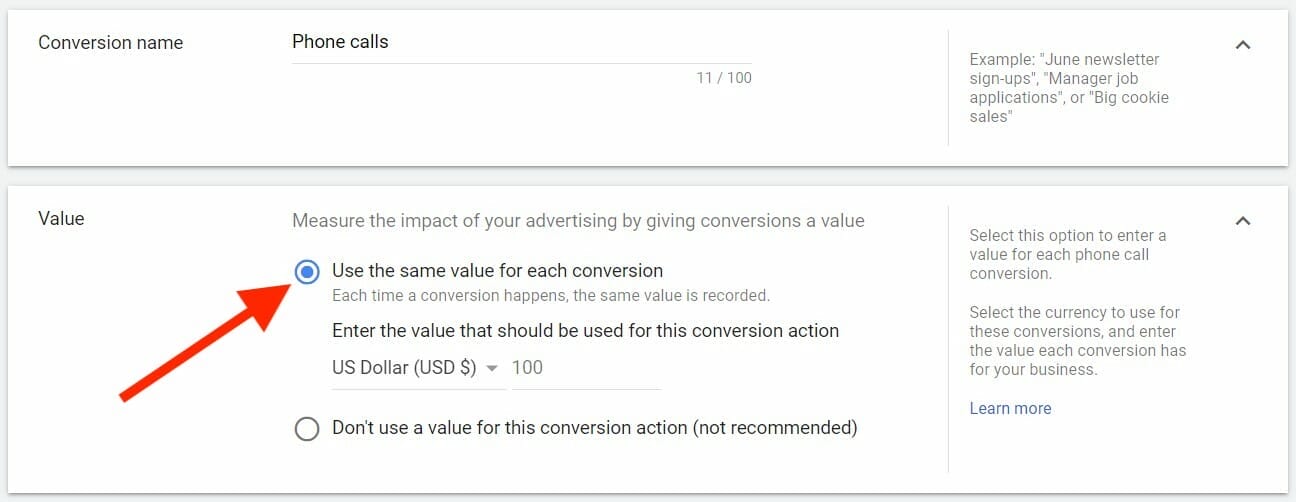
Hit next and title the conversion.
As for the value of the conversion, this will be based upon the price of your services, so it is up to your discretion. For this example, we used $100.
Next, you will choose how many conversions to count per interaction. Hopefully, your pest control company will only need to be called one time per household to rid of the infestation, so we will select One.
Ignore the next few settings, as the preselected options will work for your Google Ads for pest control campaign.
Hit create and continue.
Hit Done.
Congratulations! You are now able to track phone call conversions for your Google Ads for pest control campaign.
7. Estimating Ad Spend for Keywords in Your Campaign
Based on what we have seen so far for the keywords, the PPC is going to be expensive even with a high Quality Score.
If this is something that turns you away from Google Ads, we heavily recommend you reconsider.
If you are feeling put off by the price, we encourage you to schedule a call with us and consider the information below.
7.1 Using the Ad Spend Equation
The equation that we will show below will show you the cost per conversion. This is different from PPC because it takes into account the action taken to secure your services.
We will tweak the numbers below to reflect a Google Ads for pest control campaign.
We will give two examples: one for a low-price service keyword and one for a high-price service keyword.
Here is the price per conversion when using the keyword “exterminator near me.” This is a keyword in the higher bid range.
$34 CPC x 10 (Conversion Rate) = $340 per customer
Here is the price per conversion when using the keyword “groundhog removal near me.” This is a keyword in the lower bid range.
$60 CPC x 10 (Conversion Rate) = $600 per customer
For the CPC, this is the average that Google Adwords charges for the keyword mentioned in the area. The Conversion Rate comes from how many clicks generate an actual purchase of your services.
We estimate the Conversion Rate to be 10%. This means that for every ten people who click on your ad, one person is going to follow through with a purchase.
In sum, the price of investing 600 dollars per conversion may seem expensive, but using the Customer Lifetime Value can help put things into perspective.
7.2 Estimating Customer Lifetime Value
Say you have a customer who needs termite fumigation, bed bug extermination, rodent removal, and flea extermination over the course of four years. On the higher price end, it can be $13,900 to perform these services. This makes the average yearly revenue $3,475.
We will use this number to plug into the Customer Lifetime Value equation below.
CLV = (Yearly Revenue x Retention Rate) – Ad Costs
Using the average of the ad spend above, we find that the CLV is $13,430.
That is almost 29 times the initial investment.
If this is something that you would like to learn more about, schedule a free consultation with us today.
8. Key Takeaways
Overall, using Google Ads as part of your marketing strategy will help you reach your target goals using online advertising.
Google Ads will help you gain measurable data that will continue to give you new customers consistently. It will also help your pest control business grow and further succeed. With the right team and the right management and optimization of your Google ads, rest assured that you will experience a higher return on investment.
We’ve helped thousands of our clients achieve their target goals with their Google Ads campaigns, so if you are in doubt or you need a team to help you with your Google Ads campaign, check out Yoyofumedia’s success case studies or book an appointment with our friendly team of experts!

