Want to increase product performance and higher ROAS? In this guide, we’ll teach you how to create custom labels in Google Merchant Center.
Optimizing product visibility and performance is necessary for e-commerce marketing success. Custom labels within Google Merchant Center offer a strategic advantage, allowing merchants to customize their product listings for better segmentation. Whether you’re aiming to enhance targeting, optimize advertising campaigns, or simply improve overall product performance, making use of custom labels is important.
Want to improve your Google Ads performance through custom labels?
What Is A Custom Label?
Custom labels In Google Merchant Center allow merchants to categorize and organize their product data according to their specific criteria. These labels are customizable attributes assigned to products, enabling merchants to group items based on factors such as product type, seasonality, margin, performance, or any other relevant metric for their business.
Custom labels provide a flexible way to segment and manage inventory, facilitating more targeted advertising campaigns, bid adjustments, and performance analysis. By assigning custom labels to products, merchants can gain deeper insights into their product catalog and optimize their online presence to better meet the needs of their customers.
Ways you can segment using custom label
If you’re not sure what to use custom label for, here are some examples that you can apply to your products.
- Profit Margin – If you have specific products with a higher profit margin, then you can set custom labels for those products. That way, you can focus your optimization on those products that give you the most profit. The bigger your margin is, the more it can afford to have more ad spend for a sale.
- Price – If you have higher-priced products, you can set custom labels for those items. This way you can make a lot more profit on higher-priced items.
- Seasonality – Some products have higher demands depending on the season. For example, you set custom labels for Christmas products, this way, you can push your Christmas-related products during the holiday season.
- Popularity – You can determine this from your past data, but the amount of data should be enough to make conclusions. Once you determine your most popular products, you can set a custom label for them and push those products by increasing their bids or applying other optimization strategies.
- Your Own Metric – You can set custom labels based on your own metric. It can depend on the nature of your business and other metrics you use to determine product success.
Who should use custom labels?
You’ll benefit from using custom labels if you are an e-commerce business that has:
- Large Product Catalogs: If your business has a large inventory of products, custom labels can help organize and categorize items more effectively. This can simplify campaign management and optimization tasks.
- Advanced digital advertising knowledge: Businesses who are actively managing and optimizing their Google Shopping campaigns may benefit from the granularity and flexibility that custom labels offer. They can use custom labels to tailor their advertising strategies based on specific product attributes and performance metrics.
- Specific target audiences: If you are targeting different customer segments or markets, you may find custom labels useful for segmenting your product catalog accordingly. This allows for more targeted advertising and bid management strategies.
Seasonal Products: Businesses selling seasonal or time-sensitive products can use custom labels to categorize items based on seasonality. This facilitates targeted promotions and inventory management throughout the year.
You don’t necessarily need custom labels if you have:
- Limited product catalogs: If you have a small inventory of products, the benefits of custom labels may be minimal compared to the time and effort required to implement them. In such cases, simpler product categorization methods is enough.
- Beginner advertising knowledge: If you are new to Google Merchant Center or digital advertising, youu may find custom labels too advanced or complex to implement. It’s often recommended to focus on learning the basics of product listing optimization and campaign management before diving into custom labels.
- Product catalogs with no variations: Selling a similar range of products may not see significant benefits from custom labels. If products don’t vary much in terms of attributes or performance, custom labels may not provide much additional value.
Deciding if you need custom labels or not should be based on an assessment of your business’s specific goals, resources, and also level of expertise in digital advertising. While custom labels are great for optimization and organization, they are not always necessary or appropriate for every e-commerce business.
Advantages and disadvantages of using custom labels
Using custom labels in Google Merchant Center offers several benefits, but there are also some potential disadvantages to consider:
Advantages:
- Improved Organization: Custom labels allow you to categorize products based on their own criteria, such as product type, seasonality, or margin. This enhances the organization of product data, making it easier to manage and optimize campaigns.
- Targeted Advertising: Custom labels enable more targeted advertising campaigns by allowing you to segment their product catalog based on specific attributes. This can lead to higher relevancy and better performance in Google Shopping ads.
- Enhanced Bid Management: With custom labels, you can adjust bids based on the performance of different product segments. This level of granularity allows for more effective bid management and budget allocation.
- Advanced Reporting: Custom labels provide additional data points for performance analysis, allowing you to gain deeper insights into the performance of different product categories and attributes.
Disadvantages:
- Complexity: Managing custom labels requires careful planning and ongoing maintenance. Without a clear strategy, it’s easy to create confusion or inefficiencies in product categorization.
- Time-Consuming: Setting up and optimizing custom labels can be time-consuming, especially for businesses with large product catalogs. It may require ongoing adjustments to achieve good results.
- Limited to Google Merchant Center: Custom labels are specific to Google Merchant Center and may not be applicable or transferable to other e-commerce platforms or channels. This can limit their usefulness for businesses selling across multiple channels.
- Learning Curve: If you are new to Google Merchant Center or digital advertising, custom labels may involve a learning curve. Understanding how to effectively use and optimize custom labels requires familiarity with the platform and best practices.
Need Google Ads Help?
How To Create Custom Labels In Google Merchant Center
Here’s a step-by-step guide on how to create custom labels in Google Merchant Center:
Step 1: Determine which custom labels you need
The first step is to figure out which custom labels to use or if you really need any. You can use these questions to determine which custom labels you need:
Profit Margin: are your margins very different?
Price: do you have widely varying price points?
Seasonality: how seasonal are your products?
Popularity: are some products more popular than others?
Your own metric: do you have great products but poor resupply and you don’t want to push it too hard?
Step 2: Divide products
The next step is to divide your products. If you decide to add custom labels to your feed, you need to start organizing it a little bit. Start by putting it on a spreadsheet so you would have an overview. This will give you an idea of how you can segment your products.

Step 3: Add custom labels to feed
Now you need to add the custom labels to your product feed and there are 3 options to do this:
Option 1: Extra fields in your e-commerce platform (might be labor intensive)
Option 2: Feed rules in Google Merchant Center (gives you more flexibility)
Option 3: Data feed management tools
Which one you choose depends on how you’ve set up your product feed in the first place. If you manually added your product feed, then you can go manual again for custom labels. But if you’ve already invested in a tool, then it will make your work easier.
Option 1: Extra fields in your e-commerce platform
For Shopify, it will be easy. Just go to your Google Shopping products and you’ll see the option to edit Google Shopping fields.
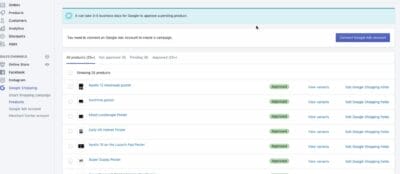
This will take you to a pop-up where you can edit your Google Shopping feed. You should see the custom labels below. Once you’re done, click save and it will be added to the product feed, will be pushed to GMC, and then to Google Ads.
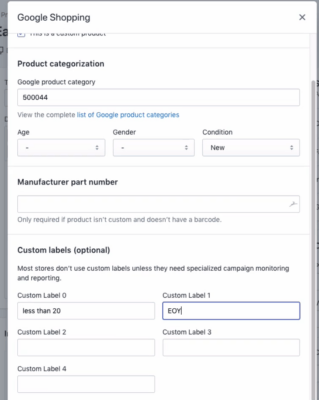
This is a labor-intensive process because you need to go through each product and add this information.
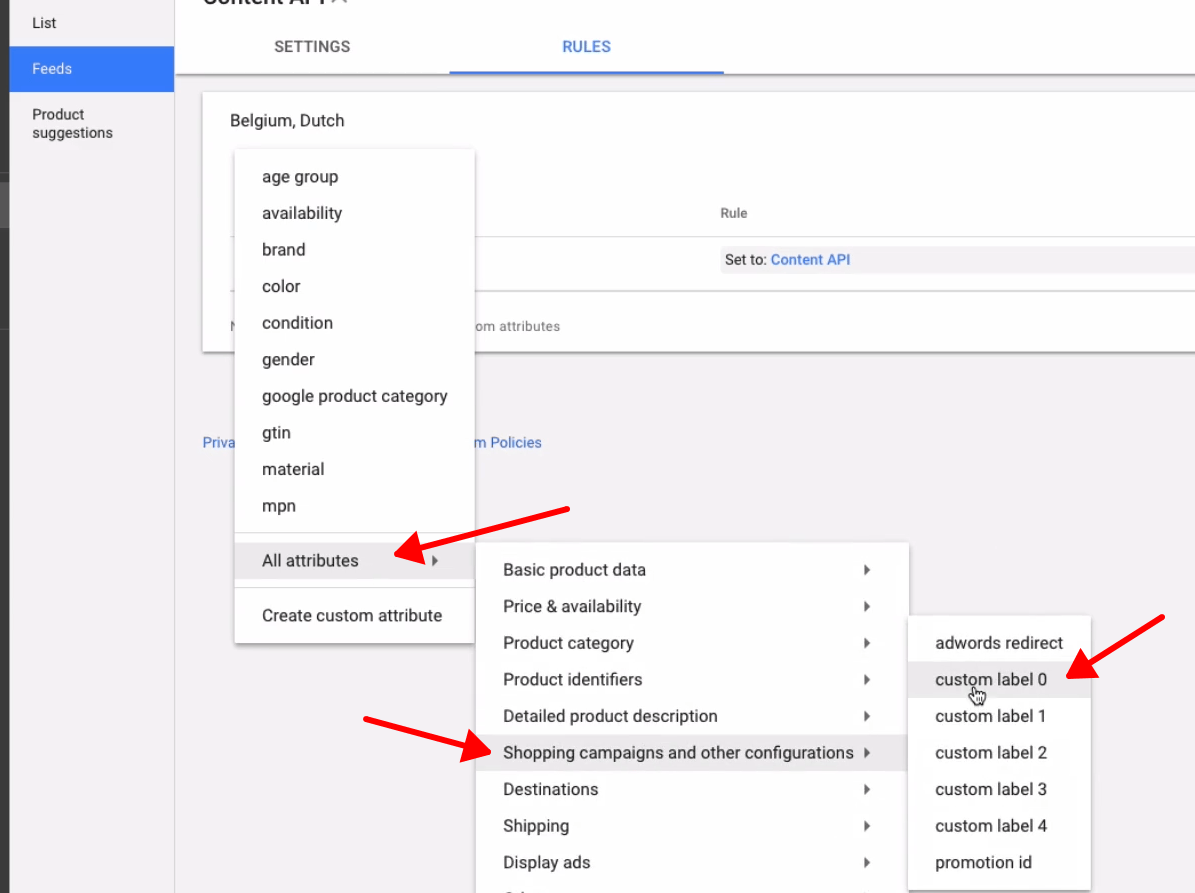
Option 2: Feed rules in Google Merchant Center
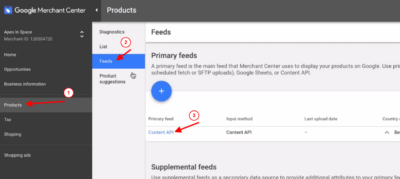
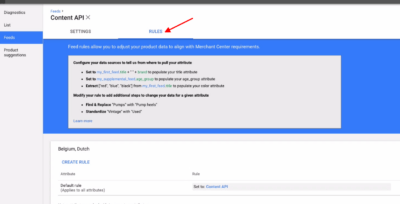
Another option is to use Google Merchant Center and use feed rules. Go to your Google Merchant Center account, then go to “Products”. Then go to “Feeds” and click on your primary feed.
Then, go to the “Rules” tab.
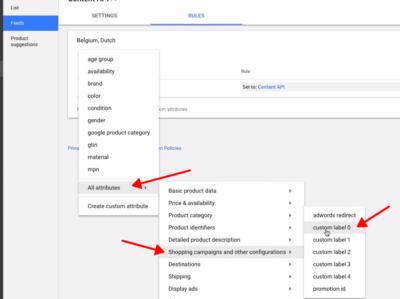
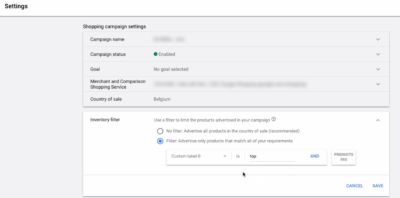
We’re going to create a rule where it will tell GMC to add extra information to the feed. Click “Create Rule”, select “All attributes”, then “Shopping campaigns and other configurations”, then click “Custom label 0”.
Click “Set to”.
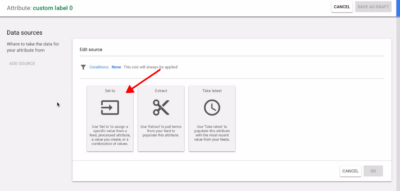
And then input your custom label name. In this example, we’ll use “Top” as the custom label. Now, click on “Conditions” to select which products will be included in the “Top” custom label.

In this example, we’ll add all products that contain “moon” in their title. Click “Ok”.
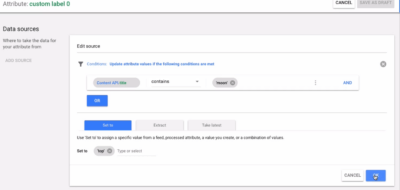
Now, you have your feed rule here to create a custom label named “Top” and include products that has “moon” in their title. You can click “Test Changes” to see if it works.
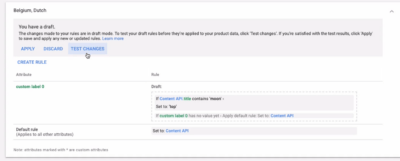
You can read more about Google Merchant Feed Rules here.
Option 3: Data feed management tools
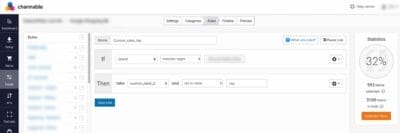
Another option is to use a data feed management tool (paid tool). In this example, we’ll use Channable. To add custom labels to your feed, go to your Channable account, click “Feeds”, and you’ll see here all the rules you can add to your products. To add a custom label, we added a name here and condition. This will create a custom label named “Top” and add products under it. You should see on the right side (Statistics) how many products were affected by this custom label.
There are more data feed management tools available and here are some that you can choose from:
- Channable: This is the data feed management tool that we used for example earlier. It’s a feed management platform with features for optimizing, syncing, and managing product feeds across multiple channels, including Google Merchant Center.
- Feedonomics: Offers advanced feed optimization, mapping, and automation for various shopping channels including Google, Amazon, and Facebook.
- GoDataFeed: Provides a platform for optimizing and managing product feeds across multiple channels, including Google Merchant Center, Amazon, and more.
- DataFeedWatch: Enables users to optimize and customize product feeds for various shopping channels, with features such as rule-based optimizations and data mapping.
- Feedvisor: Specializes in AI-driven feed optimization for Amazon, providing insights and automation tools to improve product performance.
- Optimise Retail: Offers feed optimization and management tools for Google Shopping, with features such as bulk editing, rule-based optimization, and performance analytics.
- Sales & Orders: Provides a platform for managing Google Shopping campaigns, including feed optimization, bid management, and performance tracking.
- Lengow: Offers a feed management platform with features for optimizing and syncing product feeds across various channels, including Google Merchant Center.
- ChannelAdvisor: Provides a comprehensive e-commerce platform with features for managing product feeds, optimizing listings, and maximizing sales across multiple channels.
- CommerceHub: Offers a platform for managing product data and optimizing feeds for various e-commerce channels, including Google Merchant Center.
Step 4: Reorganize account structure
The final step is to reorganize your account structure. By adding custom labels, you would be able to restructure your Google Ads account using those new custom labels. To use your custom labels go to your product groups and subdivide them by custom label 0 (this is where we put the new labels).

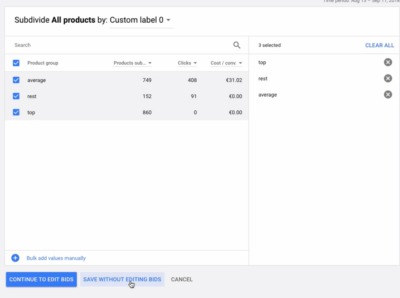
You should see the top, average, and the rest of the margins.
You can also subdivide further by seasons if you have it as a custom label, just click on the plus button and do the same thing.
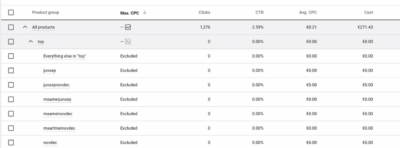
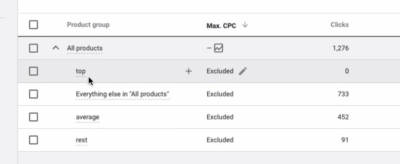
You can break this down further, and adjust the biddings of it. You can also create different campaigns based on this custom label info. For example, you only want top margin products to be on a specific campaign
Still don’t know where to start with custom labels?
Conclusion
Through strategic segmentation and targeted optimization, custom labels help you to better understand your products. This will help in improving visibility and relevance to potential customers if done correctly. By implementing the techniques and best practices discussed in this guide, you can unlock the full potential of custom labels to elevate your online store’s performance and achieve long-term success.
If you need more information on how to create custom labels in Google Merchant Center, you can schedule a free consultation with our experts today!

